Learn how to build interactive WebGL content using Adobe Flash Professional CC 2014 that will run across both desktop and mobile browsers.
What you will learn…
- How to publish for WebGL from Flash Professional CC 2014
- The basics of Flash’s WebGL Runtime API
- How to work with Flash movie-clips using JavaScript
What you should know…
- You should be comfortable working with Adobe Flash Professional
- A familiarity with ActionScript or JavaScript is required
With the release of Adobe Flash Professional CC 2014 you can target WebGL-enabled browsers, allowing your content to run across both desktop and mobile devices, while taking full advantage of GPU acceleration. If you’re familiar with Flash’s existing HTML5 Canvas export option you may be asking yourself what the distinction between that and the WebGL target is? While both draw to an HTML5 canvas element, WebGL utilises the GPU for superior rendering performance. Additionally, while the two export options provide a JavaScript API, both APIs currently differ.
This tutorial will take you through the designer-developer workflow. You’ll learn how to export your FLA’s graphical resources to WebGL, before adding interactivity to it using JavaScript and Flash’s WebGL runtime API. We’ll be creating a prototype beat ’em up game where your hero can perform either an attacking or blocking move. By doing so you’ll learn how to work with movie-clips and how to handle and respond to simple mouse (or touch) interactions. For a clear idea of what you’ll be building, take a look at the final result below.
For the avoidance of doubt. What you are looking at here is Flash-authored content running in your web browser but outside of Flash Player. By publishing to WebGL you are potentially increasing the reach of your Flash content to devices that don’t support Flash.
Before we proceed, a special mention must go to my buddy Alex Fleisig, who has provided the artwork and animation for this tutorial. Alex has worked for the likes of Pixar and DreamWorks on a wealth of hit movies. You can see some more of his animation work here.
Getting Started
You’ll need Adobe Flash Professional CC 2014 to work through this tutorial. A trail version can be downloaded from www.adobe.com/products/flash.html.
For development work you’ll need a suitable code editor or IDE. I’ll be using Sublime Text, a trial version of which can be downloaded from www.sublimetext.com/3.
Additionally, a web browser is required to test your work. Any WebGL-enabled browser will do. I’ll be using Google Chrome, which can be downloaded from www.google.co.uk/intl/en_us/chrome/browser.
Finally, a FLA has been prepared for you to work from and can be downloaded from github.com/ccaleb/bunny-flash-webgl-tutorial. You can find the FLA within the repository at: start/bunny.fla. The complete source code for this tutorial can be found within the repository’s final/ folder.
Creating a WebGL Document
If you plan to target WebGL then you’ll need to create and work with a WebGL document within Flash. To do this select File | New (Cmd + N | Ctrl + N) from Flash’s drop-down menu then select the WebGL (preview) document type from the New Document panel. This is shown in Figure 1 below.
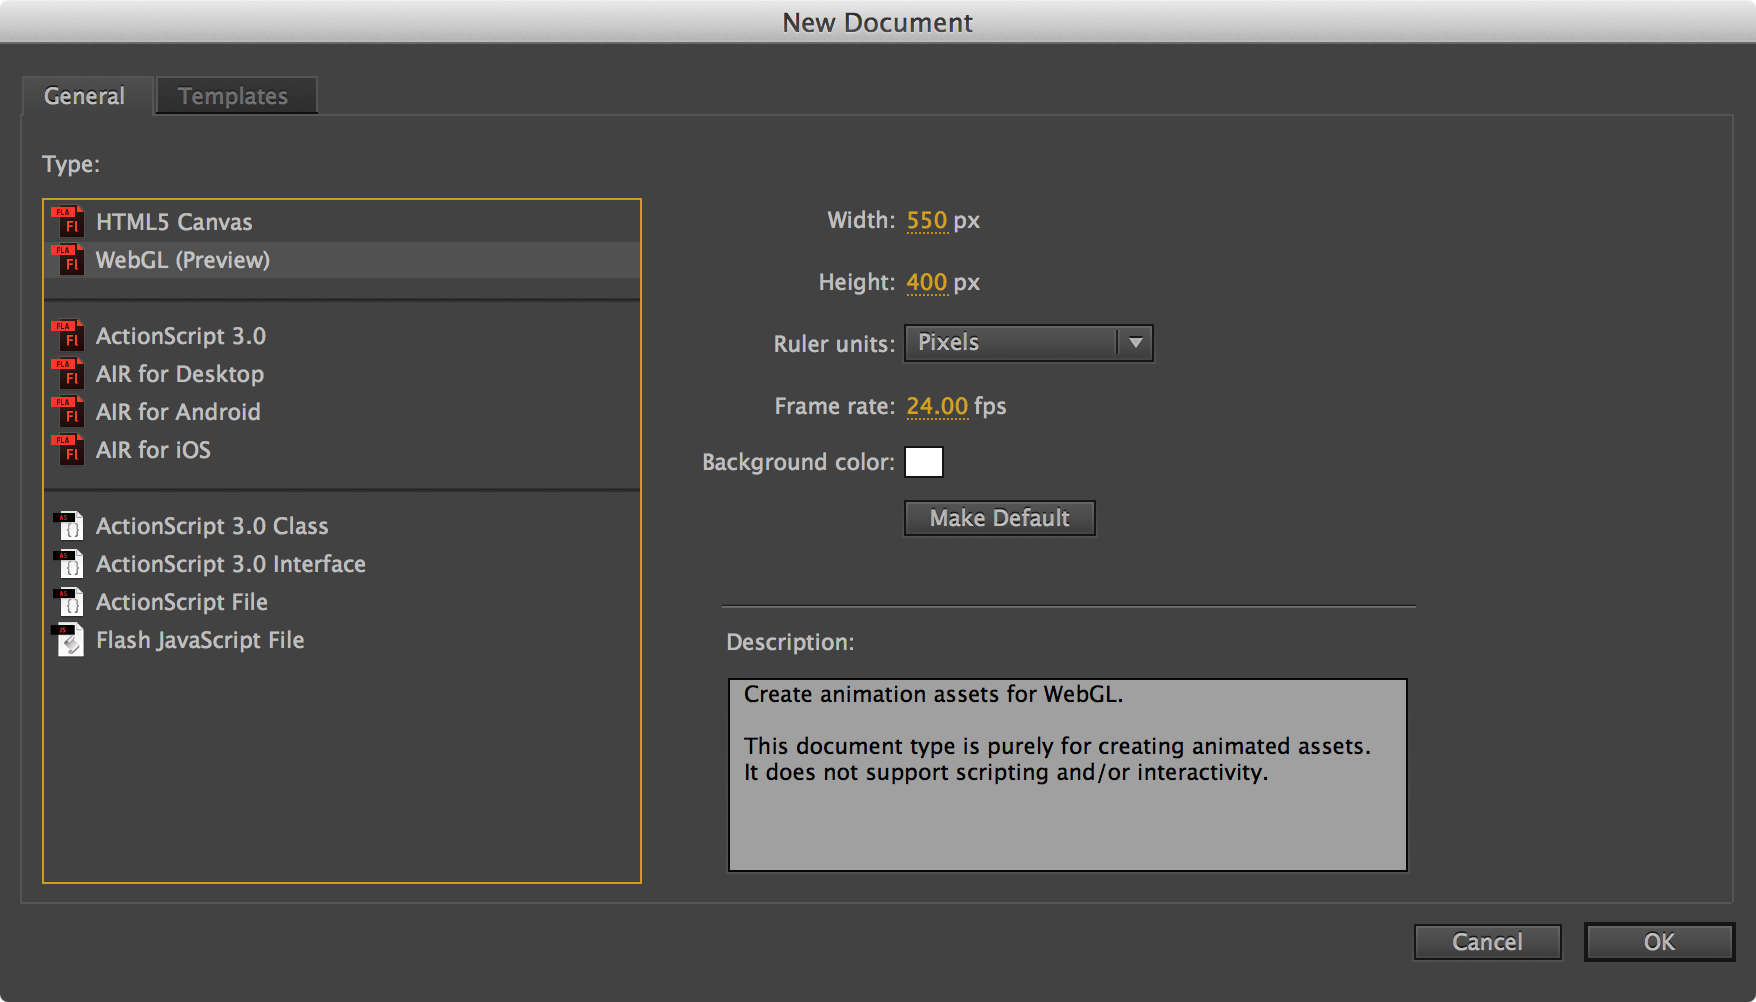
Figure 1. Selecting the WebGL (Preview) document type.
Although, most features of Flash Pro are supported, some are disabled to better accommodate the WebGL format. For example, filters and radial gradients aren’t supported and any tools within Flash related to those features will be disabled. ActionScript isn’t permitted either and although you can work with your WebGL content using JavaScript, the WebGL document type does not directly provide support for scripting. Instead we’ll rely on an external text editor for this.
You now know how to create a WebGL document but for this tutorial there’s no need to directly create one. Instead, one has been provided for you complete with its own graphics resources. Open flash-webgl-tutorial/start/bunny.fla within Flash Professional.
Exploring the FLA
Take a look at the bunny.fla file provided. On the stage, you’ll find a background movie-clip complete with trees and mountains (Figure 2). Within the Library panel you’ll find a few more items that we’ll make use of. Specifically you’ll find movie-clip representations for our game’s hero and two buttons. Our hero is a kick-ass blue bunny. His movie-clip is appropriately named Bunny. The user will control the bunny by pressing one of two buttons. The first button is used to trigger an attacking move, while the second button forces the bunny to jump out of harms way. The buttons are named Button Attack and Button Defend respectively within the library.
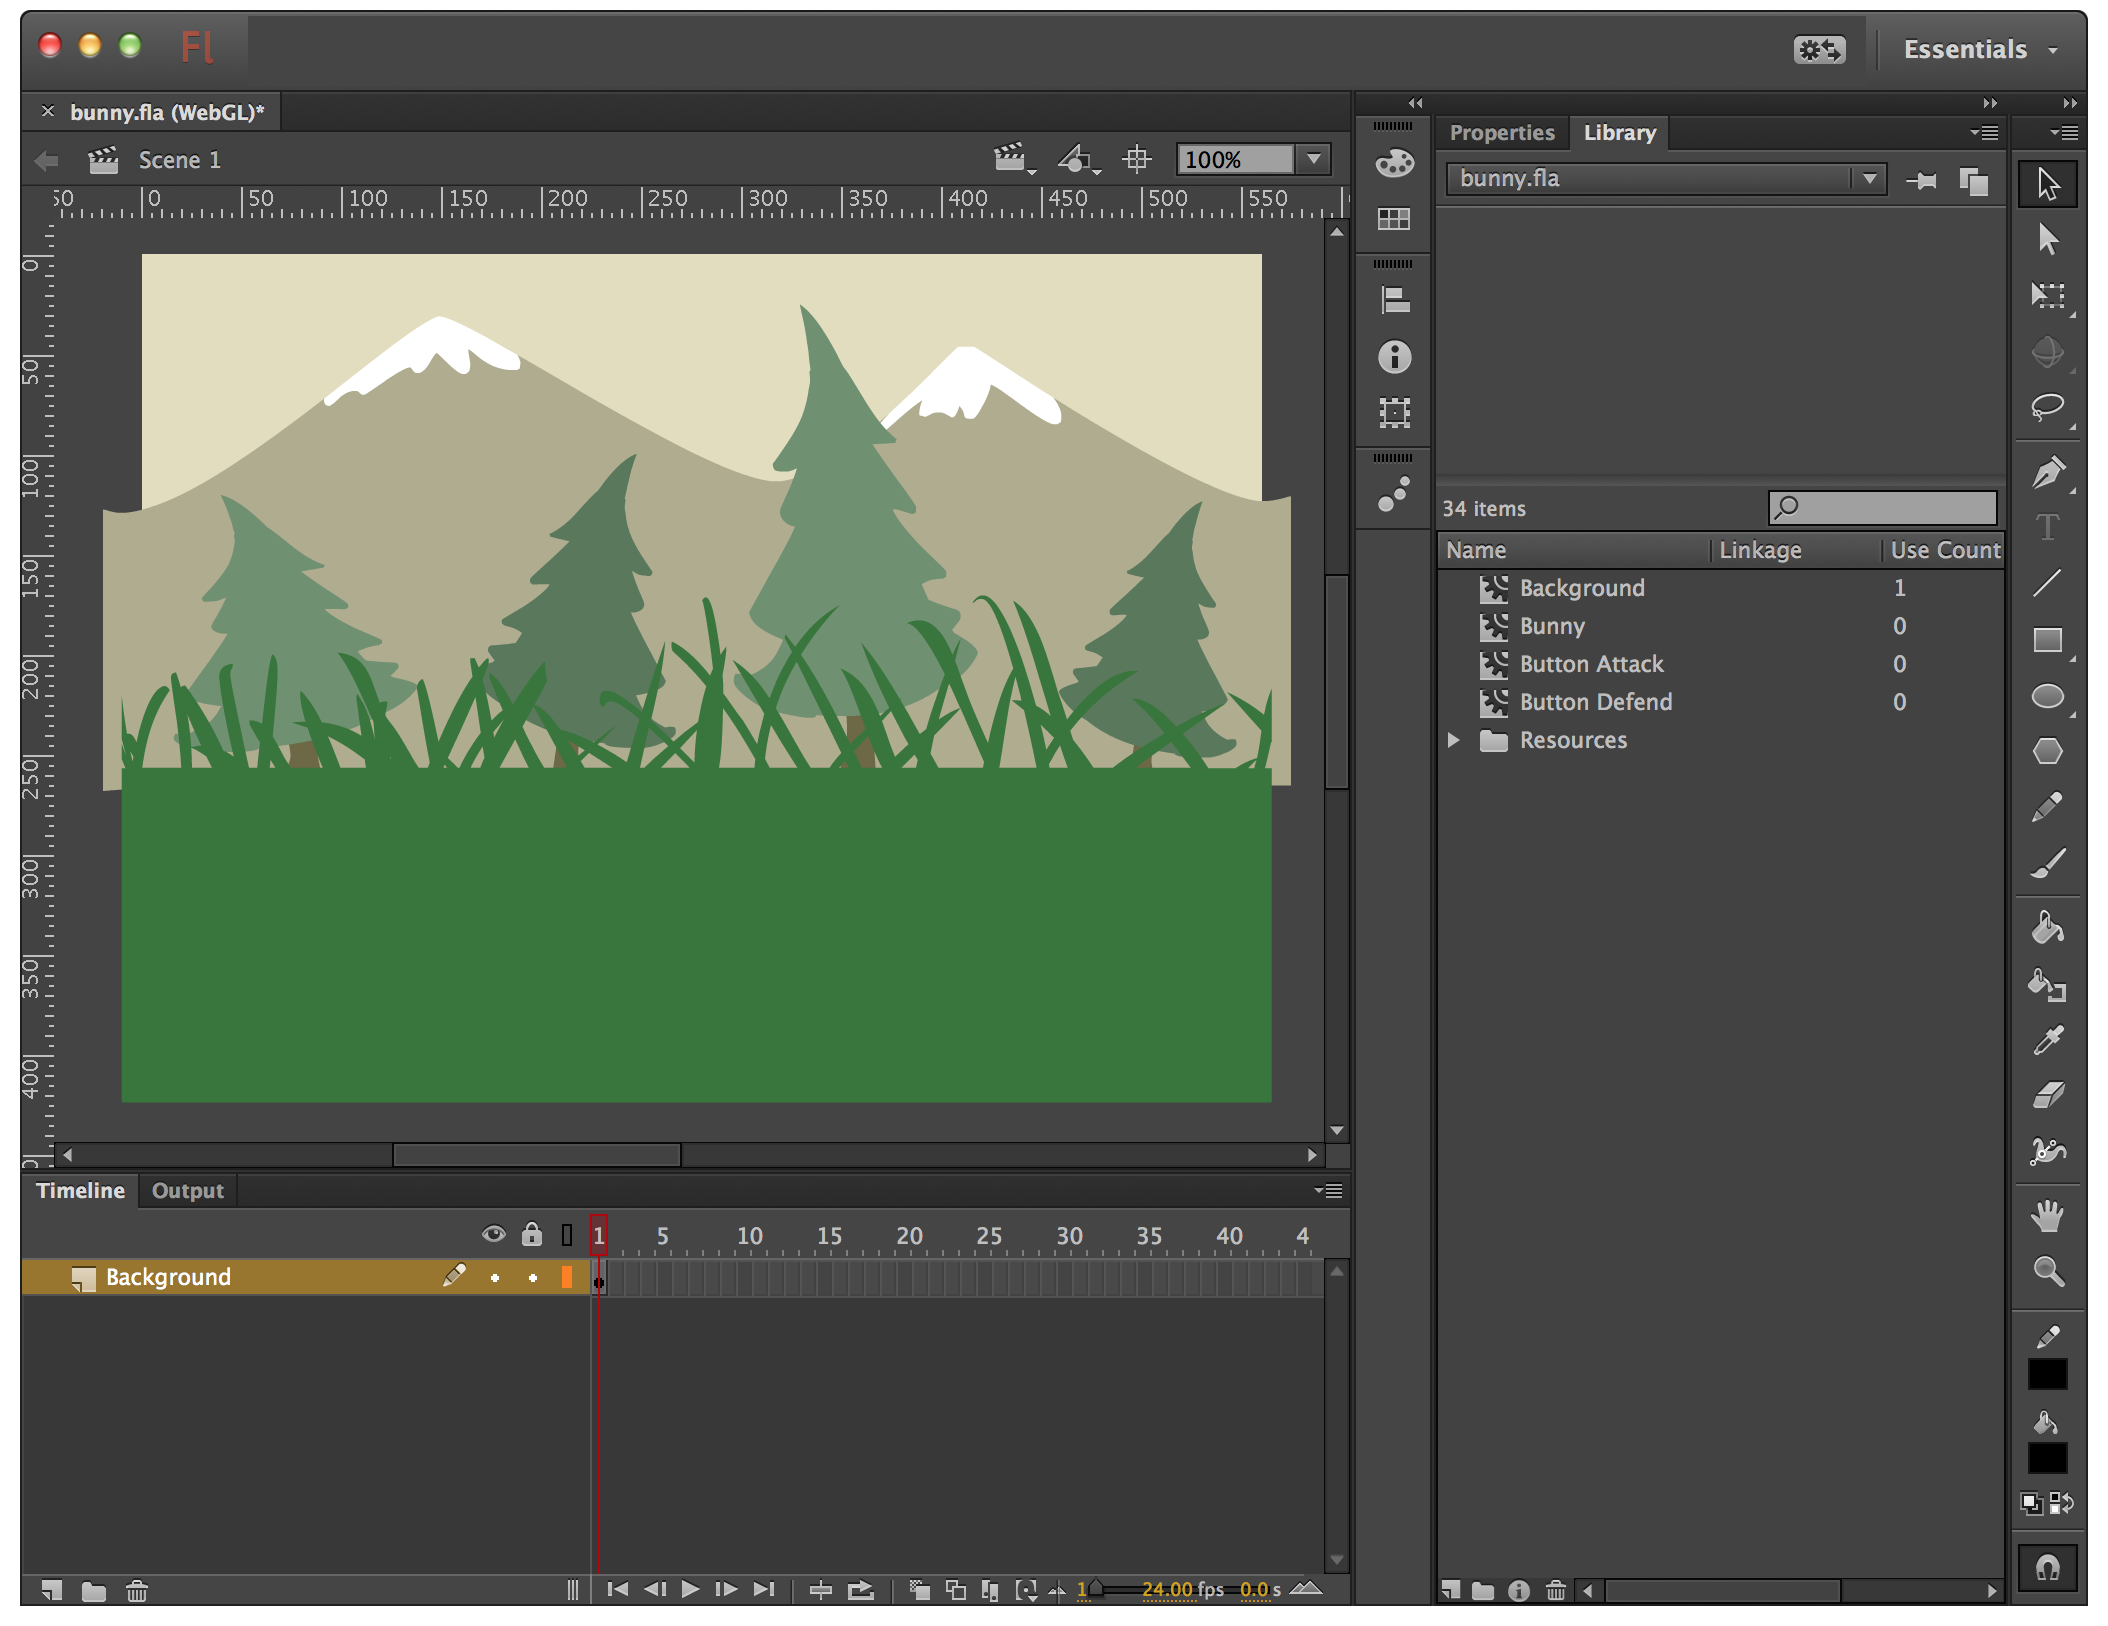
Figure 2. A view of the stage and the Library panel.
Let’s take a look at the Bunny movie-clip in more detail. Double-click on it to move to its timeline. The timeline contains three distinct animations (idle, punch, and jump), which are clearly marked by the following frame labels:
- idle (frame 1)
- punch (frame 64)
- jump (frame 120)
The idle animation will be used when the bunny is awaiting instructions from the user. We’ll trigger the punch animation when the user presses the attack button, and the jump animation when the defend button is pressed.
There’s an addition three frame labels that are used to indicate the last frame for each of these animations:
- idle-end (frame 63)
- punch-end (frame 101)
- jump-end (frame 136)
Now we’ll take a quick look at the attack button. Double-click on the Button Attack clip within the library.
As you can see, the clip spans two frames. On the first layer is the text ATTACK, which spans both frames. On the layer below is a red spot, which represents the actual button and will also be used as a hit zone when detecting user presses. The spot is key framed, with its size being reduced on the second frame. We’ll move to this frame when the user presses the button, giving the user valuable feedback that their interaction was detected.
One final thing to note is that the red spot is itself a movie-clip and has been assigned an instance name of spot. We’ll use this instance when detecting user presses.
Feel free to examine the library’s Button Defend movie-clip. You’ll find it follows an identical structure to the attack button and also has a movie-clip instance named spot
Setting Linkage IDs
We’ll be making use of the Bunny, Button Attack, and Button Defend movie-clips. However, none of them are actually sitting on the stage. That’s fine as we’ll actually programmatically add the clips using JavaScript. In order to do that though, we’ll need to assign a linkage ID to each. Let’s go ahead and do that.
The Library panel has a Linkage column that sits directly to the right of each clip’s name. Currently none of the clips have a linkage ID assigned to them. Let’s assign an ID to the Bunny movie-clip. Simply double-click on the Linkage column next to the Bunny movie clip, and enter an ID of Bunny. You can see this in Figure 3 directly below.
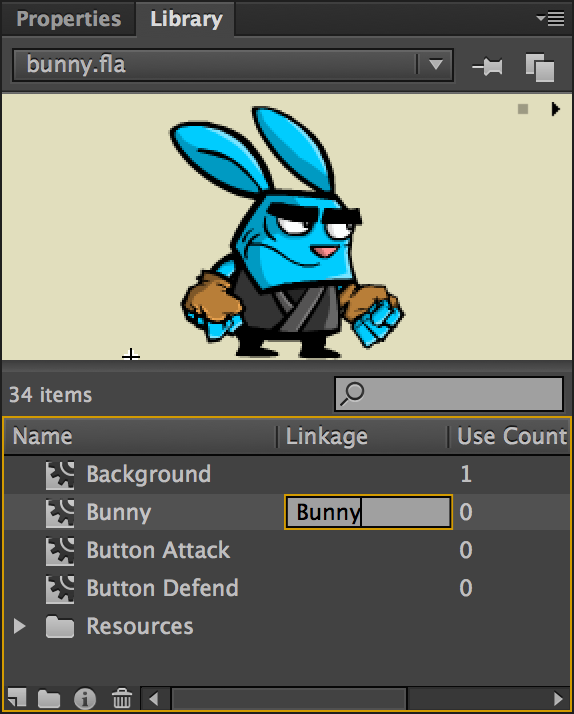
Figure 3. Setting the Bunny movie-clip’s linkage ID.
Now set a linkage ID for each button. Provide the attack button with a linkage ID of ButtonAttack and a linkage ID of ButtonDefend for the defend button. Your library should now look like the screenshot shown in Figure 4.
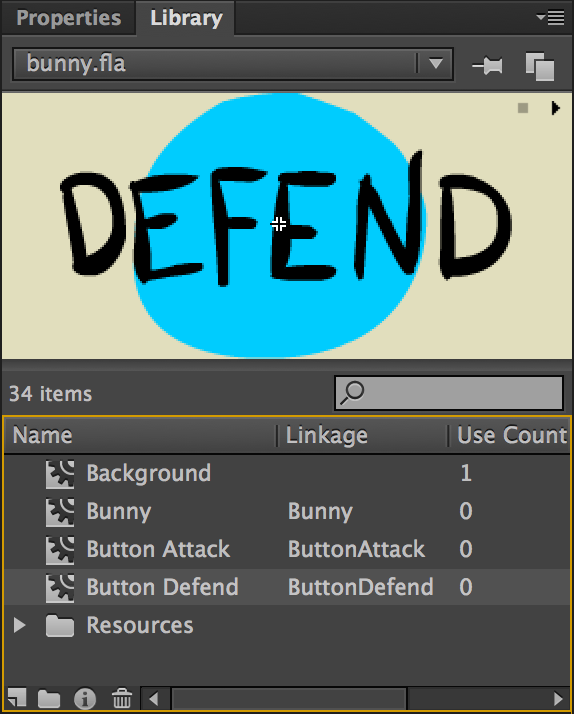
Figure 4. All three movie-clips with their linkage IDs set.
Save your FLA.
Publishing for WebGL
Now that we’ve set up our FLA, we can go ahead and publish it and see how things are currently looking in the browser. You won’t actually see the bunny or the buttons since we’ll need to write some JavaScript to do that, but we should see the background to begin with.
From the Flash drop-down menu, select Control | Test (Cmd + Enter | Shift + Enter). This will export your FLA for WebGL and launch the results within your default browser. The screenshot in Figure 5 below shows the background scenery rendered within Chrome.
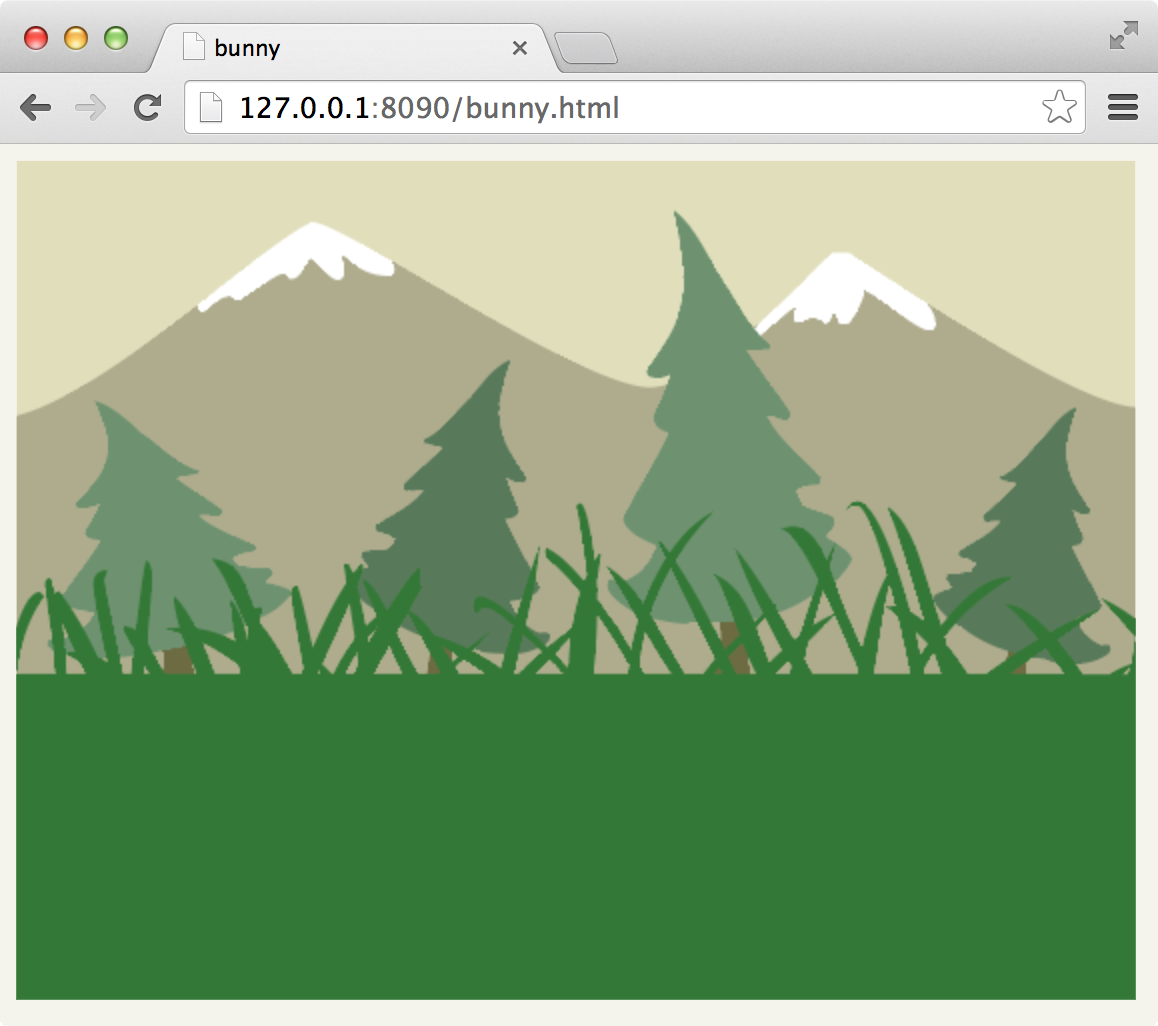
Figure 5. The FLA exported to WebGL and running in Chrome.
If you take a look at your browser’s address bar you should notice that your content is running in a local web server, which is required to run WebGL content. Flash Professional has a built-in web server that is run whenever you publish your content.
Although you can’t actually see the bunny or the buttons at the moment, they have actually been published along with your background scenery. Anything with a linkage ID will be exported along with any content sitting on the stage. We’ll soon see how to access and display that content but first let’s take a very brief look at the HTML that was output when we published our FLA.
Understanding the output HTML
Upon publication, Flash exports various files and sub-folders to your FLA’s root folder. Your root folder should now contain the following:
assets/
    bunny_atlas1.js
    bunny_atlas1.json
    bunny_atlas1.png
    bunny.js
    bunny.json
libs/
    flwebgl-0.1.min.js
bunny.fla
bunny.html
Inside the assets folder you’ll find files that represent your FLA’s visuals and animations. The assets/bunny.js file contains the JavaScript that represents each of your movie-clips and their timelines. Feel free to open it within your favourite text editor and take a peek. The file (bunny.js) is named after your FLA (bunny.fla).
Move back to the root and take a look inside the libs folder. There you’ll find a file named flwebgl-0.1.min.js. This file contains the actual JavaScript for Flash’s WebGL runtime. The API defined within this file makes it possible to run your exported Flash content. This is the API that we’ll use throughout the remainder of this tutorial.
Before we begin writing our own code however, let’s take a look at one more JavaScript file that already makes use of the WebGL Runtime’s API. Move back to your root folder and open bunny.html within a text editor. Here you’ll find some boilerplate code exported by Flash. This code initialises the runtime and displays the content that was sitting on the stage. The bulk of that work takes place within the init() function near the top of the file. The function performs the following steps:
- Creates an instance of Flash’s WebGL runtime
- Loads any required textures
- Initialises the WebGL runtime using the textures
- Creates a viewport for rendering the stage to
If the WebGL runtime is successfully initialised then a function named handleComplete() gets called. This function instructs the runtime to start playing your stage’s root timeline:
function handleComplete() {
  if(result === flwebgl.Player.S_OK) {
    player.play();
  }
}
We’ll also kick off our own code from inside this function.
A few global variables are used within this file but there’s only one your really need to care about. That’s a variable named player, which holds a reference to Flash’s WebGL runtime. In fact, you can see player in use within the handleComplete() function above. Going forward the WebGL runtime may also be referred to as the player.
To prevent your hard work being overwritten, you can instruct Flash Professional not to output a new version of the HTML file. To do this, select File | Publish Settings (Shift + Option + F12 | Ctrl + Shift + F12) from Flash’s drop-down menu. This will open the Publish Settings panel where you can uncheck the Overwrite HTML checkbox.
Okay, now it’s time to get coding.
Creating Movie Clip Instances
Let’s begin by adding our hero to the stage.
We’ll need a global variable to keep track of the bunny movie-clip. Add the following line near the top of your bunny.html file:
var canvas, player, result = flwebgl.Player.S_OK;
var bunny;
Now find the handleComplete() function. Let’s add an empty function named setup() and call it from within handleComplete():
function handleComplete() {
  if(result === flwebgl.Player.S_OK) {
    player.play();
    setup();
  }
}

function setup() {
}
The setup() function will be responsible for adding the bunny movie-clip and both buttons. Create a new empty function named addBunny() and call it from your setup() function:
function setup() {
  addBunny();
}

function addBunny() {
}
Now we can go ahead and create an instance of our bunny using its Bunny linkage ID. Start by adding the following lines:
function addBunny() {
  var sgf = player.getScenegraphFactory();
  bunny = sgf.createMovieClipInstance("Bunny");
}
Movie clips are created via the Scene Graph Factory, a reference to which is obtained from the player by calling getScenegraphFactory(). Once you have a Scene Graph Factory reference, call its createMovieClipInstance() method and pass it the linkage ID of the movie-clip you wish to instantiate. Notice that we assign the newly created movie-clip instance to our global bunny variable.
Now add the bunny movie-clip to the stage. A reference to the stage is obtained via the player’s getStage() method. Once you have a reference to the stage, simply call its addChild() method to add your movie-clip:
function addBunny() {
  var sgf = player.getScenegraphFactory();
  bunny = sgf.createMovieClipInstance("Bunny");

  player.getStage().addChild(bunny);
}
Save your changes.
If you refresh your browser, you’ll notice that the bunny is absent. That’s because we’ve still to provide an on-screen position for him.
Positioning a Movie Clip
We’ll make use of our bunny movie-clip’s setLocalTransform() method to set its position. It expects a matrix that defines the position and scale of our movie-clip. The runtime’s API provides a flwebgl.geom.Matrix class for this. Make the following additions to your addBunny() function:
function addBunny() {
  var sgf = player.getScenegraphFactory();
  bunny = sgf.createMovieClipInstance("Bunny");

  var x = 123, y = 293, s = 1;
  var mat = new flwebgl.geom.Matrix([s, 0, 0, s, x, y]);
  bunny.setLocalTransform(mat);

  player.getStage().addChild(bunny);
}
As you can see, we employ three local variables (x, y, and s) to define the position and scale factor for our movie-clip. Those variables are then passed to the Matrix class’ constructor before it’s passed to the setLocalTransform() method.
Now save your changes and refresh your browser.
If you still don’t see what you were expecting then you may have an error in your JavaScript. Chrome’s Developer Tools can come in handy here. Simply select Tools | Developer Tools (Cmd + Option + i | F12) to open the Developer Tools window then click the Console tab to open its JavaScript Console window. Here you can see any JavaScript errors and find out the line number in your code that is causing the issue.
You should now see the bunny standing in the centre of the screen (Figure 6). The bunny movie-clip will cycle through the three animations within its timeline, looping back to the beginning once the end of the timeline is reached. We’ll address that soon enough to ensure that the bunny initially loops on his idle animation until the user presses either the attack or defend button.
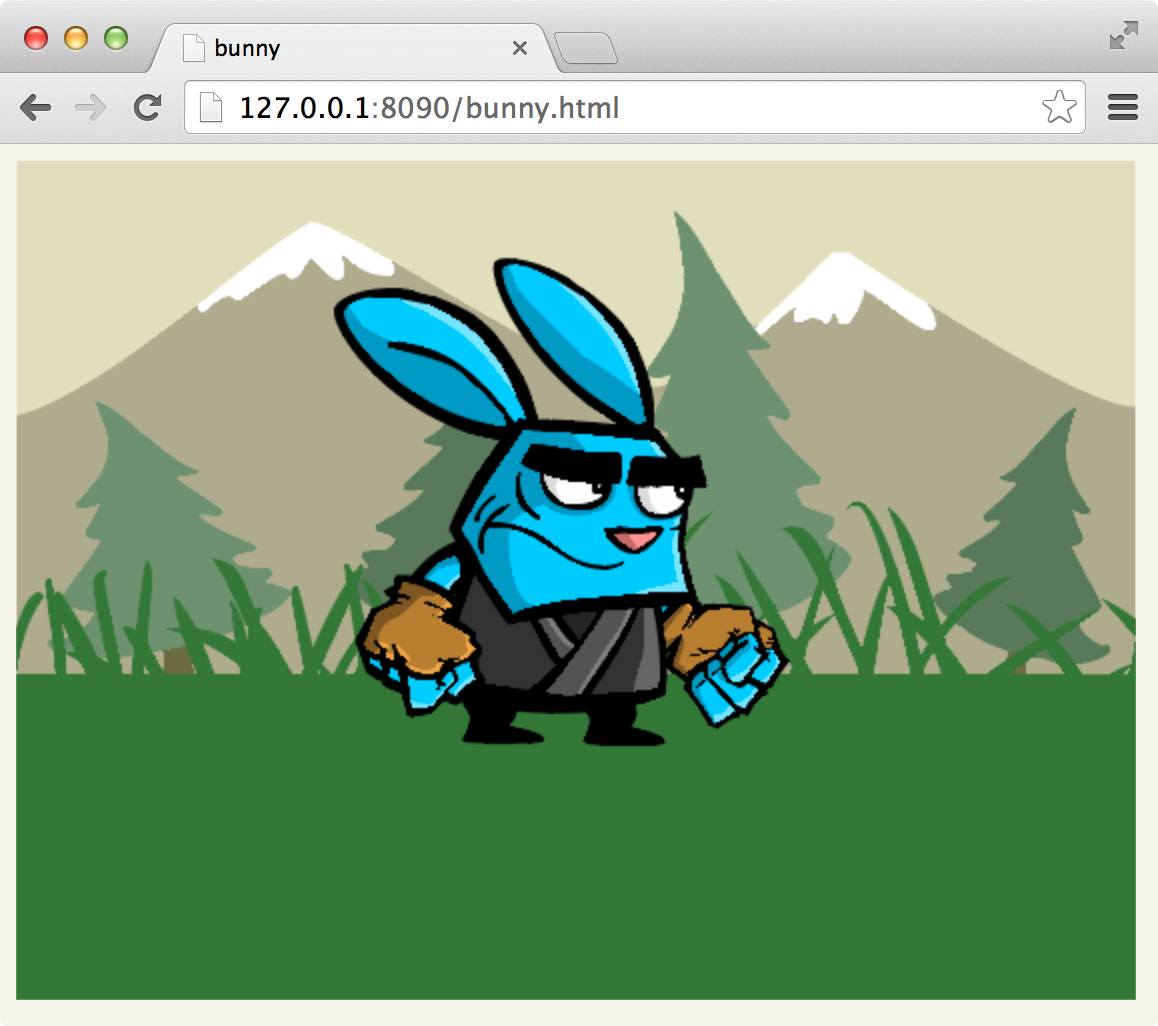
Figure 6. The bunny standing in front of the scenery.
Seasoned Flash developers will note that setting a movie-clip’s position is a little more involved compared to the ActionScript 3 equivalent. Let’s write a simple support function that will make life easier when positioning movie-clips. Add the following directly after your addBunny() function:
function setPosition(mc, x, y) {
  var mat = new flwebgl.geom.Matrix([1, 0, 0, 1, x, y]);
  mc.setLocalTransform(mat);
}
This function expects three parameters: a movie-clip reference, and an x and y position that it will apply to the movie-clip.
Now remove the old positioning code from your addBunny() function and replace it with the following:
function addBunny() {
  var sgf = player.getScenegraphFactory();
  bunny = sgf.createMovieClipInstance("Bunny");
  setPosition(bunny, 123, 293);
  player.getStage().addChild(bunny);
}

function setPosition(mc, x, y) {
  var mat = new flwebgl.geom.Matrix([1, 0, 0, 1, x, y]);
  mc.setLocalTransform(mat);
}
Once again, save your changes and refresh your browser. Double-check that everything is still working as expected and that there are no errors in your browser’s JavaScript console. If there are any errors then correct them.
Timeline Scripts
Our bunny is now sitting on the screen and looping through all three of his timeline animations. However, we only really want the user to see his idle animation at the moment. If we were targeting Flash Player, we’d simply add an action to the bunny’s timeline to control the playhead. For example, adding gotoAndPlay("idle"); to the last frame of the idle animation would be enough to force it to loop.
Unfortunately, the WebGL document does not support timeline scripting directly within the Flash Professional IDE. We can however move to our text editor and write some JavaScript that behaves in a similar manner. To do this we’ll make use of the flwebgl.events.Event.EXIT_FRAME event, which is dispatched every time a movie-clip’s playhead moves to a new frame.
Add the following line to your addBunny() function to listen for the EXIT_FRAME event:
function addBunny() {
  var sgf = player.getScenegraphFactory();
  bunny = sgf.createMovieClipInstance("Bunny");
  setPosition(bunny, 123, 293);
  bunny.addEventListener(flwebgl.events.Event.EXIT_FRAME, bunnyExitFrame);
  player.getStage().addChild(bunny);
}
The line of code above will guarantee that a function named bunnyExitFrame() will be called every time the bunny movie-clip’s playhead moves to a new frame. We can therefore write a bunnyExitFrame() function that checks to see if the playhead has moved to the last frame of the idle animation (idle-end). If it has then we can simply instruct the movie-clip to move its playhead back to the first frame of the idle animation. Let’s give that a go. Add the following:
function addBunny() {
  var sgf = player.getScenegraphFactory();
  bunny = sgf.createMovieClipInstance("Bunny");
  setPosition(bunny, 123, 293);
  bunny.addEventListener(flwebgl.events.Event.EXIT_FRAME, bunnyExitFrame);
  player.getStage().addChild(bunny);
}

function bunnyExitFrame(e) {
  var bunny = e.getTarget();
  switch(bunny.getCurrentFrameLabel()) {
    case "idle-end":
      bunny.gotoAndPlay(1);
      break;
  }
}
Notice that your bunnyExitFrame() function expects a single parameter named e. This is an object of type flwebgl.events.Event that is instantiated and passed to your handler every time the EXIT_FRAME event is dispatched. You can use this event object to obtain a reference to the movie-clip that dispatched the event. In other words, you can obtain a reference to your bunny movie-clip from this event. This is done by calling the event’s getTarget() method.
Once we have a reference to the bunny movie-clip, we simply call its getCurrentFrameLabel() method. This returns a string representing the current frame’s label or undefined if the frame has no label.
Finally, we use a switch statement to determine if the playhead has just moved away from the idle-end frame. If so then we call the movie-clip’s gotoAndPlay() method to loop back to the first frame of the idle animation.
The gotoAndPlay() method accepts a frame number as a parameter. It would have been preferable if we could have specified the frame’s idle label rather than its number since using hard coded frame numbers can be error prone. Let’s write a simple support function to help us do that. Add the following to your code:
function setPosition(mc, x, y) {
  var mat = new flwebgl.geom.Matrix([1, 0, 0, 1, x, y]);
  mc.setLocalTransform(mat);
}

function getFrameNumber(mc, labelName) {
  var labels = mc.getFrameLabels();
  for (var i = 0; i < labels.length; i++) {
    var label = labels[i];
    if (label.name == labelName) {
      return label.frameNum;
    }
  }

  return 1;
}
This function takes a reference to a movie-clip and a string representing a frame label within that movie-clip. If the label is found then it returns the number of frame that the label belongs to, otherwise it simply returns 1. So we can use our support function to get the number of the frame within the bunny movie-clip that is labeled idle:
var frameNum = getFrameNumber(bunny, "idle");
The getFrameNumber() support function makes use of the flwebgl.sg.MovieClip class’ getFrameLabels() method, which returns an array of objects. Each object represents a labelled frame and contains a frameNum and name property. Our support function simply walks through this array looking for the specified frame label before returning the frame number associated with it.
Before moving on, make a change to the addBunny() function to make use of your support function:
function bunnyExitFrame(e) {
  var bunny = e.getTarget();
  switch(bunny.getCurrentFrameLabel()) {
    case "idle-end":
      var frameNum = getFrameNumber(bunny, "idle");
      bunny.gotoAndPlay(frameNum);
      break;
  }
}
Save your changes and test them within the browser. You should see that the bunny now loops on his idle animation rather than running through all the animations in his timeline.
EXIT_FRAME a movie-clip can also dispatch an ENTER_FRAME event, which is triggered when the playhead moves to a new frame but before the frame is processed. There are also ADDED and REMOVED events, which are dispatched when a display element is added as a child, or removed from a parent respectively.Adding Buttons
With the bunny now happily standing on screen, let’s go ahead and add the attack and defend buttons. With the buttons in place (Figure 7) we’ll be able to add some interactivity to the bunny.

Figure 7. Both buttons rendered within the scene.
Begin by adding global variables to hold references to both button movie-clips:
var bunny, attackButton, defendButton;
Now let’s implement the defend button. Add the following line to your setup() function:
function setup() {
  addBunny();
  addDefendButton();
}
Now write a function to add the defend button to the stage at position (128, 340):
function bunnyExitFrame(e) {
  var bunny = e.getTarget();
  switch(bunny.getCurrentFrameLabel()) {
    case "idle-end":
      var frameNum = getFrameNumber(bunny, "idle");
      bunny.gotoAndPlay(frameNum);
      break;
    }
  }

  function addDefendButton() {
    var sgf = player.getScenegraphFactory();
    defendButton = sgf.createMovieClipInstance("ButtonDefend");
    setPosition(defendButton, 128, 340);
    player.getStage().addChild(defendButton);
  }
If you save and test your code you should now see the defend button sitting on the left-hand side of the screen.
You’ll notice that the button’s playhead is quickly looping through both frames of its timeline. We want the button to initially sit on its first frame and only move to the second frame when the user clicks on it. Let’s pause the button on the first frame. We’ll use the flwebgl.sg.MovieClip class’ gotoAndStop() method to do this:
function addDefendButton() {
  var sgf = player.getScenegraphFactory();
  defendButton = sgf.createMovieClipInstance("ButtonDefend");
  setPosition(defendButton, 128, 340);
  player.getStage().addChild(defendButton);
  defendButton.gotoAndStop(1);
}
Save your changes and test again in the browser. The button should be paused on its first frame.
stop() method that you may be tempted to use in place of gotoAndStop(). Calling this method however will actually stop the playback of your button’s timeline before its first frame has even been rendered. Using stop() in this situation will therefore prevent your button movie-clip from being rendered. Therefore, to initially freeze a movie-clip on a frame, use gotoAndStop().Let’s go ahead and add the attack button. The code’s almost identical to the defend button. Start by making a call from your setup() function:
function setup() {
  addBunny();
  addDefendButton();
  addAttackButton();
}
Now write the actual addAttackButton() function:
function addDefendButton() {
  var sgf = player.getScenegraphFactory();
  defendButton = sgf.createMovieClipInstance("ButtonDefend");
  setPosition(defendButton, 128, 140);
  player.getStage().addChild(defendButton);
  defendButton.gotoAndStop(1);
}

function addAttackButton() {
  var sgf = player.getScenegraphFactory();
  attackButton = sgf.createMovieClipInstance("ButtonAttack");
  setPosition(attackButton, 434, 340);
  player.getStage().addChild(attackButton);
  attackButton.gotoAndStop(1);
}
Once again, save your changes and check the result in the browser. You should now see both the attack and defend buttons sitting on the screen.
With the buttons in place let’s go ahead and add some interaction.
Detecting Button Clicks
With Flash and ActionScript it’s trivial to detect when the user has pressed on a movie-clip. Unfortunately it’s not as simple with Flash’s WebGL runtime.
Our WebGL content renders into an HTML5 Canvas element. In order to check that one of our buttons has been pressed we’ll need to do the following:
- Listen for a click event on the actual canvas
- Obtain the location of the click within the canvas
- Find the rectangular bounding regions that surround each of the buttons
- Determine if the click point is within either of the button bounding regions
Let’s begin by detecting when the user has pressed on the screen. Within your setup() function, listen for the user pressing and releasing the mouse button:
function setup() {
  document.onmousedown = mouseDown;
  document.onmouseup = mouseUp;

  addBunny();
  addDefendButton();
  addAttackButton();
}
The code above calls a function named mouseDown() when the user holds the mouse button down, and calls mouseUp() when the mouse button is released. Add placeholders for both functions. Within mouseDown() we’ll capture the screen location that the mouse was clicked at:
function addAttackButton() {
  var sgf = player.getScenegraphFactory();
  attackButton = sgf.createMovieClipInstance("ButtonAttack");
  setPosition(attackButton, 434, 340);
  player.getStage().addChild(attackButton);
  attackButton.gotoAndStop(1);
}

function mouseDown(e) {
  var clickedAt = new flwebgl.geom.Point(e.pageX, e.pageY);
}

function mouseUp(e) {
}
Save your changes.
We obtained the x and y position of the mouse click from the event object passed to our mouseDown() function. We then used the flwebgl.geom.Point class provided by the WebGL runtime API to actually store the click location.
The next step is to determine the rectangular region surrounding our buttons. Once we have that we can simply check to see if our click point falls within either rectangle. To do that we’ll take advantage of the flwebgl.sg.MovieClip class’s getBounds() method. It returns the rectangular bounding region surrounding your movie-clip within a specified coordinate space.
Let’s start by adding the following line of code to your mouseDown() function:
function mouseDown(e) {
  var clickedAt = new flwebgl.geom.Point(e.pageX, e.pageY);

  var bounds = attackButton.getBounds(player.getStage());
}
Here we are obtaining the attack button’s bounding box within the stage’s coordinate space.
To gain a better understanding of getBounds() enter the following into your browser’s JavaScript console:
attackButton.getBounds(player.getStage())
The following will be returned:
b {oc: false, left: 330.9499969482422, top: 270.5,
   width: 214.60000610351562, height: 138.3499984741211…}
Here the left and top properties specify the top-left corner of the movie-clip’s bounding region. You can also see the width and height properties, which specify the size of the clip’s bounding region.
getBounds() then it will return the movie-clip’s bounds using its own coordinate space.The next step is to determine whether the point stored in the clickedAt variable falls within the rectangular region stored within our bounds variable. If it does then we know that the user has successfully pressed on the attack button. However, before we do that let’s make a small adjustment. Change your line:
function mouseDown(e) {
  var clickedAt = new flwebgl.geom.Point(e.pageX, e.pageY);

  var bounds = attackButton.getBounds(player.getStage());
}
to this:
function mouseDown(e) {
  var clickedAt = new flwebgl.geom.Point(e.pageX, e.pageY);

  var bounds = attackButton.getChildByName("spot").getBounds(player.getStage());
}
Notice that we no longer call getBounds() on the attackButton movie-clip instance, but on its child spot clip instead. We’re only really interested in the user pressing the button’s spot rather than everything within the clip, including its text. To get a reference to the spot movie-clip we used another method provided by the flwebgl.sg.MovieClip class called getChildByName().
Now that we have the rectangular bounding region for the button’s spot we can now work out whether or not the user has pressed on it. To do that we’ll write another support function. Add the following at the end of your JavaScript file:
function getFrameNumber(mc, labelName) {
  var labels = mc.getFrameLabels();
  for (var i = 0; i < labels.length; i++) {
    var label = labels[i];
    if (label.name == labelName) {
      return label.frameNum;
    }
  }

  return 1;
}

function isPointInsideRect(point, rect) {
  if (point.x > rect.left && point.x < (rect.left + rect.width)) {
    if (point.y > rect.top && point.y < (rect.top + rect.height)) {
      return true;
    }
  }

  return false;
}
The isPointInsideRect() function expects two parameters: a point and a rectangle. The function returns true if the point is within the rectangle. Otherwise it returns false.
Let’s make use of this function to see if the user has pressed on the attack button. Add the following code to your mouseDown() function:
function mouseDown(e) {
  var clickedAt = new flwebgl.geom.Point(e.pageX, e.pageY);

  var bounds = attackButton.getChildByName("spot").getBounds(player.getStage());
  if (isPointInsideRect(clickedAt, bounds)) {
    attackButton.gotoAndStop(2);
  }
}
The code above checks to see if the user has pressed on the attack button. If so, then we move the button’s playhead to its second frame to give visual feedback that it is being pressed.
Save your changes and test them within your browser. Try pressing on the attack button. If the click is detected then the button’s red spot will shrink in size.
Attack Button Interaction
So we’ve written some code to detect when the attack button is pressed by the user, but presently the button’s state does not reset when the user releases the mouse button. That’s an easy fix. Simply add the following line of code to your empty mouseUp() function:
function mouseUp(e) {
  attackButton.gotoAndStop(1);
}
Save your changes and test them in the browser. This time the attack button’s state should reset when you release the mouse button.
The final step is to trigger the bunny’s punch animation when the attack button is pressed. That’s simple enough. Just add the following line of code to trigger the animation:
function mouseDown(e) {
  var clickedAt = new flwebgl.geom.Point(e.pageX, e.pageY);

  var bounds = getGlobalMovieClipRect(attackButton.getChildByName("spot"));
  if (isPointInsideRect(clickedAt, bounds)) {
    attackButton.gotoAndStop(2);
    bunny.gotoAndPlay(getFrameNumber(bunny, "punch"));
  }
}
Save and test your changes in the browser. Now when you press the attack button, our hero should unleash a deadly punch.
You will notice however, that as soon as his punch animation is complete, he will immediately move to his jump animation. To prevent that from happening we need to check for the bunny movie-clip’s playhead reaching the end of the punch animation and move it back to the first frame of the bunny’s idle animation. We’ll do that within our bunnyExitFrame() function. Add the following line of code:
function bunnyExitFrame(e) {
  var bunny = e.getTarget();
  switch(bunny.getCurrentFrameLabel()) {
    case "idle-end":
    case "punch-end":
      var frameNum = getFrameNumber(bunny, "idle");
      bunny.gotoAndPlay(frameNum);
      break;
  }
}
Save your latest change and test it within the browser. This time the bunny will move back to his idle animation immediately after performing a punch.
Defend Button Interaction
We’re almost done. All that’s left to do is add interaction to the defend button. Let’s go ahead and do that.
Check for the user pressing the defend button by adding the following code to your mouseDown() function:
function mouseDown(e) {
  var clickedAt = new flwebgl.geom.Point(e.pageX, e.pageY);

  var bounds = attackButton.getChildByName("spot").getBounds(player.getStage());
  if (isPointInsideRect(clickedAt, bounds)) {
    attackButton.gotoAndStop(2);
    bunny.gotoAndPlay(getFrameNumber(bunny, "punch"));
  }

  var bounds = defendButton.getChildByName("spot").getBounds(player.getStage());
    if (isPointInsideRect(clickedAt, bounds)) {
    defendButton.gotoAndStop(2);
    bunny.gotoAndPlay(getFrameNumber(bunny, "jump"));
  }
}
Notice in the code above that we trigger the bunny’s jump animation when the button is pressed and also move the button to its pressed state.
We’ll need to remember to reset the button’s state when the user releases the mouse button:
function mouseUp(e) {
  attackButton.gotoAndStop(1);
  defendButton.gotoAndStop(1);
}
Finally, move the bunny back to his idle animation immediately after he’s finished jumping:
function bunnyExitFrame(e) {
  var bunny = e.getTarget();
  switch(bunny.getCurrentFrameLabel()) {
    case "idle-end":
    case "punch-end":
    case "jump-end":
      var frameNum = getFrameNumber(bunny, "idle");
      bunny.gotoAndPlay(frameNum);
      break;
  }
}
Save your changes and test everything within the browser. You should now have a fully interactive bunny that will jump and punch depending on which button you press.
Summary
It’s early days yet but Flash’s WebGL Runtime API holds a lot of promise. It provides an avenue for those wishing to deliver rich GPU-accelerated Flash content across desktop and mobile browsers without the need for Flash Player. With an increasing number of mobile phones and tablets now supporting WebGL, this starts to really open up the potential reach of your Flash content on the web once again.
If you’d like to know more about Flash’s WebGL Runtime API then take a look at Adobe’s official API documentation.
Wow – great post ! Things are getting exciting !
I actually can’t wait untl WebGL finally replaces the Flash plugin altogether, but still i have many great memories from my days working with flash myself
Thank for your post, Do you have any tutorial video to support it ?
Hi. You can find a video tutorial that covers most of this tutorial’s content here: http://www.yeahbutisitflash.com/?p=7684. Thanks.