This tutorial series has been updated for PixiJS v4.
Welcome back to the third in a series of tutorials covering how to make a parallax scrolling map using JavaScript and pixi.js. A lot’s been covered so far. In the first tutorial you learned some pixi.js fundamentals and applied parallax scrolling to a couple of repeating layers. While in the second you wrapped your existing scrolling functionality into its own class by applying some object-oriented concepts to your codebase. We’ll now focus on a third, more complex, parallax layer which will represent the terrain that the player’s character would traverse if we were actually writing a full game.
What you will learn…
- How to work with textures and sprite sheets
- The basics of object pooling
What you should know…
- Familiarity with pixi.js fundamentals
- An understanding of JavaScript or ActionScript
- Basic object-oriented concepts
We’ll continue where we left off in the previous tutorial. You can either work with the code you produced during the first two tutorials or download the second tutorial’s source code from GitHub and work from there. You can also find the entire source for this third tutorial on GitHub although I do encourage you to work through the steps detailed in this tutorial and only refer to the source if you run into problems.
This series of tutorials is very much inspired by endless runner games such as Cannabalt and Monster Dash, which both make excellent use of parallax scrolling to provide a dizzying illusion of depth as the player’s hero runs and jumps between platforms.
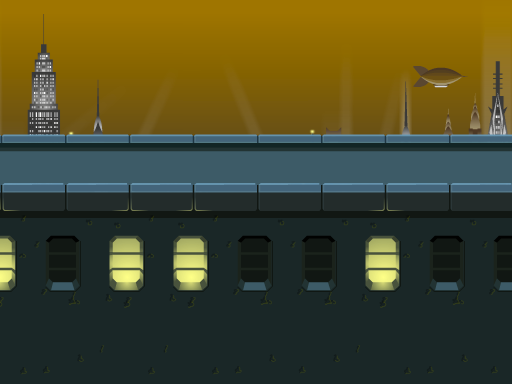
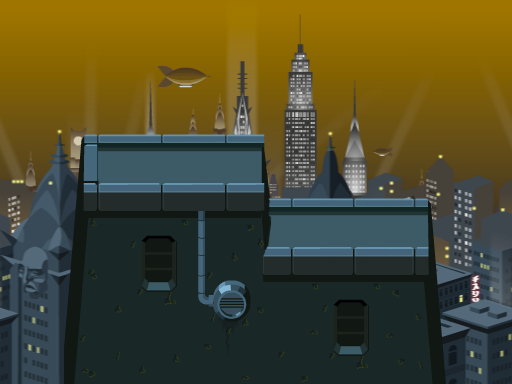
Over the course of the next two tutorials we’ll build a scrolling game map very similar to that found in Monster Dash. Monster Dash’s game maps are built from a series of wall spans of varying width and height. The aim of the game is to survive as long as possible by jumping between wall spans. The scrolling speed of the game map increases over time adding to the challenge.

A demonstration of what you’ll be writing can be found above. Simply click on the image to see the scrolling map complete with wall spans and gaps.
Getting Started
If you haven’t already worked your way through the previous two tutorials then I recommend you do so. The first tutorial can be found here, while the second is available here.
We’ll be working with some new graphics resources during this tutorial. Rather than have you create your own, I’ve provided a zip file at www.yeahbutisitflash.com/pixi-parallax-scroller/tutorial-3/resources.zip. Download this file and extract its contents into your project’s resources folder.
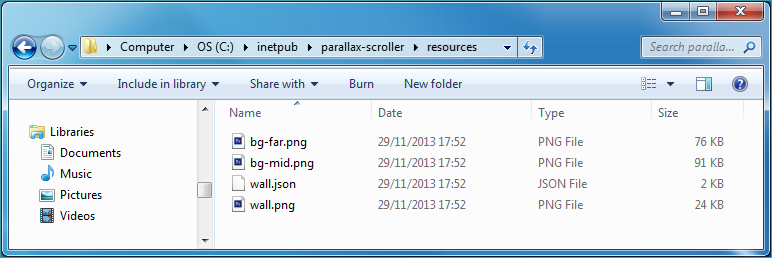
Here’s how your resources folder should now look on Windows:
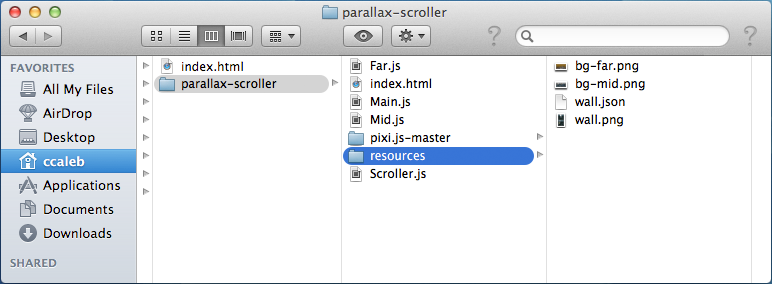
And for those using Mac OS X your folder structure should now look like this:
Also, remember that you’ll need to be running a local web server in order to test your work. If you haven’t already done so, refer to the first tutorial’s Getting Started section for details regarding how to set up your web server.
It’s also worth noting that this tutorial is longer than the previous two. You’ll probably need to set aside around two hours in order to work all the way through it.
The Game Map
As you can see from the demo above there’s a fair amount of diversity to our game map. As mentioned earlier, the wall spans are of varying width and height. Also each span consists of a series of windows and wall decorations. The wall decorations themselves are made up of pipes and vents.
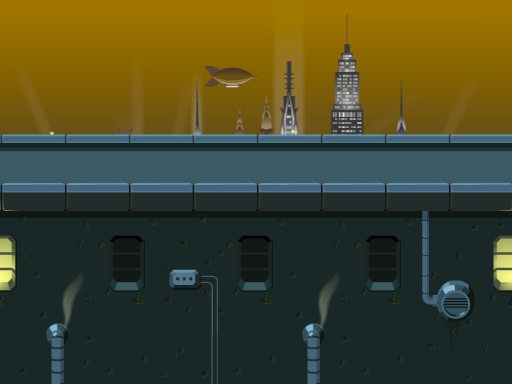
So how is a wall span constructed? Well each span is built from a series of vertical slices that are stitched together. Each slice is 64 x 256 pixels in size. The image below shows an example span.

The height of a wall span is taken care of by vertically shifting the position of each of its slices. You can see this in the diagram below where the second wall’s slices are partially below the visible area of the viewport to give the appearance that it is lower than the first wall.
For the majority of cases, each slice within a wall span will sit at the same vertical position to produce a perfectly flat surface. There is however one exception. Monster Dash has a stepped wall span that lets the player drop down onto a surface directly below. Here’s how it’s constructed:
If you look closely at the diagram above you should notice that what we really have here are two wall spans (the first span higher than the second) connected by a slice in the middle that represents the step.
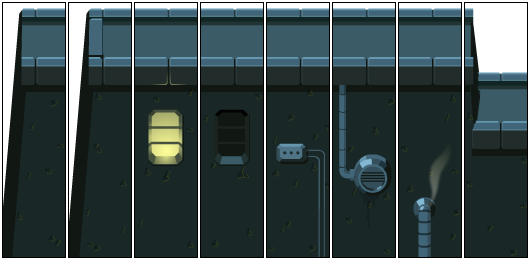
You might be surprised to hear that our entire game map will be constructed from only eight different types of vertical slices! You can see all eight below:
The order of those slices within a wall span is important. Let’s talk some more about that.
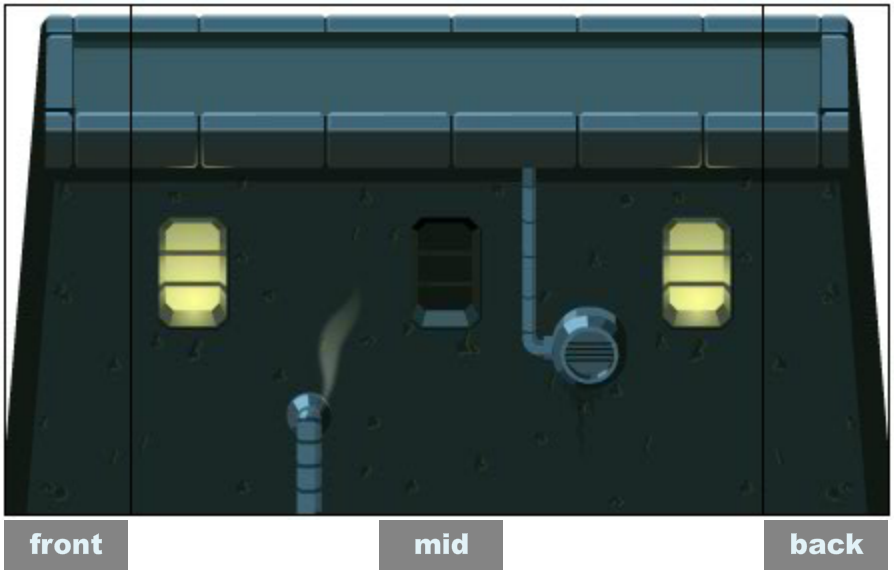
Anatomy of a Wall Span
A typical wall span consists of three major parts:
- A front edge
- A mid section
- A back edge
The front edge is represented by a single vertical slice. So too is the back edge. The mid section however can be made from one or more slices. The more slices, the longer a particular wall span will be. In the demo we are working towards, we’ll include some walls that span well over 30 slices. The diagram below should further illustrate the three major parts of a wall span.
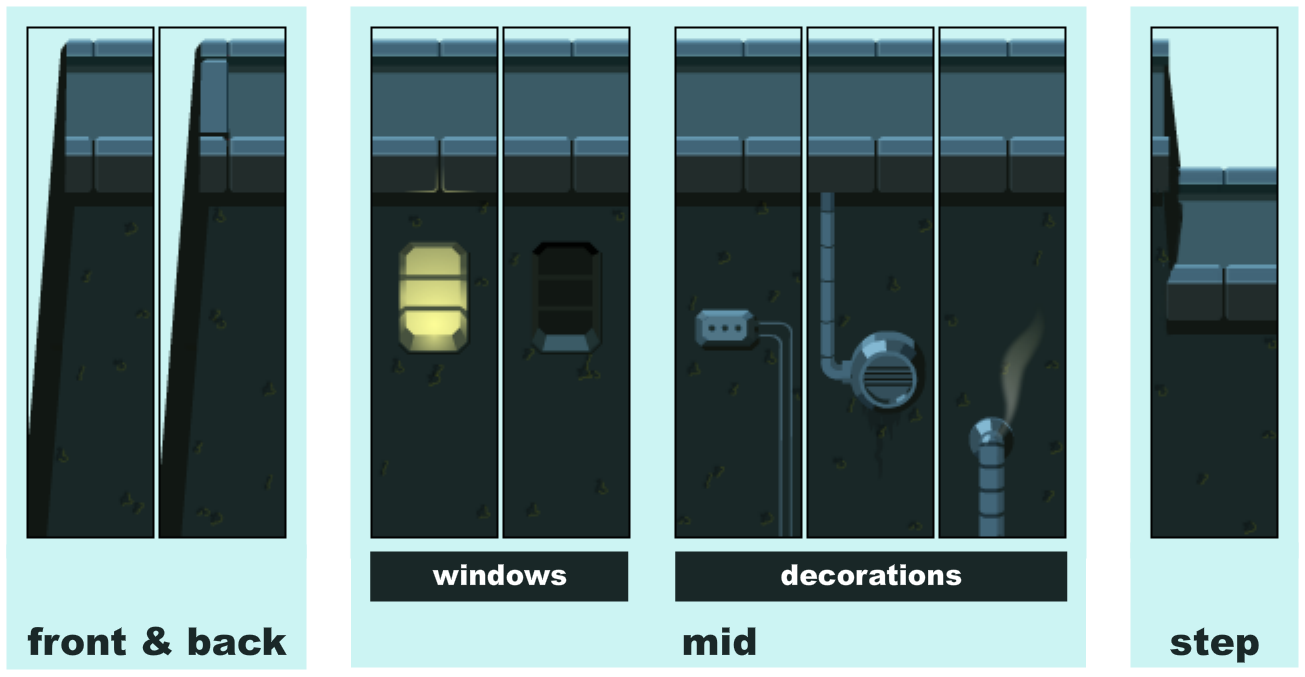
A wall’s mid section is made from the following two parts continuously chained together:
- A Window
- A Wall decoration
So a wall’s mid section that is 6 slices long would be structured like this:
window, decoration, window, decoration, window, decorationTypically however, a wall span’s mid section will be an uneven length to ensure that we start and finish with a window. So rather than being 6 slices long in the example above, we’d actually have a mid section that’s 7 slices long:
window, decoration, window, decoration, window, decoration, windowTo keep the walls as visually interesting as possible, a window can be either lit or unlit, and there will be three variety of wall decoration that we can randomly select from. So a wall’s mid section will be built from five different types of vertical slices.
To add further variety, we’ll select from two types of vertical slice when deciding upon the front edge of a wall span. A wall’s back edge will be selected from the same two slice types as the front, only we’ll horizontally flip the slice so that it correctly joins at the end of the span. Stepped walls will occur infrequently so we’ll have only a single type of vertical slice that will be used when placing a step into a wall span.
To help clarify all that, here are all eight slice types again, but this time I’ve marked the purpose of each slice:
It might be worth keeping the above diagram open in a separate tab and referencing it while working through this tutorial.
Now that you understand how wall spans are constructed we can start thinking about coding everything up.
Sprite Sheets
As discussed, our wall spans are built from eight different types of wall slice. The most obvious way to represent these slices within our project would be to have a separate PNG file for each slice. While that’s one way of doing things we’ll actually add all our slices onto a single large PNG file known as a sprite sheet.
I’ve provided the sprite sheet for you within this tutorial’s resources.zip file. It’s a file named wall.png and is also shown below. As you can see, all eight slices have been packed onto a single bitmap.
There’s also a wall.json file in our resources folder that accompanies the sprite sheet. Load it into your text editor and take a look. This file uses the JSON data format to define the name and position of the separate bitmap slices sitting in your sprite sheet. When working with sprite sheets, each separate bitmap within the sheet is known as a frame.
You don’t need to fully understand your JSON file as Pixi will take care of all that for you. However, it’s worth having some familiarity with what you’re working with. Here’s a snippet from the JSON data showing the frame that represents the first wall edge slice. I’ve highlighted a few things for you:
"edge_01":
{
  "frame": {"x":128,"y":0,"w":64,"h":256},
  "rotated": false,
  "trimmed": false,
  "spriteSourceSize": {"x":0,"y":0,"w":64,"h":256},
  "sourceSize": {"w":64,"h":256}
},
The first line contains the unique name (edge_01) associated with the frame:
"edge_01":
We’ll use this name within our code whenever we want to directly obtain this wall slice’s bitmap image from our sprite sheet.
The next highlighted line defines the frame’s rectangular region:
"frame": {"x":128,"y":0,"w":64,"h":256},
Essentially this is used to locate the frame’s associated bitmap within the sprite sheet.
There are also entries within the JSON file for the other seven wall slice types. Each slice will be represented by a unique frame name. When working with sprite sheets the only thing you really need to take from the accompanying JSON file is the name associated with each frame. Below you can see the sprite sheet again but this time I’ve also provided the frame name associated with each wall slice type. You may also want to keep this image open in a separate browser tab too.
If you scroll down to the very bottom of wall.json you’ll see a section that contains some meta data:
"meta": {
  "app": "http://www.codeandweb.com/texturepacker ",
  "version": "1.0",
  "image": "wall.png",
  "format": "RGBA8888",
  "size": {"w":256,"h":512},
  "scale": "1",
  "smartupdate": "$TexturePacker:SmartUpdate:fc102f6475bdd4d372c..."
}
Within that data is the relative path to the sprite sheet’s actual PNG file. Pixi will use that data to load the correct PNG file.
Once again, don’t worry too much about the actual JSON data as pixi.js handles the loading of it and the sprite sheet for you. All you need to remember are the unique frame names.
TexturePacker
I used a tool to generate this tutorial’s sprite sheet and accompanying JSON file. That tool is the excellent TexturePacker, which is available for Windows, Mac OS X, and Linux. It exports for many sprite sheet data formats including the JSON (Hash) format used by pixi.js. I won’t cover how to use TexturePacker in this tutorial but it is extremely easy to get to grips with. The paid version is great value for money and there’s also a free version for those who want to learn the basics first.
Loading the Sprite Sheet
Okay, now that we understand a little about sprite sheets let’s go ahead and load ours. We’ll start by adding some code to your project’s main application class. Open Main.js within your text editor.
At the end of the file, add the following method to load the sprite sheet:
Main.prototype.loadSpriteSheet = function() {
  var loader = PIXI.loader;
  loader.add("wall", "resources/wall.json");
  loader.once("complete", this.spriteSheetLoaded.bind(this));
  loader.load();
};
Our method takes advantage of the PIXI.loaders.Loader class, which can be used to load images, sprite sheets, and bitmap font files. We obtain a pre-made instance of the loader directly from the PIXI.loader property. Using the loader, we add each of the resources we wish to load. In this case we simply add our wall.json file. We pass a unique ID that we wish to associated with the file as the first parameter and the actual relative path to the resource as the second paramater.
The PIXI.loaders.Loader class triggers a complete event once the sprite sheet is loaded. To respond to that event we simply hook the complete event to a method of our choosing. We’ve opted to name that method spriteSheetLoaded() and will write it in just a moment.
Finally, our PIXI.loaders.Loader instance’s load() method is called to actually commence the loading of our sprite sheet. Once the sprite sheet has been loaded, Pixi will extract its frames and store them in an internal texture cache for access later.
Far and Mid classes. Give it a try by adding them to our Loader instance:
loader.add("wall", "resources/wall.json");
loader.add("bg-mid", "resources/bg-mid.png");
loader.add("bg-far", "resources/bg-far.png");
There is no need to make any edits to your Far or Mid classes as their calls to PIXI.Texture.fromImage() will look in the internal texture cache before attempting to load your textures from the file system.
Now let’s write our spriteSheetLoaded() method. Add the following at the end of the file:
Main.prototype.spriteSheetLoaded = function() {
};
The method’s body is empty at the moment but there are a few things we’ll actually want to do within it. At the moment we create an instance of our Scroller class and kick off our main loop within the main application class’ constructor. However, we now want to wait until our sprite sheet has loaded before we do all that. Let’s move that code into our spriteSheetLoaded() method.
Scroll up to your constructor function and remove the following two lines:
function Main() { this.stage = new PIXI.Container(); this.renderer = PIXI.autoDetectRenderer( 512, 384, {view:document.getElementById("game-canvas")} );this.scroller = new Scroller(this.stage);requestAnimationFrame(this.update.bind(this));}
Now move back down to your spriteSheetLoaded() method and add those two lines there instead:
Main.prototype.spriteSheetLoaded = function() {
  this.scroller = new Scroller(this.stage);
  requestAnimationFrame(this.update.bind(this));
};
Finally, move back up to the constructor function and make a call to your loadSpriteSheet() method:
function Main() {
  this.stage = new PIXI.Container();
  this.renderer = PIXI.autoDetectRenderer(
    512,
    384,
    {view:document.getElementById("game-canvas")}
  );

  this.loadSpriteSheet();
}
Now save your changes and refresh your browser. Check within Chrome’s JavaScript console that there are no errors.
Testing Your Sprite Sheet
While we’ve successfully loaded our sprite sheet, we’ve yet to actually prove to ourselves that its frames (our eight vertical wall slice types) have been stored within Pixi’s texture cache. So let’s go ahead and create a couple of sprites that use some of those frames.
We’ll carry out our test inside the spriteSheetLoaded() method. Add the following code to it:
Main.prototype.spriteSheetLoaded = function() {
  this.scroller = new Scroller(this.stage);
  requestAnimationFrame(this.update.bind(this));

  var slice1 = PIXI.Sprite.fromFrame("edge_01");
  slice1.position.x = 32;
  slice1.position.y = 64;
  this.stage.addChild(slice1);
};
In the code above we took advantage of the PIXI.Sprite class’ fromFrame() static method. It creates a new sprite using the texture from the texture cache matching the specified frame ID. We specified the edge_01 frame to show one of the slices used to represent the front of a wall span.
Save your code and refresh the browser to see your wall slice. Its on-screen position isn’t important at the moment so don’t worry about that just now.
Let’s add a second vertical slice. This time we’ll use a slice type from the wall’s mid section. To be more precise we’ll use the frame named decoration_03 from our sprite sheet:
Main.prototype.spriteSheetLoaded = function() {
  this.scroller = new Scroller(this.stage);
  requestAnimationFrame(this.update.bind(this));

  var slice1 = PIXI.Sprite.fromFrame("edge_01");
  slice1.position.x = 32;
  slice1.position.y = 64;
  this.stage.addChild(slice1);

  var slice2 = PIXI.Sprite.fromFrame("decoration_03");
  slice2.position.x = 128;
  slice2.position.y = 64;
  this.stage.addChild(slice2);
};
Once again save and test your code. You should now see two vertical wall slices sitting on the stage similar to the screenshot below.
![]()
Hopefully you’re now satisfied that your sprite sheet’s frames have been successfully loaded and cached. Remove your test code from the spriteSheetLoaded() method. Your method should once again look like this:
Main.prototype.spriteSheetLoaded = function() {
  this.scroller = new Scroller(this.stage);
  requestAnimationFrame(this.update.bind(this));
};
Save your changes.
Some GPU Theory
I’ve yet to explain why we opted to pack our wall slices onto a sprite sheet rather than simply load eight separate PNGs into memory. The reason is performance. Pixi’s WebGL renderer takes advantage of your computer’s graphics processing unit (GPU) to accelerated graphics performance. However to guarantee optimal performance we must at least have some understanding of how a GPU works.
GPUs prefer to work with large clumps of data at once. Pixi tries to accommodate your GPU by sending the data that describes your display objects as a single batch. However it can only batch display objects that have similar states. When a display object with a different state is encountered a state change is said to have occurred and the GPU stops to draw the current batch. The fewer state changes that occur in your program then the fewer draw operations the GPU needs to preform in order to render your display list. And the fewer draw operations the GPU has to perform, the faster your rendering performance will be.
Unfortunately every time a display object with a different texture is encountered a state change occurs. Sprite sheets can help avoid state changes as all your images are stored within a single texture. The GPU can quite happily draw each frame (or sub-texture) from the sprite sheet without the need for separate draw calls.
However there is a size limit to the textures that can be stored on a GPU. Most modern GPUs can store textures up to 2048×2048 pixels in size. So if you are going to use a sprite sheet then make sure its dimensions do not exceed the GPU’s texture size limit. Thankfully the size of our sprite sheet is not an issue.
So our sprite sheet can help significantly increase our scroller’s performance compared to storing each wall slice’s image on a separate texture.
Representing the Game Map
So we’ve successfully loaded our sprite sheet and also managed to display some of its frames, but how do we actually go about building a large map containing our wall spans?
I guess the most obvious approach would be to create an array of sprites where each sprite represents a vertical wall slice from our map. However, given the slender width of each slice, our entire map will easily consist of several thousand sprites. That’s a lot of sprites to hold in memory at once. Additionally, if we were to simply dump all those sprites onto our display list then it would put a significant amount of strain on the renderer, potentially impacting your game’s frame rate.
Another approach would be to instantiate and display only the sprites that are going to be visible within the viewport. As the map scrolls, the left most sprite will eventually leave the screen. When that happens we could remove that sprite from the display list and add a new sprite just outside the viewport’s far right. With this approach we can give the user the illusion of the full map being scrolled while in reality we’re only actually having to deal with the section of the map that’s currently visible within the viewport.
While this second approach is certainly better than the first it requires constant memory allocations and deallocations for our sprites: Memory is allocated for each new sprite that enters from the right, and that sprite’s memory must eventually be released after it has left the viewport and been removed. So why’s this bad? Well, allocating memory requires precious CPU cycles that may impair the performance of your game. This is especially true if you’re having to continually allocate memory.
Freeing memory previously used by objects is also a potential CPU hog. The JavaScript runtime utilises a garbage collector to free the memory that was previously being used by objects that are no longer required. However, you have no direct control over when garbage collection takes place and the process can take several milliseconds if a significant amount of memory must be freed. Therefore constantly instantiating sprites and also removing sprites from your display list will result in frequent garbage collection, which in turn will impact the performance of your game.
There’s a third approach that circumvents the problems of the previous two. It’s called object pooling and makes much smarter use of memory without triggering JavaScript’s garbage collector.
Object Pooling
To understand object pooling consider this simple example. In a shoot ’em up game, the player’s ship may fire a hundred thousand projectiles during the course of a game, but due to the ship’s rate of fire, it’s only possible for 20 projectiles to ever be on screen at any one time. Therefore, it makes sense to only create 20 projectile instances within the game’s code and re-use those projectiles during the course of the game.
The 20 projectiles could be stored in an array. Each time the player fires we remove a projectile from the array and add it to the screen. When the projectile leaves the screen (or hits an enemy) we add it back to the array for re-use again later. The important thing is that we never need to create new projectile instances. Instead we only ever work with the pool of 20 instances we created up-front. In this example, the array would be our object pool. Make sense?
We can apply object pooling to our game map and have the following: a pool of window slices; a pool of wall decoration slices; a pool of front wall edges; a pool of rear wall edges; and a pool of wall steps.
So while our game map may ultimately contain hundreds of windows, we actually only need to create enough window sprites to cover the width of our viewport. When a window is about to be shown within our viewport we simply retrieve a window sprite from the windows object pool. When that window scrolls out of view we remove it from the display list and return it to the object pool. We’ll apply the exact same principle to our wall edges, decorations, and steps.
That’s enough theory. Let’s start building an object pool class to hold our wall slice sprites.
Starting the Object Pool Class
Since our game map represents a series of walls we’ll create a class named WallSpritesPool to act as a pool for our various wall parts.
MapSpritesPool or simply ObjectPool. However, for the purposes of this tutorial WallSpritesPool makes sense.Create a new file within your text editor and add the following constructor function:
function WallSpritesPool() {
  this.windows = [];
}
Save the file and name it WallSpritesPool.js.
Within the constructor we’ve defined an empty array named windows. This array will act as the object pool for all our map’s window sprites.
Adding the Pool of Windows
Our array needs to be pre-populated with some window sprites. Remember, there are two types of windows that our wall spans can support – a lit window and an unlit window – so we’ll need to ensure we add a plentiful supply of both types. Populate the array by adding the following code to your constructor:
function WallSpritesPool() {
  this.windows = [];

  this.windows.push(PIXI.Sprite.fromFrame("window_01"));
  this.windows.push(PIXI.Sprite.fromFrame("window_01"));
  this.windows.push(PIXI.Sprite.fromFrame("window_01"));
  this.windows.push(PIXI.Sprite.fromFrame("window_01"));
  this.windows.push(PIXI.Sprite.fromFrame("window_01"));
  this.windows.push(PIXI.Sprite.fromFrame("window_01"));
  this.windows.push(PIXI.Sprite.fromFrame("window_02"));
  this.windows.push(PIXI.Sprite.fromFrame("window_02"));
  this.windows.push(PIXI.Sprite.fromFrame("window_02"));
  this.windows.push(PIXI.Sprite.fromFrame("window_02"));
  this.windows.push(PIXI.Sprite.fromFrame("window_02"));
  this.windows.push(PIXI.Sprite.fromFrame("window_02"));
}
The code above adds 12 window sprites to your object pool. The first 6 sprites represent our lit windows (window_01) whereas the other 6 sprites represent our unlit windows (window_02).
When sprites are retrieved from the object pool, they will be taken from the front of the array. Given the order we added the sprites to our array when populating it, the first 6 requests for a window sprite will always return a lit window, whereas the next 6 requests will always return an unlit window. We’d rather the type of window slice obtained from the pool appeared random. This can be achieved by shuffling the array after populating it.
The following method shuffles an array passed to it. Add the method:
WallSpritesPool.prototype.shuffle = function(array) {
  var len = array.length;
  var shuffles = len * 3;
  for (var i = 0; i < shuffles; i++)
  {
    var wallSlice = array.pop();
    var pos = Math.floor(Math.random() * (len-1));
    array.splice(pos, 0, wallSlice);
  }
};
Now make a call to your shuffle() method from the constructor:
function WallSpritesPool() {
  this.windows = [];

  this.windows.push(PIXI.Sprite.fromFrame("window_01"));
  this.windows.push(PIXI.Sprite.fromFrame("window_01"));
  this.windows.push(PIXI.Sprite.fromFrame("window_01"));
  this.windows.push(PIXI.Sprite.fromFrame("window_01"));
  this.windows.push(PIXI.Sprite.fromFrame("window_01"));
  this.windows.push(PIXI.Sprite.fromFrame("window_01"));
  this.windows.push(PIXI.Sprite.fromFrame("window_02"));
  this.windows.push(PIXI.Sprite.fromFrame("window_02"));
  this.windows.push(PIXI.Sprite.fromFrame("window_02"));
  this.windows.push(PIXI.Sprite.fromFrame("window_02"));
  this.windows.push(PIXI.Sprite.fromFrame("window_02"));
  this.windows.push(PIXI.Sprite.fromFrame("window_02"));

  this.shuffle(this.windows);
}
Now let’s do some re-factoring as there’s a much more concise way to populate our array. Since we are essentially adding two groups of sprites (lit and unlit windows) to our array, we can replace the following lines of code:
function WallSpritesPool() { this.windows = [];this.windows.push(PIXI.Sprite.fromFrame("window_01"));this.windows.push(PIXI.Sprite.fromFrame("window_01"));this.windows.push(PIXI.Sprite.fromFrame("window_01"));this.windows.push(PIXI.Sprite.fromFrame("window_01"));this.windows.push(PIXI.Sprite.fromFrame("window_01"));this.windows.push(PIXI.Sprite.fromFrame("window_01"));this.windows.push(PIXI.Sprite.fromFrame("window_02"));this.windows.push(PIXI.Sprite.fromFrame("window_02"));this.windows.push(PIXI.Sprite.fromFrame("window_02"));this.windows.push(PIXI.Sprite.fromFrame("window_02"));this.windows.push(PIXI.Sprite.fromFrame("window_02"));this.windows.push(PIXI.Sprite.fromFrame("window_02"));this.shuffle(this.windows); }
with this:
function WallSpritesPool() {
  this.windows = [];

  this.addWindowSprites(6, "window_01");
  this.addWindowSprites(6, "window_02");

  this.shuffle(this.windows);
}

WallSpritesPool.prototype.addWindowSprites = function(amount, frameId) {
  for (var i = 0; i < amount; i++)
  {
    var sprite = PIXI.Sprite.fromFrame(frameId);
    this.windows.push(sprite);
  }
};

WallSpritesPool.prototype.shuffle = function(array) {
  var len = array.length;
  var shuffles = len * 3;
  for (var i = 0; i < shuffles; i++)
  {
    var wallSlice = array.pop();
    var pos = Math.floor(Math.random() * (len-1));
    array.splice(pos, 0, wallSlice);
  }
};
Make those changes and save your work.
The addWindowSprites() method lets us add a number of sprites to our windows array that use the same specified frame from our sprite sheet. It therefore makes it very easy to add a group of 6 lit window sprites and a group of 6 unlit window sprites to our pool.
We should do one more piece of re-factoring before continuing. Let's move the code from our constructor into its own method. Scroll up to your constructor and remove the following lines:
function WallSpritesPool() {this.windows = [];this.addWindowSprites(6, "window_01");this.addWindowSprites(6, "window_02");this.shuffle(this.windows);}
Place them within a new method:
function WallSpritesPool() {
}

WallSpritesPool.prototype.createWindows = function() {
  this.windows = [];

  this.addWindowSprites(6, "window_01");
  this.addWindowSprites(6, "window_02");

  this.shuffle(this.windows);
};
Finally, make a call to your createWindows() method from within the constructor:
function WallSpritesPool() {
  this.createWindows();
}

WallSpritesPool.prototype.createWindows = function() {
  this.windows = [];

  this.addWindowSprites(6, "window_01");
  this.addWindowSprites(6, "window_02");

  this.shuffle(this.windows);
};
Okay, we currently have code that creates our window sprites, adds them to an array, and shuffles that array. Save your file before proceeding.
Why Twelve Window Sprites?
Technically speaking we can get away with much fewer than twelve window sprites within our pool. After all, we only need enough sprites to cover the width of the viewport. The reason I've opted for twelve is to give some randomness to the pattern of lit and unlit windows across wall spans. This should become obvious later when we write test code to generate wall spans. However it's worth noting that I could have used any number of sprites within reason, so long as it provides enough window sprites for me to generate a wall span within the viewport.
Borrowing and Returning Sprites
Our object pool has a collection of window sprites but we haven't yet provided public methods allowing a sprite to be obtained from the pool or returned back to the pool.
We'll provide the following two methods for this:
borrowWindow()returnWindow()
The borrowWindow() method will remove a window sprite from the windows pool and return a reference to it for your use. When you're done with the sprite, you can place it back into the pool by calling returnWindow() and passing the sprite as a parameter.
Okay, let's add our borrowWindow() method. Add the following just after your class' constructor:
function WallSpritesPool() {
  this.createWindows();
}

WallSpritesPool.prototype.borrowWindow = function() {
  return this.windows.shift();
};
As you can see, it's a fairly trivial method that simply removes the first sprite from the front of the windows array and returns it.
borrowWindow() method doesn't check to see if there are any sprites left in the pool. We don't have to worry about that in this series of tutorials but it is good practice to check to see if your sprite pool is empty before attempting to return something from it. There are various strategies available for dealing with empty pools. A common one is to dynamically increase the size of the pool when it runs dry.Now add the returnWindow() method directly underneath it:
WallSpritesPool.prototype.borrowWindow = function() {
  return this.windows.shift();
};

WallSpritesPool.prototype.returnWindow = function(sprite) {
  this.windows.push(sprite);
};
Just like borrowWindow(), the returnWindow() method is straightforward. It takes a sprite as a parameter and pushes that sprite back onto the end of the windows array.
We now have a way of obtaining a window sprite from our object pool, and also a way of inserting a sprite back into the object pool once we're done with it.
Save your changes.
A Quick Recap
It's worth looking over your WallSpritesPool class. There isn't a lot of code but it's important you understand what's going on before we add to it. Here's how the current version of your class should look:
function WallSpritesPool() {
  this.createWindows();
}

WallSpritesPool.prototype.borrowWindow = function() {
  return this.windows.shift();
};

WallSpritesPool.prototype.returnWindow = function(sprite) {
  this.windows.push(sprite);
};

WallSpritesPool.prototype.createWindows = function() {
  this.windows = [];

  this.addWindowSprites(6, "window_01");
  this.addWindowSprites(6, "window_02");

  this.shuffle(this.windows);
};

WallSpritesPool.prototype.addWindowSprites = function(amount, frameId) {
  for (var i = 0; i < amount; i++)
  {
    var sprite = PIXI.Sprite.fromFrame(frameId);
    this.windows.push(sprite);
  }
};

WallSpritesPool.prototype.shuffle = function(array) {
  var len = array.length;
  var shuffles = len * 3;
  for (var i = 0; i < shuffles; i++)
  {
    var wallSlice = array.pop();
    var pos = Math.floor(Math.random() * (len-1));
    array.splice(pos, 0, wallSlice);
  }
};
The class simply creates an array containing 6 lit window sprites and 6 unlit window sprites. The array acts as the sprite pool for the windows and is shuffled to ensure a random mix of lit and unlit windows. Two public methods are provided - borrowWindow() and returnWindow() - that allow a window sprite to be obtained from the sprite pool and later returned back to the pool.
That's really all there is to it. Of course we still need to worry about the other wall slice types (front wall edges, rear wall edges, wall decoration, and the wall step) but we'll add them to our WallSpritesPool class soon enough. First let's hook-up the sprite pool to the rest of our code and perform a few tests to ensure that everything is working as expected.
Testing Your Object Pool
Move to your index.html file and include the source file for your WallSpritesPool class:
<script src="https://cdnjs.cloudflare.com/ajax/libs/pixi.js/4.0.0/pixi.min.js"></script>
<script src="Far.js"></script>
<script src="Mid.js"></script>
<script src="Scroller.js"></script>
<script src="WallSpritesPool.js"></script>
<script src="Main.js"></script>
Save your file.
Now open Main.js. We'll make some temporary changes to your main application class in order to test our object pool.
We'll start by adding some code to our spriteSheetLoaded() method. Create an instance of our object pool and also an array that we'll use to hold wall slice sprites obtained from the pool:
Main.prototype.spriteSheetLoaded = function() {
  this.scroller = new Scroller(this.stage);
  requestAnimationFrame(this.update.bind(this));

  this.pool = new WallSpritesPool();
  this.wallSlices = [];
};
In the code above, we store our object pool instance within a member variable named pool, while our array's member variable is named wallSlices.
Now let's write some code to obtain a specified number of windows from our pool and add them to the stage in a row. Add the following test method at the end of your class:
Main.prototype.borrowWallSprites = function(num) {
  for (var i = 0; i < num; i++)
  {
    var sprite = this.pool.borrowWindow();
    sprite.position.x = -32 + (i * 64);
    sprite.position.y = 128;

    this.wallSlices.push(sprite);

    this.stage.addChild(sprite);
  }
};
As well as adding the window sprites to the stage, the borrowWallSprites() method above also adds each sprite to our wallSlices member variable. The reason for this is that we need to be able to access those window sprites from within a second test method, which we will now write. Add the following:
Main.prototype.returnWallSprites = function() {
  for (var i = 0; i < this.wallSlices.length; i++)
  {
    var sprite = this.wallSlices[i];
    this.stage.removeChild(sprite);
    this.pool.returnWindow(sprite);
  }

  this.wallSlices = [];
};
This returnWallSprites() method removes any window slices that were added to the stage and also returns those sprites to the object pool.
Save your changes.
With these two methods we can verify that we can borrow window sprites from the object pool and also return those sprites back to the pool. We'll use Chrome's JavaScript console window for this:
Refresh your browser and open the JavaScript console.
First ensure that there are no errors being reported in the console window. If there are then fix them before proceeding.
Now let's create a very crude wall by retrieving nine windows from our object pool. Enter the following into the console:
main.borrowWallSprites(9);
main global variable, which we can use to call the borrowWallSprites() method.Just like the screenshot below, you should see a span of nine window sprites laid out across the stage. All nine sprites were borrowed from your object pool and added to the stage. Also notice that the sequence of lit and unlit windows has likely appeared random. That's due to the fact that our array of windows within the pool was shuffled after it was created.
Let's now verify that we can return those sprites back to the object pool. Enter the following into the console:
main.returnWallSprites();
Your wall sprites should disappear from the stage and will be returned to the object pool.
We need to satisfy ourselves that the sprites have indeed been returned to the pool. The easiest way to do that is to request some more windows from the pool and check that they too appear on screen. Let's get another nine windows from the pool:
main.borrowWallSprites(9);
And return them back to the pool:
main.returnWallSprites();
We've now obtained a total of 18 sprites from the object pool. Remember, the pool only contains 12 window sprites. Therefore we have some proof that sprites are being borrowed from the pool and successfully returned when we're finished. If they weren't being returned then we'd eventually receive a runtime error when the object pool's internal array became empty.
Seeing as everything in JavaScript is publicly accessible we can quite easily check the object pool's internal array at any point. Try checking the size of the array from the console:
main.pool.windows.length
Doing so should return a length of 12. Now borrow four window sprites from the pool using:
main.borrowWallSprites(4);
Check the size of the object pool again:
main.pool.windows.length
It should now only contain 8 sprites. Finally return the sprites back to the pool with a call to returnWallSprites(). Check the size of the object pool again and confirm that its length has returned to 12.
I'm satisfied that our object pool is working. Let's move on but keep the test code you added to your main application class as we'll use it again shortly.
Adding Wall Decorations to the Object Pool
Currently our object pool only provides window sprites but we also need to add support for the front wall edges, rear wall edges, wall decoration slices, and the wall step. Let's start with the three wall decoration slices.
If you remember, some of our wall slices are decorated with pipes and vents. These slices are used to provide some variety between each window. Let's update our WallSpritesPool class to include the wall decoration slices. What we're about to write is pretty much identical to our object pool code for the wall's windows, so it should all look fairly familiar.
Open WallSpritesPool.js and make the following call within the constructor:
function WallSpritesPool() {
  this.createWindows();
  this.createDecorations();
}
Now actually add the createDecorations() method:
WallSpritesPool.prototype.createWindows = function() {
  this.windows = [];

  this.addWindowSprites(6, "window_01");
  this.addWindowSprites(6, "window_02");

  this.shuffle(this.windows);
};

WallSpritesPool.prototype.createDecorations = function() {
  this.decorations = [];

  this.addDecorationSprites(6, "decoration_01");
  this.addDecorationSprites(6, "decoration_02");
  this.addDecorationSprites(6, "decoration_03");

  this.shuffle(this.decorations);
};
The code above adds 18 wall decoration sprites to your object pool by calling the addDecorationSprites() method (we'll write it in a moment). The first six sprites use the decoration_01 frame from our sprite sheet. The next six use decoration_02 and the final six use decoration_03. A call is then made to shuffle() ensuring that the sprites are randomly placed within our decorations array, which we've declared as a member variable of this class and is used to store the wall decoration sprites.
Now let's write the addDecorationSprites() method. Add the following directly after your addWindowSprites() method:
WallSpritesPool.prototype.addWindowSprites = function(amount, frameId) {
  for (var i = 0; i < amount; i++)
  {
    var sprite = new PIXI.Sprite(PIXI.Texture.fromFrame(frameId));
    this.windows.push(sprite);
  }
};

WallSpritesPool.prototype.addDecorationSprites = function(amount, frameId) {
  for (var i = 0; i < amount; i++)
  {
    var sprite = new PIXI.Sprite(PIXI.Texture.fromFrame(frameId));
    this.decorations.push(sprite);
  }
};
Now all that's left to do is add two new methods that allow the wall decoration sprites to be borrowed from the object pool and returned. The method names will follow the naming convention used for the window sprites. Add a borrowDecoration() and a returnDecoration() method:
WallSpritesPool.prototype.borrowWindow = function() {
  return this.windows.shift();
};

WallSpritesPool.prototype.returnWindow = function(sprite) {
  this.windows.push(sprite);
};

WallSpritesPool.prototype.borrowDecoration = function() {
  return this.decorations.shift();
};

WallSpritesPool.prototype.returnDecoration = function(sprite) {
  this.decorations.push(sprite);
};
Save your changes.
Our object pool now supports window and wall decoration slice types. Let's go back to the test methods we added to our main application class and test that everything works as expected.
More Object Pool Testing
Previously we built a crude wall that comprised entirely of windows from our object pool. Let's alter our test code slightly to place wall decoration slices between each window. This will prove to us that we're able to obtain both window slices and wall decoration slices from the object pool.
Open Main.js and remove the following line from your borrowWallSprites() method:
Main.prototype.borrowWallSprites = function(num) { for (var i = 0; i < num; i++) {var sprite = this.pool.borrowWindow();sprite.position.x = -32 + (i * 64); sprite.position.y = 128; this.wallSlices.push(sprite); this.stage.addChild(sprite); } };
In its place add the following:
Main.prototype.borrowWallSprites = function(num) {
  for (var i = 0; i < num; i++)
  {
    if (i % 2 == 0) {
      var sprite = this.pool.borrowWindow();
    } else {
      var sprite = this.pool.borrowDecoration();
    }
    sprite.position.x = -32 + (i * 64);
    sprite.position.y = 192;

    this.wallSlices.push(sprite);

    this.stage.addChild(sprite);
  }
};
The code above utilises the modulo operator (%) to ensure we borrow a window sprite on every odd iteration of the loop, and to borrow a wall decoration sprite on every even iteration. This simple change allows us to now generate a test wall with the following pattern:
window, decoration, window, decoration, window, decoration, windowNow move to your returnWallSprites() method and remove the following line:
Main.prototype.returnWallSprites = function() { for (var i = 0; i < this.wallSlices.length; i++) { var sprite = this.wallSlices[i]; this.stage.removeChild(sprite);this.pool.returnWindow(sprite);} this.wallSlices = []; };
Replace it with the following:
Main.prototype.returnWallSprites = function() {
  for (var i = 0; i < this.wallSlices.length; i++)
  {
    var sprite = this.wallSlices[i];
    this.stage.removeChild(sprite);

    if (i % 2 == 0) {
      this.pool.returnWindow(sprite);
    } else {
      this.pool.returnDecoration(sprite);
    }
  }

  this.wallSlices = [];
};
We've again utilised the modulo operator, this time to ensure we return the correct sprite (window or decoration) back to the object pool.
Save your changes.
Refresh your browser and let's test our object pool using Chrome's JavaScript console. Generate a test wall by entering the following into the console window:
main.borrowWallSprites(9);
If everything has gone according to plan then you should see a test wall that's constructed from windows interspersed with various wall decorations such as pipes and vents. In fact, your wall span should look similar to the screenshot underneath, which was taken from my development computer.
While we're only writing some simple tests at the moment, what we are doing isn't that far off what we'll need in order to generate our entire game map.
Return your sprites back to the object pool with the following call:
main.returnWallSprites();
Verify that the object pool is fully working by making a few more calls to borrowWallSprites() and returnWallSprites(). Also, use the console to check that the lengths of the object pool's windows and decorations arrays are as you would expect at each stage.
Adding Wall Edges to the Object Pool
We're getting there. Our sprite pool currently lets us create a primitive wall span but it provides no support for a wall's front and rear edges. Let's go ahead and add those wall slice types.
Open WallSpritesPool.js within your text editor and add the following two lines to its constructor:
function WallSpritesPool() {
  this.createWindows();
  this.createDecorations();
  this.createFrontEdges();
  this.createBackEdges();
}
Now add a createFrontEdges() and a createBackEdges() method:
WallSpritesPool.prototype.createDecorations = function() {
  this.decorations = [];

  this.addDecorations(6, "decoration_01");
  this.addDecorations(6, "decoration_02");
  this.addDecorations(6, "decoration_03");

  this.shuffle(this.decorations);
};

WallSpritesPool.prototype.createFrontEdges = function() {
  this.frontEdges = [];

  this.addFrontEdgeSprites(2, "edge_01");
  this.addFrontEdgeSprites(2, "edge_02");

  this.shuffle(this.frontEdges);
};

WallSpritesPool.prototype.createBackEdges = function() {
  this.backEdges = [];

  this.addBackEdgeSprites(2, "edge_01");
  this.addBackEdgeSprites(2, "edge_02");

  this.shuffle(this.backEdges);
};
You should be able to easily follow what both methods are doing. The first creates four front wall edge slices with two of them using the sprite sheet's edge_01 frame and the other two using edge_02. The second method creates four rear edge slices and uses the exact same frames from the sprite sheet as the front edges.
Four front wall edges may seem like quite a small amount but it will be more than enough since even a short wall span will consume at least half the viewport's width. In other words, we'll never use more than four front wall edges at any one time. The same goes for the back wall edges.
Now go ahead and add the addFrontEdgeSprites() and addBackEdgeSprites() methods:
WallSpritesPool.prototype.addDecorationSprites = function(amount, frameId) {
  for (var i = 0; i < amount; i++)
  {
    var sprite = new PIXI.Sprite(PIXI.Texture.fromFrame(frameId));
    this.decorations.push(sprite);
  }
};

WallSpritesPool.prototype.addFrontEdgeSprites = function(amount, frameId) {
  for (var i = 0; i < amount; i++)
  {
    var sprite = new PIXI.Sprite(PIXI.Texture.fromFrame(frameId));
    this.frontEdges.push(sprite);
  }
};

WallSpritesPool.prototype.addBackEdgeSprites = function(amount, frameId) {
  for (var i = 0; i < amount; i++)
  {
    var sprite = new PIXI.Sprite(PIXI.Texture.fromFrame(frameId));
    sprite.anchor.x = 1;
    sprite.scale.x = -1;
    this.backEdges.push(sprite);
  }
};
There should be no real surprises in this code, however the following lines within the addBackEdgeSprites() method deserve some attention:
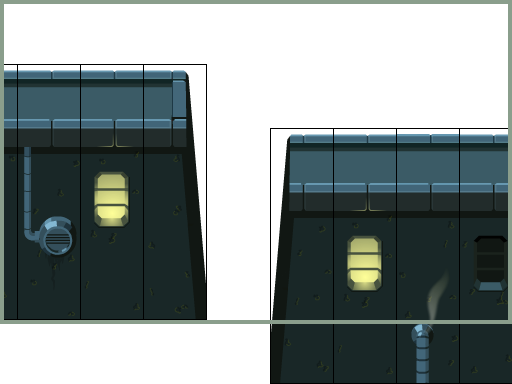
var sprite = new PIXI.Sprite(PIXI.Texture.fromFrame(frameId));
sprite.anchor.x = 1;
sprite.scale.x = -1;
this.backEdges.push(sprite);
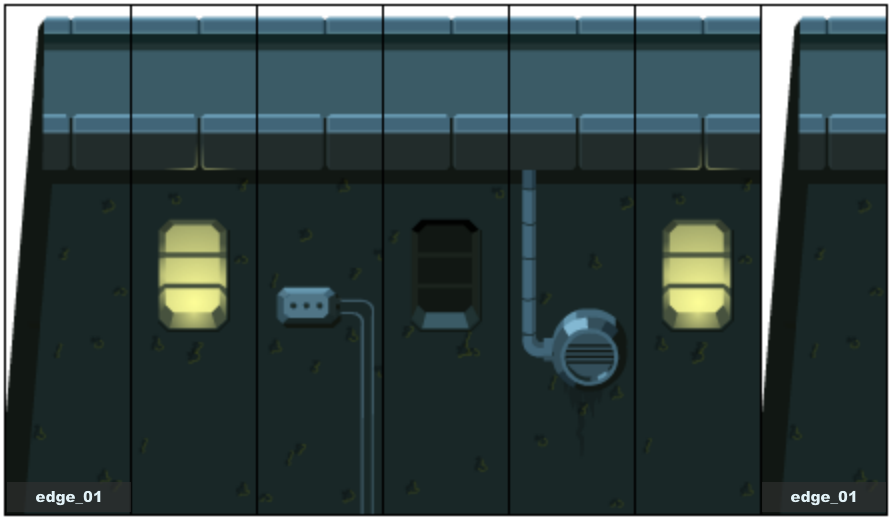
Since we are using the same sprite sheet frames used by the wall's front edges, we need to actually horizontally flip our back edge sprites in order for them to fit properly at the end of our wall spans. The diagram below illustrates what I mean. It shows the rear wall edge before it has been flipped. As you can see, it doesn't connect properly with the wall span and frankly looks wrong.
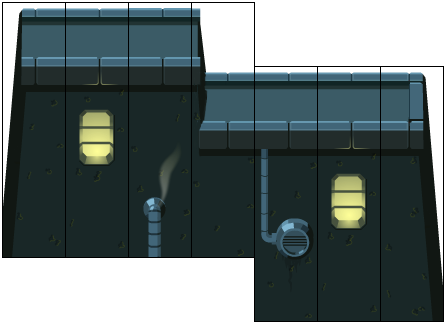
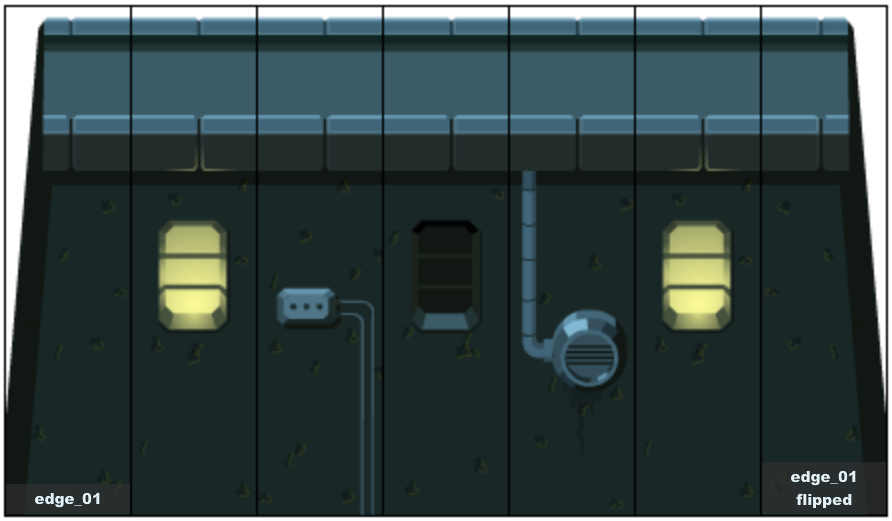
However, after flipped the rear edge's sprite, it snugly fits to the end of the wall span. This is evident in the diagram below.
Flipping the sprite is easy. We simply use the PIXI.Sprite class' scale property to do that. The scale property has an x and y value that can be adjusted in order to change a sprite's size. However, by setting the scale.x value to -1 we can actually force our sprite to be flipped horizontally instead of being scaled.
Pixi's PIXI.Sprite class also provides an anchor property, which is used to define the sprite's origin. By default a sprite's origin is set to its top-left corner. You can set the anchor's x and y positions to adjust the sprite's origin. A ratio is used for both the x and y position with 0,0 representing the sprite's top-left corner and 1,1 representing its bottom-right corner.
For all our wall slice sprites we've simply used the default, meaning all positioning takes place from the sprite's top-left corner. However, by horizontally flipping our wall's back edge sprites, we also flipped the position of their anchors. In other words, after horizontally flipping a sprite, its origin changes to its top-right corner, which isn't what we want. To fix this we set the sprite's origin to the top-right before we horizontally flip it. That way, after flipping, it will be set correctly to the top-left.
Okay, now let's add our methods that will allow the wall edges to be borrowed from and returned to the object pool.
WallSpritesPool.prototype.returnDecoration = function(sprite) {
  this.decorations.push(sprite);
};

WallSpritesPool.prototype.borrowFrontEdge = function() {
  return this.frontEdges.shift();
};

WallSpritesPool.prototype.returnFrontEdge = function(sprite) {
  this.frontEdges.push(sprite);
};

WallSpritesPool.prototype.borrowBackEdge = function() {
  return this.backEdges.shift();
};

WallSpritesPool.prototype.returnBackEdge = function(sprite) {
  this.backEdges.push(sprite);
};
Save your changes.
Building Your First Complete Wall Span
Our sprite pool now supports enough vertical wall slice types for us to build a complete wall span. Remember a wall span should include a front edge, a mid section, and a back edge. The mid section should consist of windows and wall decorations at the very least. Some spans may also include a step but we'll address that shortly.
Let's move back to our main application class and write some more test code to draw a complete wall span within our viewport.
First we'll remove our previous test methods. Open Main.js and remove both borrowWallSprites() and returnWallSprites().
We'll add a new method named generateTestWallSpan(), which we'll use to generate a wall span that is seven slices wide. To help build the wall we'll employ the use of a lookup table. Start by adding the following:
Main.prototype.generateTestWallSpan = function() {
  var lookupTable = [
    this.pool.borrowFrontEdge,  // 1st slice
    this.pool.borrowWindow,     // 2nd slice
    this.pool.borrowDecoration, // 3rd slice
    this.pool.borrowWindow,     // 4th slice
    this.pool.borrowDecoration, // 5th slice
    this.pool.borrowWindow,     // 6th slice
    this.pool.borrowBackEdge    // 7th slice
  ];
}
The lookup table is an array of function references. Each index within the array represents one of the seven wall slices. The first index representing the wall's front edge and the last index position representing the back edge. The indices in between represent the five slices that represent the wall's mid section.
Each index holds a reference to the correct method from our object pool required to build the wall span. For example, the first index holds a reference to the pool's borrowFrontEdge() method. The second index holds a reference to borrowWindow() and the third holds a reference to borrowDecoration().
Using a for loop, we can walk through this lookup table and construct a wall span. Let's add some code to do that:
Main.prototype.generateTestWallSpan = function() {
  var lookupTable = [
    this.pool.borrowFrontEdge,  // 1st slice
    this.pool.borrowWindow,     // 2nd slice
    this.pool.borrowDecoration, // 3rd slice
    this.pool.borrowWindow,     // 4th slice
    this.pool.borrowDecoration, // 5th slice
    this.pool.borrowWindow,     // 6th slice
    this.pool.borrowBackEdge    // 7th slice
  ];

  for (var i = 0; i < lookupTable.length; i++)
  {
    var func = lookupTable[i];

    var sprite = func.call(this.pool);
    sprite.position.x = 32 + (i * 64);
    sprite.position.y = 128;

    this.wallSlices.push(sprite);

    this.stage.addChild(sprite);
  }
};
Inside the loop our code gets a reference to the correct sprite pool method and stores it within a local variable named func:
var func = lookupTable[i];
Once we have a reference to the correct function, we make a call to it using:
var sprite = func.call(this.pool);
call() is a native JavaScript method that can be used to call a method on behalf of an object. In our case we use it to ensure that each lookup method call is applied to our sprite pool instance. For example, on the first iteration of our loop, the func variable will point to the sprite pool's borrowFrontEdge() method. Applying call() to the func variable is therefore equivalent to the following:
this.pool.borrowFrontEdge()
With our generateTestWallSpan() method complete we can now concentrate on writing one more test method named clearTestWallSpan(). This method will remove the wall span from the stage and return our wall slices back to the object pool.
Add the following at the end of your file:
Main.prototype.clearTestWallSpan = function() {
  var lookupTable = [
    this.pool.returnFrontEdge,  // 1st slice
    this.pool.returnWindow,     // 2nd slice
    this.pool.returnDecoration, // 3rd slice
    this.pool.returnWindow,     // 4th slice
    this.pool.returnDecoration, // 5th slice
    this.pool.returnWindow,     // 6th slice
    this.pool.returnBackEdge    // 7th slice
  ];

  for (var i = 0; i < lookupTable.length; i++)
  {
    var func = lookupTable[i];
    var sprite = this.wallSlices[i];

    this.stage.removeChild(sprite);
    func.call(this.pool, sprite);
  }

  this.wallSlices = [];
};
Once again we make use of a lookup table. But this time we store references to methods that will return our wall slices back to the object pool. For example, we know the first slice of our test wall span is the wall's front edge. Therefore the first method stored in our lookup table is returnFrontEdge().
Also, notice that when using the native JavaScript call() method this time, we pass a second argument to it. This second argument is the sprite we want to return to the pool.
Save your changes and refresh your browser. Let's see what a complete wall span looks like.
Open Chrome's JavaScript console and generate your test wall span by entering the following:
main.generateTestWallSpan();
You should see a wall span that's seven vertical slices long. It will also have a front and back edge. Your browser window should look something like the screenshot below.
All seven wall slices were borrowed from our object pool. Let's return them by entering the following into the console:
main.clearTestWallSpan();
The wall's sprites should get removed from the stage and returned to your object pool.
Generate the wall span again:
main.generateTestWallSpan();
You should see your wall again but this time you may see different decoration on the walls, the window types may appear different, and there's even a chance that the appearance of the front and back edges will also have changed. You can see a screenshot below taken from my development computer. If you compare it to the previous screenshot you should notice some of the differences I've just mentioned.
These differences are caused by the fact that we've borrowing different wall slices this time. Our previous slices were returned to the back of each of the object pool's arrays, whereas borrowed sprites always come from the front of our arrays. This is a nice result as it makes it harder to predict exactly how each slice type will look when obtained from the pool. Basically it will result in our game map's wall spans appearing a little more random, which is exactly what we want.
Adding Wall Steps to the Object Pool
Hopefully you should be happy with the current version of the code. We were able to use the object pool to construct a complete wall span. Now all that's left to do is add support to our object pool for the wall step. Let's go ahead and do that.
Move back to your text editor and ensure that WallSpritesPool.js is open.
Add the following line to the constructor:
function WallSpritesPool() {
  this.createWindows();
  this.createDecorations();
  this.createFrontEdges();
  this.createBackEdges();
  this.createSteps();
}
Now write our createSteps() method:
WallSpritesPool.prototype.createBackEdges = function() {
  this.backEdges = [];

  this.addBackEdgeSprites(2, "edge_01");
  this.addBackEdgeSprites(2, "edge_02");

  this.shuffle(this.backEdges);
};

WallSpritesPool.prototype.createSteps = function() {
  this.steps = [];
  this.addStepSprites(2, "step_01");
};
And add the addStepSprites() method:
WallSpritesPool.prototype.addBackEdgeSprites = function(amount, frameId) {
  for (var i = 0; i < amount; i++)
  {
    var sprite = new PIXI.Sprite(PIXI.Texture.fromFrame(frameId));
    sprite.anchor.x = 1;
    sprite.scale.x = -1;
    this.backEdges.push(sprite);
  }
};

WallSpritesPool.prototype.addStepSprites = function(amount, frameId) {
  for (var i = 0; i < amount; i++)
  {
    var sprite = new PIXI.Sprite(PIXI.Texture.fromFrame(frameId));
    sprite.anchor.y = 0.25;
    this.steps.push(sprite);
  }
};
Steps will appear so infrequently that we'll make do with only two in our sprite pool. Although to be perfectly honest, one would probably have been enough.
Also, just like the back edge slice type, we've employed the use of the anchor property to change the sprite's origin. This time we've altered the origin's vertical position rather than its horizontal position by moving it down 64 pixels. Remember a ratio is used when working with the anchor property. With each slice being 256 pixels in height, moving the anchor's y-position down by 64 pixels results in a ratio of 0.25.
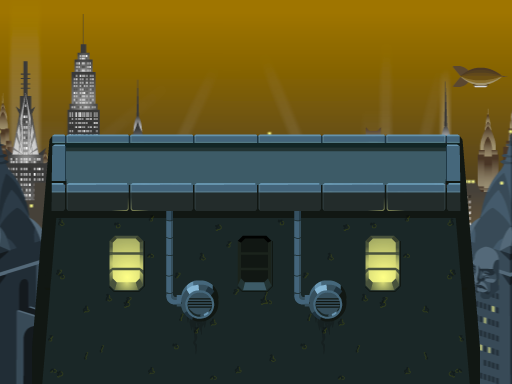
So why was this change to the anchor property required? Well, when we eventually get around to actually generating the game map, all the wall slices belonging to a particular span will use the same y-position to ensure that everything aligns correctly. We've actually already seen this with the various test methods we've written during this tutorial. However, the design of the step slice's bitmap makes it an exception - it won't correctly align with the other slices within a span. You can see this in the diagram below where all the slices (including the step) have the same y-position and have their origin set to the top-left corner.
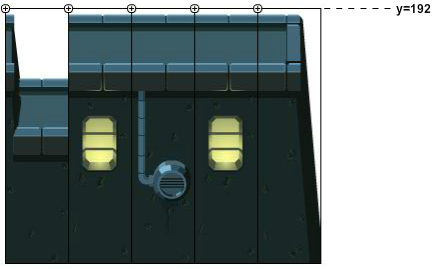
As you can see, the wall step's vertical position is clearly incorrect. However, by shifting its origin down by 64 pixels, we can force it to sit correctly within the span. You can see this in the diagram below where every slice (including the step) still shares the same y-position but the step slice now sits correctly within the span thanks to its anchor point having been moved.
Now all we need to do is provide methods that allow us to borrow and return a step from the object pool. Add the following borrowStep() and returnStep() methods:
WallSpritesPool.prototype.returnBackEdge = function(sprite) {
  this.backEdges.push(sprite);
};

WallSpritesPool.prototype.borrowStep = function() {
  return this.steps.shift();
};

WallSpritesPool.prototype.returnStep = function(sprite) {
  this.steps.push(sprite);
};
Save the changes to your file. Your object pool's class is now complete.
Testing the Wall Step
We're just about done for this tutorial. Let's finish up by generating a test wall span that contains a step.
Open Main.js and remove the code within your generateTestWallSpan() method. Replace it with the following:
Main.prototype.generateTestWallSpan = function() {
  var lookupTable = [
    this.pool.borrowFrontEdge,  // 1st slice
    this.pool.borrowWindow,     // 2nd slice
    this.pool.borrowDecoration, // 3rd slice
    this.pool.borrowStep,       // 4th slice
    this.pool.borrowWindow,     // 5th slice
    this.pool.borrowBackEdge    // 6th slice
  ];

  var yPos = [
    128, // 1st slice
    128, // 2nd slice
    128, // 3rd slice
    192, // 4th slice
    192, // 5th slice
    192  // 6th slice
  ];

  for (var i = 0; i < lookupTable.length; i++)
  {
    var func = lookupTable[i];

    var sprite = func.call(this.pool);
    sprite.position.x = 64 + (i * 64);
    sprite.position.y = yPos[i];

    this.wallSlices.push(sprite);

    this.stage.addChild(sprite);
  }
};
Our new version of generateTestWallSpan() is almost identical to the previous one. This time the wall is only six slices long and we've also added a second array named yPos to our method.
If you examine the lookup table you'll see that the 4th index represents the wall's step. Remember, the step lets a player drop down onto the wall surface directly below. If you think back to the beginning of the tutorial you should remember that when working with a step what we are really dealing with is two separate wall spans connected together. The first span will be higher than the second and the step slice itself will belong to the second span.
The difference in height between the two spans is taken care of by our yPos array. It has a y-position for each of our slices. The first three slices all have a y-position of 128 pixels and the remaining slices will have a y-position of 192 pixels.
Let's move onto our clearTestWallSpan() method. Remove the code from the existing version of the method and replace it with the following:
Main.prototype.clearTestWallSpan = function() {
  var lookupTable = [
    this.pool.returnFrontEdge,  // 1st slice
    this.pool.returnWindow,     // 2nd slice
    this.pool.returnDecoration, // 3rd slice
    this.pool.returnStep,       // 4th slice
    this.pool.returnWindow,     // 5th slice
    this.pool.returnBackEdge    // 6th slice
  ];

  for (var i = 0; i < lookupTable.length; i++)
  {
    var func = lookupTable[i];
    var sprite = this.wallSlices[i];

    this.stage.removeChild(sprite);
    func.call(this.pool, sprite);
  }

  this.wallSlices = [];
};
As you can see, the lookup table holds references to all the methods required to return each of our slices back to the object pool, including the step.
Save your changes and refresh your browser.
Enter the following into the JavaScript console:
main.generateTestWallSpan();
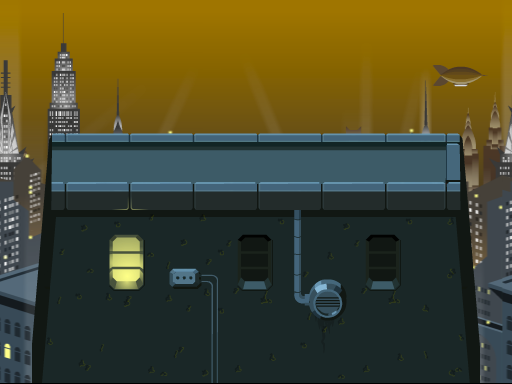
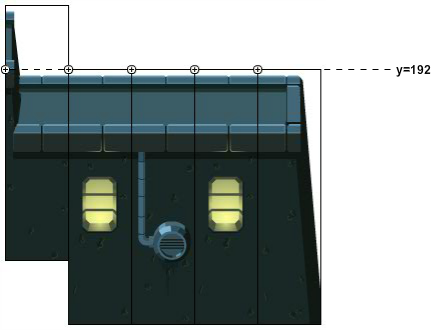
You should see a wall complete with a step appear on screen. In fact it should look something like this:
Now return your wall slices back to the object pool:
main.clearTestWallSpan();
Try generating the wall and returning the slices to the object pool a few more times, just to satisfy yourself that everything is behaving as expected.
Cleaning Up
We've continually tested our object pool as it has taken shape. In preparation for the final tutorial in the series let's now remove that test code from our main application class. Remove the following two lines:
Main.prototype.spriteSheetLoaded = function() { this.scroller = new Scroller(this.stage); requestAnimationFrame(this.update.bind(this));this.pool = new WallSpritesPool();this.wallSlices = [];};
Also completely remove your generateTestWallSpan() and clearTestWallSpan() methods.
Now save your changes.
Conclusion
Thanks for hanging in there. A huge amount has been covered in this tutorial. We've discussed various techniques for scrolling a game map and learned why an object pool is ideal for our needs.
While this tutorial was quite lengthy, the concept of an object pool is actually fairly straightforward. It's easy to get bogged down in the implementation detail but the major point to remember is that your object pool has a very simple API: there are a set of methods for borrowing sprites from the pool, and another set of methods for returning those sprites.
We've also learned more about pixi.js itself, covering sprite sheets and spending some more time with the PIXI.Sprite class. In addition, we've covered the benefits of GPU acceleration and why using a sprite sheet can give us huge performance gains.
And while we haven't actually started to build the scrolling game map yet, we have written some code to generate a few test wall spans. This should have helped you understand how to use your object pool and also to help familiarise you with the general structure of wall spans and the game map in general.
Next Time
Next time we will actually add the third parallax layer to our scroller. Unlike the previous two layers, this one will represent a full game map that consists of a series of wall spans built from individual vertical slices. The sprites for those wall slices will come from the object pool we built during this tutorial.
As always, the source code for this and previous tutorials in the series is available on GitHub.
See you soon for the fourth and final part.
nice tutorial
waiting for the next part
Thanks! I’ve starting writing the final part so hopefully you won’t need to wait too long.
Very enlightening. Cant wait for the next part! Btw the link is broken on the main page of pixel.js website.
Thanks for spotting the broken link. I’ll give the Pixi guys a ping and see if they’ll fix it.
Nice tutorial and thank you.
There is a typo: Main.as->Main.js
Thanks for spotting the typo Massimo. I’ve made a fix to the post.
thanks!it’s perfect!
Great tutorial.
I found the part where all the wall slices are placed with a vertical offset (downwards) after a step slice confusing. I’m not sure why setting the anchor on the step causes the rest to follow.
Apart from that, couldn’t we use a JS object for the object pool? An array seems to have a non-constant complexity when removing from the pool. Also since we put the objects back in the same order as we retrieved them, isn’t it going to make the order initially random but repetitive later within a certain object pool? Using a JS object and randomly retrieving objects and putting them back seems to solve both these problems. What do you think?
Hi Sachin. Thanks for getting in touch and sorry about the late reply.
>> I’m not sure why setting the anchor on the step causes the rest to
>> follow.
Setting the anchor simply results in the step being vertically moved up slightly so that it sits correctly with the slices that come after it. The step’s anchor doesn’t really affect the position of the subsequent slices in any way. The best way to understand this is to simply remove the line of code that sets the step’s anchor and then check the result in the browser. It should then become apparent why setting the anchor on that sprite is required.
>> Apart from that, couldn’t we use a JS object for the object pool?
I guess there are many ways to implement this. For the purpose of the tutorial, an array seemed to make sense and would be an implementation that most people would be able to easily follow.
>> An array seems to have a non-constant complexity when
>> removing from the pool.
Given the low number of items in each array, I wasn’t too worried about the time it would take to remove the items. Again, I picked a solution that would be clear to the user. But yeah, there will be many alternative implementations that will be faster, and definitely worth exploring if you are writing your own game.
>> Also since we put the objects back in the same order as we
>> retrieved them, isn’t it going to make the order initially random but >> repetitive later within a certain object pool?
Strictly that’s true, but considering each wall span itself can be of a different length (with front and back slices), and the occasional stepped wall too, it makes it almost impossible for a user to see any predictable pattern. However, if you require more randomness in your maps then, as you suggested, you could make things a lot more random than they currently are. A simple way to do this would be to insert each slice back into the array at a random position when returning them to the object pool.
Thanks.
this doesn’t work with PIXI.js v3, the loader syntax is different