Another ‘Lost Recipe’ Released

Well I thought it was about time I dug out another ‘lost recipe’ from my Flash iOS Apps Cookbook. This one shows how to stream remote video to a device and was originally intended for Chapter 12, Working with Video and Audio.

You’d have thought this recipe would have been a strong candidate to make it to print, but unfortunately I decided to drop it for a couple of reasons. First, there was the pressing need to reduce the book’s page count. I already had a recipe detailing how to work with local video and I guessed that more developers would have a need for that rather than working with remote video.

Additionally, at the time of writing there was a bug with the NetStream class that meant that certain buffering events weren’t being fired when working with Stage Video. Rather than running the risk of readers thinking there was an issue with my code, I felt it would be safer to simply remove the material.

Hope you find it useful.

Playing Remote Video

It’s often convenient to playback video remotely from a web server rather than bundling it directly within your app. This is necessary, for example, in apps where the user has to select from a collection of dynamically uploaded video.

Let’s see how to progressively download either an FLV or H.264 video from the web and handle buffering of that video.

Flash iOS Apps CookbookThis tutorial is a previously unreleased recipe from Flash iOS Apps Cookbook and supplements the content found in Chapter 12, Working with Video and Audio.
Flash iOS Apps Cookbook provides the recipes required to build native iOS apps using your existing knowledge of the Flash platform. Whether you want to create something new or simply convert an existing Flash project, the relevant steps and techniques are covered, helping you achieve your goal.

Getting Ready

Depending on your preferred video format we’ll work from either the code you wrote as part of Playing Local FLV Video or Playing Local H.264 Video. Alternatively, download this recipe’s accompanying code bundle and use it as a starting point.

For FLV video, open chapter12/recipe8-flv/recipe.fla and use it as a starting point. Alternatively, for H.264 video, open chapter12/recipe8-mp4/recipe.fla. H.264 video is only available to those using the AIR 3.0 SDK and above.

Both FLAs have had a movie clip named bufferingIcon added to the center of their stage. We’ll show this clip whenever the video is buffering.
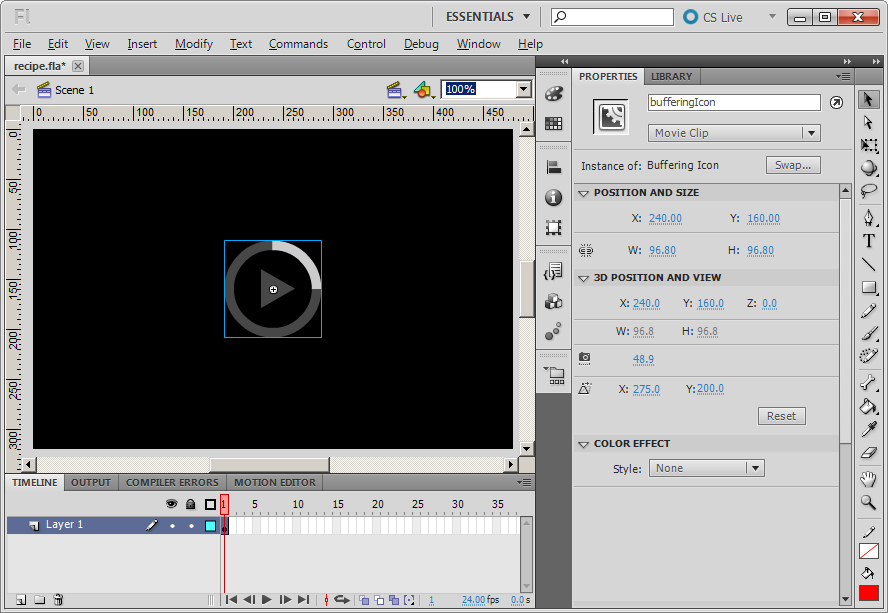
View of your FLA's stage.

If you examine either FLA’s AIR for iOS settings you’ll see that, unlike the local equivalents, there’s no need to bundle the video with the app. Instead we’ll upload the corresponding video to a web server. If you don’t have access to a web server then you’ll need to purchase a package from one of the many available web hosting companies.

Alternatively set one up locally on your development computer. Microsoft Windows users can set-up IIS: www.howtogeek.com/howto/windows-vista/how-to-install-iis-on-windows-vista, while Mac OS X users can configure and run the built-in Apache web server: http://macdevcenter.com/pub/a/mac/2001/12/07/apache.html.

If you already have access to a web server then you’ll likely have an FTP client for uploading content to your space. If not then consider installing FileZilla. It’s free and can be downloaded from filezilla-project.org for both Windows and Mac OS X.

Once ready, upload either chapter12/resources/video.flv or chapter12/resources/video.mp4 to a suitable location on your web server.

How to do it…

Perform the following steps.

  1. Open your FLA’s document class.
  2. Add an additional import statement to it:
    import flash.events.NetStatusEvent;
  3. Within the constructor, make the following changes to your NetStream object, allowing the buffering of the video to be managed:
    netStream = new NetStream(netConnection);
    netStream.client = this;
    netStream.bufferTime = 4;
    netStream.addEventListener(NetStatusEvent.NET_STATUS, statusUpdated);
  4. Staying within the constructor, find your existing call to the NetStream object’s play() method and alter it to load your remote video rather than a local version. For FLV video your code should look like this:
    netStream.play("http://www.yourdomain.com/video.flv");

    If you’re working with H.264 video then change the existing code to this:

    netStream.play("http://www.yourdomain.com/video.mp4");
    In either of the above calls to play(), replace www.yourdomain.com with the URL to the folder on your own personal web server where you uploaded the FLV or H.264 video to.
  5. Now add an event handler that sets the visibility of the buffering icon depending on the status of the NetStream object’s buffer:
    private function statusUpdated(e:NetStatusEvent):void {	
      switch(e.info.code)
      {
        case "NetStream.Buffer.Empty":		
          bufferingIcon.visible = true;
          break;
    
        case "NetStream.Buffer.Full":
          bufferingIcon.visible = false;
          break;
      }
    }

    We’ll show the icon whenever the video buffer is filling and remove it from view when video playback is about to take place again.

  6. Save your document class and move back to the FLA.

    Streaming video onto your device.

  7. Publish the FLA and test the app on your device. When launched it will connect to your web server and begin loading the video. When enough data has downloaded, the video will start playing.

How it works…

The ActionScript required to play a video from the web isn’t that dissimilar to the playback of a local video. In both cases, a technique known as progressive downloading is employed, where playback begins after the video has partially loaded. This allows playback to begin as soon as possible without the whole video having to first be loaded and held in memory. You’re probably already familiar with this type of video streaming as it’s used by popular sites such as YouTube and Vimeo.

To enable progressive downloading, the NetStream object holds an internal buffer, which is filled with video data as it becomes available. Once filled, playback of the buffer’s data will commence. As video data is played, it’s removed from the buffer and eventually discarded from memory.

With progressive downloading of video, the hope is to always have enough video data held within the buffer to produce seamless playback of the video. If the video data is being consumed faster than the buffer is being filled, then the buffer will eventually become empty. When this happens, the video is paused until the buffer is large enough for playback to resume again.

When playing local video from the file system it’s unlikely that the video buffer will ever become empty as your application will have almost immediate access to the data. However, this won’t be the case with remote video and the number of interruptions during playback will depend on the video’s size, the device’s download speed, and the bandwidth capabilities of the server hosting the video.

The NetStream class provides the bufferTime property, which can be used to dictate how many seconds of video data should be contained within the buffer before playback can commence. The larger this value, the longer the user will have to wait before the video initially starts playing, but the less likely it will be that the buffer becomes empty during playback.

It’s possible to monitor the status of the buffer by listening for the NetStream object dispatching NetStatusEvent.NET_STATUS. By examining this event’s info.code property you can determine when the buffer has become empty, and when it has filled again. This is useful as it allows you to inform the user that the app is currently waiting for more video data in order to continue playback. In this recipe’s example code, we did this by making the bufferingIcon movie clip visible when the buffer became empty. When it filled again, we hid the movie clip from view, providing the user with an unobstructed view of the resumed video.

When downloading video from the web, it’s advisable to warn the user beforehand. After all, if they’re using a carrier’s cellular network at the time then they could incur significant data costs.

There’s more…

The NetStatusEvent object can be used to determine the status of more than just the NetStream object’s buffer.

NetStream Status

The NetStatusEvent object is dispatched in response to a plethora of useful status changes, errors and warnings. Here are just a few strings that the info.code property can be queried for:

  • NetStream.Play.Start: Playback has started.
  • NetStream.Play.Stop: Playback has stopped.
  • NetStream.Play.StreamNotFound: The video file cannot be found.
  • NetStream.Play.InsufficientBW: The client does not have sufficient bandwidth to play the video at its intended frame rate.
  • NetStream.Pause.Notify: The stream has paused.
  • NetStream.Unpause.Notify: The stream has un-paused.
  • NetStream.Buffer.Flush: Playback has ended and the buffer is now empty.

You can determine the code’s type by examining the info.level property, which will be set to one of the following strings: status, error or warning. For a comprehensive list of supported strings, perform a search for flash.events.NetStatusEvent within Adobe Community Help.

The flash.net.NetConnection object also dispatches NetStatusEvent objects, which you can listen for.

Streaming Video with Flash Media Server

While it’s not covered within this book, it’s possible to stream video from a Flash Media Server using the NetConnection and NetStream classes. Flash Media Server is a server solution optimized to deliver real-time media and is ideal for high-volume websites where performance and reliability are critical.

See also
HTML5 Bubbles (with Flash’s Help)

You’re probably sick of these bubbles. They’ve already popped up in my book, a recent Starling tutorial I wrote, and now here they are again. So what’s different this time? Well, if you right-click on any of them you’ll notice something odd. That’s right, there’s no Adobe Flash Player driving them. Unlike my other bubble demo’s, this one’s powered by JavaScript and HTML5’s canvas tag.

It doesn’t mean I’ve ditched Flash though. In fact, I used Flash Professional to create the artwork and fancy wobbling bubble animation. The code however was written entirely in JavaScript. Witchcraft you say? Yeah we’ll I suppose you’re not that far off. All this magic is made possible by Flash Professional CS6’s Toolkit for CreateJS, and Grant Skinner’s rather impressive CreateJS JavaScript framework.

The Toolkit for CreateJS is an extension for Flash Professional that exports a FLA’s contents to HTML5. Once exported, you can write JavaScript to manipulate and add interactivity to that content by taking advantage of CreateJS’s libraries.

As a seasoned ActionScript developer, I was pleasantly surprised at just how familiar the CreateJS APIs felt. If you have Flash Professional CS6 then I recommend you download the Toolkit for CreateJS and give it a spin. If you don’t have CS6, then I think CreateJS is a great reason to upgrade.

Oh, and pop the bubbles by left-clicking them.

Six Open Source Native Extensions

Firstly, if you haven’t already seen it in action, then download Song Pop from the Apple Store or Google Play. It’s a great little song recognisation game that lets you challenge your friends. What’s more, it was written using Adobe AIR and is a perfect example of what can be developed using the Flash platform when targeting mobile.

Interestingly, FreshPlanet, the team behind Song Pop, has generously open sourced six native extensions that were used in the project. They are:

  • Facebook mobile SDK
  • In-App-Purchase
  • Flurry Analytics
  • Push Notification
  • Background Music Management
  • Network Information

You can download them from GitHub and you’ll be pleased to know that they can be used for both iOS and Android projects.

Good to see so many great native extensions being made available, and I might just use the Flurry Analytics one in an upcoming project.

Managing the AIR SDK in Flash Professional CS6

Sometimes it’s the little things that make such a big difference. If you’ve been using Flash Professional CS5.5 then you’ll know what a chore it is to overlay the latest AIR SDK onto your installation. Well the good news is, if you upgrade to Flash Professional CS6 then all that hardship will be a thing of the past.

It’s now possible to install and manage various AIR SDKs within Flash Professional CS6’s IDE. To show just how easy it is let’s walk through the steps involved to install the latest AIR 3.3 public beta.

  1. Download the Adobe AIR 3.3 SDK Beta archive from Adobe Labs.
  2. Copy the archive to your desktop and extract it to a folder.
    After unzipping you should be left with a folder named air3-3_p3_sdk_win_050412 on your Windows desktop and a folder named air3-3_p3_sdk_mac_050412 on Mac OSX.
  3. Now launch Flash Professional CS6.
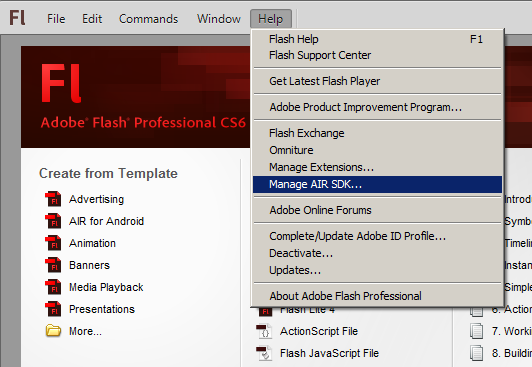
  4. From Flash Professional select Help | Manage AIR SDK from it’s drop-down menu.
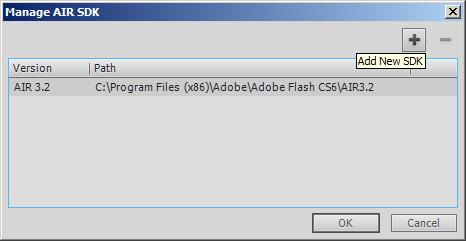
  5. The Manage AIR SDK panel will appear. Click on the Add New SDK icon, which is represented by a + symbol. You’ll be asked to select an AIR SDK to be installed. Simply browse to your desktop and select the AIR 3.3 SDK folder.
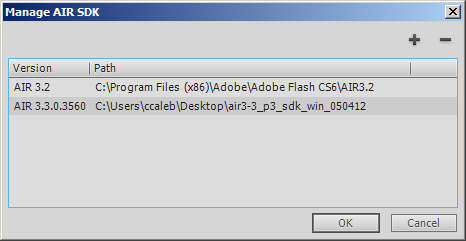
  6. The AIR 3.3 SDK will be added to the list of installed SDKs within the Manage AIR SDK panel.
  7. Now click OK to close the panel.

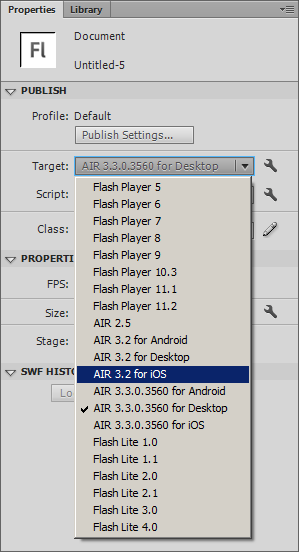
Congratulations, you’ve successfully installed the latest AIR SDK. Whenever you create a new AIR document within Flash Professional CS6, the AIR 3.3 SDK will be used by default. You can however revert back to the default AIR SDK, or select from any other versions of the AIR SDK that you have installed.

This can be done from either your FLA’s Properties panel, or from the Publish Settings panel. Simply select the desired SDK from the Target drop-down box. As you can see from the screenshot below, each AIR SDK can be used to target desktop, iOS, and Android.

So there you have it. Each new AIR SDK can be installed and used within Flash Professional CS6 with only a few simple steps.

Learning Games for iOS

Frosby Design has just released its latest iOS kids educational app – Frosby Learning Games. It was developed using Adobe AIR and Flash Professional CS5.5, and has also been featured in Apple’s App Store in the US, UK, Australia and China.

It’s a great little app for toddlers and young children, containing a collection of fun activities to help with early learning skills and language. My little nephew had a brilliant time playing it. He laughed his little head off when we had to find mice hiding in a block of cheese, and also seemed to love feeding worms to a mole a little later on too.

For more details take a look at Frosby’s official Facebook page. Also, Frosby Design is looking to hire London based Flash game developers to work with on future apps. If you have any ActionScript 3 game demos, then contact Matt Wasser at matt [at] frosby [dot] net.

Frosby Learning Games is available on iPhone, iPod touch, and iPad.

Excerpt on Adobe’s Developer Connection Site

I’m delighted to announce that, along with a photo of my big ugly mug, Adobe are currently featuring an excerpt from my Flash iOS Apps Cookbook. So if you’re undecided about making a purchase then why not head on over to their Developer Connection website where you can download Chapter 15, ActionScript Optimization in its entirety. It’s full of practical code examples and good advice for squeezing the best performance out of your iOS apps.

Flash iOS Apps Cookbook – The lost recipes

When writing a book there are many tough decisions to be made. Perhaps the most agonising for me was deciding what to keep and what to drop. With an agreed page count to stick to I found that I simply couldn’t cram everything I wanted to into my Flash iOS Apps Cookbook.

So during the revision process I went about cutting out certain code recipes that I felt I could probably do without. Some of them simply didn’t fit the structure of the book and were clear candidates. Others had limited real-world use cases, or weren’t aimed at the book’s target audience. In the end we probably removed around 100 pages worth of content.

I thought it would be worth resurrecting some of that material and making it available from my blog. There’s no particular order and some of it went through more revisions than others. I’ll start with a couple of recipes that were originally intended for Chapter 11, Rendering Web Pages. Both detail bi-directional ActionScript/JavaScript communication and are worth a read if you’re planning to make use of AIR’s StageWebView class. Anyway, enjoy and I’ll see what else I can dig out for you over the coming months.

JavaScript to ActionScript Communication

While ActionScript to JavaScript communication is straightforward, JavaScript to ActionScript communication is less obvious and somewhat limited when working with the StageWebView class.

In this tutorial we’ll walk through the steps required to pass data from an HTML page to your AIR for iOS app.

Flash iOS Apps CookbookThis tutorial is a previously unreleased recipe from Flash iOS Apps Cookbook and supplements the content found in Chapter 11, Rendering Web Pages.

Flash iOS Apps Cookbook provides the recipes required to build native iOS apps using your existing knowledge of the Flash platform. Whether you want to create something new or simply convert an existing Flash project, the relevant steps and techniques are covered, helping you achieve your goal.

Getting ready

As with the majority of recipes presented in this chapter, the steps covered here are only applicable to those using AIR 2.6 and above.

From this recipe’s accompanying code bundle, open chapter11\recipe8\recipe.fla and use it as a starting point.

Included within the FLA’s AIR for iOS Settings is a folder named html, which contains the HTML page that will be used to pass data to your app. The HTML is basic and displays a form with two fields prompting the user for their forename and surname. When the user submits the form, a JavaScript function on the page will attempt to pass the value of both fields to your AIR for iOS app.

Sitting on the stage is a dynamic text field with an instance name of output. We’ll use this to display the data retrieved from the HTML page.

Before proceeding, use a text editor of your choice to familiarize yourself with the HTML and its JavaScript. It can be found at chapter11\recipe8\html\index.html.

Now let’s write some ActionScript to retrieve the data.

How to do it…

Perform the following steps:

  1. Create a new document class and name it Main.
  2. Add the following import statements:
    import flash.events.LocationChangeEvent;
    import flash.filesystem.File;
    import flash.geom.Rectangle;
    import flash.media.StageWebView;
    import flash.net.URLVariables;
  3. Declare a StageWebView member variable:
    private var webView:StageWebView;
  4. Within the constructor, load html/index.html and listen for the LOCATION_CHANGING event being dispatched from the StageWebView object:
    public function Main() {	
      var url:String = File.applicationDirectory.resolvePath(
        "html/index.html").nativePath;
    
      webView = new StageWebView();
      webView.stage = stage;
      webView.viewPort = new Rectangle(
        0, 0, stage.stageWidth, stage.stageHeight);
      webView.addEventListener(
        LocationChangeEvent.LOCATION_CHANGING, locationChanging);
      webView.loadURL(url);
    }
  5. Finally, add a handler for the LOCATION_CHANGING event, which will obtain the data passed from the HTML page and display it on screen:
    private function locationChanging(e:LocationChangeEvent):void {
      var arr:Array = e.location.split(".html?");
      var vars:URLVariables = new URLVariables(arr[1]);
      output.text = (vars.first + " " + vars.last);
      webView.stage = null;
      webView.dispose();
      e.preventDefault();
    }
  6. Save the class and when prompted, name its file Main.as.
  7. Move back to your FLA and save it too.
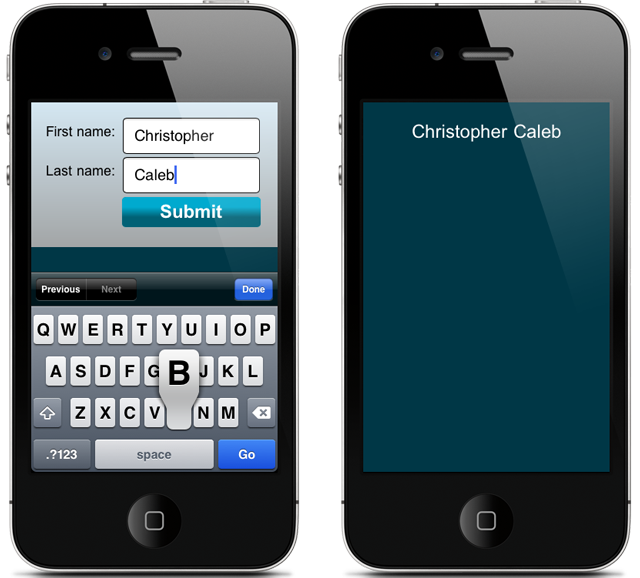
  8. Receiving text from an HTML page.

  9. Now publish the FLA and test it on your device. Once the HTML page loads, enter your forename and surname into the form’s fields, then tap the Submit button. The HTML page will disappear from view and the value of both fields will be written to the output text field.

How it works…

It’s possible to pass data from an HTML page to an AIR for iOS app by making use of the StageWebView class’ location property and the LOCATION_CHANGING event. This is achieved by having JavaScript change the page’s location to a URL that contains encoded data. The changed URL can then be obtained from the LOCATION_CHANGING event’s handler and the data extracted from it.

Here’s the JavaScript function from index.html:

<script type="text/javascript">
  function passData() {
    document.location = (
      "?first=" + encodeURIComponent(field1.value) + 
      "&last="  + encodeURIComponent(field2.value));
  }
</script>

This function is called when the user presses the Submit button on the page. Notice that it sets document.location to an encoded string of name-value pairs. The two fields within the HTML page’s form have IDs of field1 and field2 respectively, and the value of each is used to create the string.

For example, if the user was to enter Christopher into the first field and Caleb into the second, then the JavaScript function would set document.location to the following:

?first=Christopher&last=Caleb

In addition, the absolute path to the current HTML document is also prefixed resulting in the location actually resembling the following:

///var/mobile/Applications/4D7985D8-029A-4E03-85CC-E77ECD38C987/recipe8.app/html/index.html?first=Christopher&last=Caleb

When the JavaScript changes the document’s location, the StageWebView object will dispatch a LOCATION_CHANGING event, which will be captured by the locationChanging() handler. The data can then be retrieved by querying the event’s location property. Since name-value pairs are used to represent the data, we can use Flash’s URLVariables class to easily extract the value of each:

private function locationChanging(e:LocationChangeEvent):void {
  var arr:Array = e.location.split(".html?");
  var vars:URLVariables = new URLVariables(arr[1]);
  output.text = (vars.first + " " + vars.last);
  webView.stage = null;
  webView.dispose();
  e.preventDefault();
}

In the code snippet above, the split() method is used to extract the name-value pairs from the location’s string. The name-value pairs are then passed to the URLVariable class’ constructor.

Although the JavaScript function changed the page’s location property, we have no desire to actually move to a new page – we simply needed a mechanism for passing data. A call is therefore made to the event object’s preventDefault() method, stopping the new URL from actually loading. This is convenient as the new URL simply contains data and would result in a load error if the operation was to commence.

Also, this recipe used name-value pairs, but you can just as easily use some other data format such as JSON.

For more information regarding the URLVariables class, perform a search within Adobe Community Help.

There’s more

You may find bi-directional ActionScript/JavaScript communication cumbersome when using the StageWebView class. There is however, a third-party library available that removes much of the pain.

StageWebView Bridge

StageWebViewBridge is an extended version of the StageWebView class. It makes working with HTML content easier by providing an API that lets you do the following:

  • Call JavaScript functions from ActionScript
  • Call ActionScript functions from JavaScript
  • Load local files and resources

Although these things can already be done using StageWebView, the StageWebViewBridge class provides a layer of abstraction that helps remove much of the effort involved.

You can obtain the latest version of StageWebViewBridge from its Google Code Project page at code.google.com/p/stagewebviewbridge.

See also

ActionScript to JavaScript Communication

Although limited, the StageWebView class makes it possible for an app to directly call a JavaScript function embedded within an HTML page.

Let’s walk through the steps required to call a JavaScript function from ActionScript.

Flash iOS Apps CookbookThis tutorial is a previously unreleased recipe from Flash iOS Apps Cookbook and supplements the content found in Chapter 11, Rendering Web Pages.

Flash iOS Apps Cookbook provides the recipes required to build native iOS apps using your existing knowledge of the Flash platform. Whether you want to create something new or simply convert an existing Flash project, the relevant steps and techniques are covered, helping you achieve your goal.

Getting ready

You’ll need AIR 2.6 or above for this recipe.

From this recipe’s accompanying code bundle, open chapter11\recipe7\recipe.fla and use it as a starting point.

Bundled within the FLA’s AIR for iOS settings is an HTML file named index.html. Embedded within the HTML is a JavaScript function named setMessage(), which takes a string argument and writes it to the HTML page.

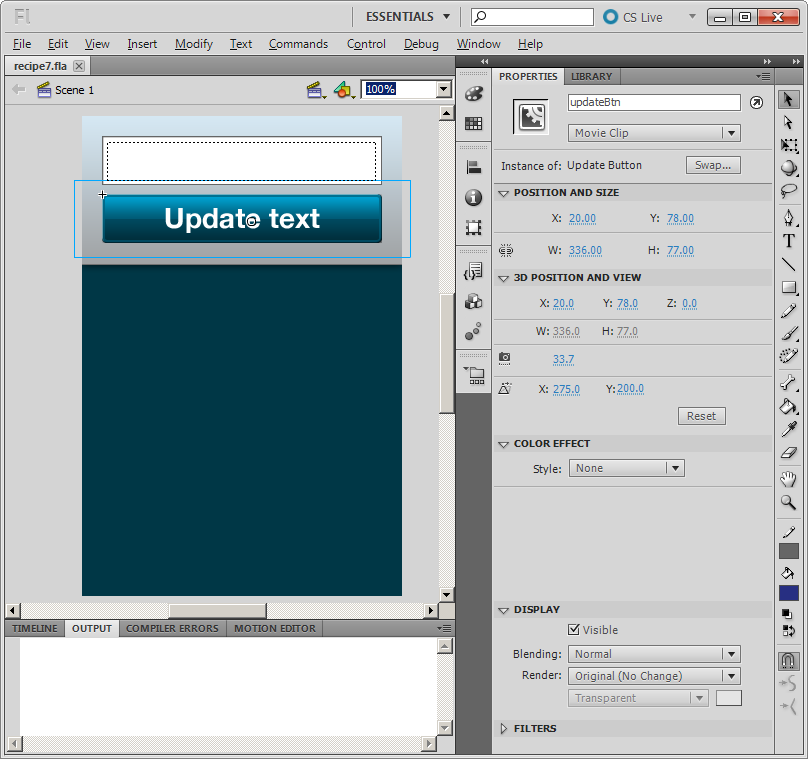
Sitting on the FLA’s stage is an input text field named inputField and a movie clip with an instance name of updateBtn. When the user taps the updateBtn movie clip, we’ll send any text within inputField to the HTML page’s setMessage() function.

View of your FLA's stage.

Essentially, we’ll write code to pass a message entered within the app directly to a StageWebView object’s HTML, where it will be displayed.

Before proceeding, use a text editor of your choice to familiarize yourself with the HTML and its JavaScript. It can be found at chapter11\recipe7\html\index.html.

Let’s go ahead and write this recipe’s ActionScript.

How to do it…

Perform the following steps:

  1. Create a new document class and name it Main.
  2. Add the following import statements and declare a StageWebView member variable:
    package {
    
      import flash.display.MovieClip;
      import flash.events.MouseEvent;
      import flash.filesystem.File;
      import flash.geom.Rectangle;
      import flash.media.StageWebView;
      
      public class Main extends MovieClip {
    	
        private var webView:StageWebView;
    		
        public function Main() {
          // constructor code
        }
      }
    }
  3. Within the constructor, load the local web page and listen for the updateBtn movie clip being pressed. Position the web page’s viewport below the movie clip:
    public function Main() {
      var url:File = File.applicationDirectory.resolvePath(
        "html/index.html");
    			
      webView = new StageWebView();
      webView.stage = stage;
      webView.viewPort = new Rectangle(
        0, 160, stage.stageWidth, stage.stageHeight-160);
      webView.loadURL(url.nativePath);
    			
      updateBtn.addEventListener(MouseEvent.MOUSE_UP, pressed);
    }
  4. Finally, add the updateBtn movie clip’s event handler. Within it, call the web page’s setMessage() JavaScript function, passing it any text entered by the user:
    private function pressed(e:MouseEvent):void {
      var message:String = encodeURIComponent(inputField.text);
      webView.loadURL(
        "javascript:setMessage('" + message + "');");
    }
  5. Save the class and name its file Main.as when prompted.
  6. Move back to your FLA and save it.
  7. Passing text to an HTML page.

  8. Publish the FLA and test it on your device. Enter some text into the input text field and tap the Update text button. The text will be sent to the HTML page where it will be displayed.

How it works…

ActionScript to JavaScript communication is performed via the StageWebView class’ loadURL() method. Once a page is fully loaded you can use the javascript: URI scheme to invoke any functions that are declared within a StageWebView object’s web page. Take a look at the following example:

webView.loadURL("javascript:doSomething();");

This will call a JavaScript function named doSomething().

Parameters can also be passed:

webView.loadURL("javascript:setName('Tom', 'Waits');");

The call above passes two strings to a setName() function – Tom and Waits.

For this recipe, the text entered by the user was passed to the HTML page’s setMessage() JavaScript function. First it was URL-encoded using Flash’s top-level encodeURIComponent() function:

var message:String = encodeURIComponent(inputField.text);
webView.loadURL("javascript:setMessage('" + message + "');");

All strings passed from ActionScript to JavaScript should be URL-encoded, since certain characters, such as spaces, can cause problems for the StageWebView object’s URL parser. This is a common mistake and can be difficult to track. Take the following call as an example:

webView.loadURL("javascript:setMessage('Hello World');");

This will fail due to the un-encoded space within the string Hello World. The following is correct:

var message:String = encodeURIComponent("Hello World");
webView.loadURL("javascript:setMessage('" + message + "');");

Be careful when making calls to JavaScript. No errors are thrown if the function you are calling doesn’t exist or throws a run-time error. Your call will simply silently fail, making debugging difficult.

It’s also not possible to directly receive a return value from a JavaScript function using loadURL(). You’ll need to apply a little creative coding if you want to receive data from the JavaScript-side. Take a look at the next recipe, JavaScript to ActionScript communication, for more detail.

There’s more…

Here’s some additional detail.

Calling in response to page events

For this recipe we made our JavaScript call in response to the user pressing a button. It is however, perfectly acceptable to make a call as soon as an HTML page loads by listening for either Event.COMPLETE or LocationChangeEvent.LOCATION_CHANGE being dispatched by the StageWebView object.

Calling built-in JavaScript functions

It’s not possible to directly invoke JavaScript’s built-in functions using the loadURL() method. For example:

webView.loadURL("javascript:alert('Hello World');");

This line of ActionScript will not force an alert dialog to appear within the StageWebView. Instead the alert() would have to be placed inside a custom function that exists on the page.

JavaScript injection

JavaScript injection cannot be performed using the loadURL() method either. Take a look at the following:

webView.loadURL("javascript:var name='Christopher';");

The above attempt will fail to declare and initialize a variable called name.

See also