Learn how to build rich HTML5 applications with content exported using Flash Professional CS6’s Toolkit for CreateJS.
What you will learn…
- The fundamentals of the CreateJS suite of JavaScript libraries
- How to publish Flash Professional CS6 assets for use with CreateJS
- How to write JavaScript that utilizes your exported content
What you should know…
- You should be comfortable working with Flash Professional
- A familiarity with ActionScript or JavaScript is required
The ubiquity of HTML5 makes it the ideal technology for the delivery of rich web-based content across a wide range of devices and platforms. While various JavaScript code libraries and frameworks exist for the benefit of developers, there has been a serious lack of tooling to aid designers wishing to create rich expressive content. This has been particularly problematic for those accustomed to Flash Professional’s powerful illustration and animation capabilities. Just how do you create equivalent content when targeting HTML5?
With the release of Flash Professional CS6, Adobe has solved this problem by providing the Toolkit for CreateJS – an extension that takes animated content created in Flash and exports it to HTML5. Once exported, developers can write JavaScript to manipulate and add interactivity to the content by taking advantage of the popular CreateJS framework.
This tutorial will take you through the entire designer-developer workflow. You’ll learn how to export the contents of a FLA to HTML5, before adding interactivity to it using JavaScript and the CreateJS framework. We’ll be creating an underwater scene complete with animating air bubbles (Figure 1) that rush towards the surface. We’ll also add a little interactivity, allowing the user to pop any of the bubbles by clicking on them. The major difference being that this time we’ll be targeting HTML5 within the browser rather than the Flash runtime.
Figure 1. Designed in Flash but running in HTML5.
Getting Started
You’ll need Flash Professional CS6 to work through this tutorial. A trail version can be downloaded from www.adobe.com/downloads.
The Toolkit for CreateJS is a complimentary extension for Flash Professional CS6 that can be downloaded from www.adobe.com/go/downloadcreatejs. Once downloaded, simply double-click the .zxp file to install it through Adobe Extension Manager CS6. Adobe are committed to updating the toolkit’s capabilities on a quarterly basis, so check the CreateJS Developer Center from time to time for any new versions.
For development work you’ll need a suitable code editor or IDE. I’ll be using Sublime Text 2, a trial version of which can be downloaded from www.sublimetext.com/2.
Finally, a FLA has been prepared for you to work with. Download it from www.yeahbutisitflash.com/downloads/toolkit-for-create-js-tut/bubbles.fla and open it within Flash Professional CS6.
Creating Assets within Flash Professional CS6
Let’s begin by taking a look at the FLA. It contains a mixture of vector and bitmap content that’s used to represent our underwater scene.
Sitting on the stage is a movie clip with an instance name of background. The movie clip itself contains a bitmap that represents the underwater scene’s background image.
The rest of our content doesn’t sit on the stage, but can instead be found in the library. If you move to the Library panel you’ll find a symbol named Bubble that will be used for each of the scene’s bubbles. Double-click the symbol to move to its timeline.
Its timeline consists of 48 frames of animation. It’s a fairly conventional animation that uses classic tweening to skew the bubble, giving the illusion of it changing shape while underwater. The bubble itself consists of vector artwork making it scalable without the loss of fidelity. This is useful as we’d like to add bubbles of varying sizes to the scene at runtime.
In order to add bubble instances at runtime, we’ll need to provide the Bubble symbol with a linkage class name. To do that, simply right-click on the Bubble symbol within the library and select Properties from the context menu (Figure 2). From the Symbol Properties panel, ensure that the Advanced section is expanded and click the Export for ActionScript checkbox (Figure 3). Doing so will provide the Bubble symbol with a default class name of Bubble. It’s this class name that we’ll use within our JavaScript code to dynamically create instances of the bubble at runtime.
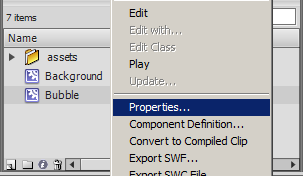
Figure 2. Moving to the symbol's Properties panel.
Now click the OK button to close the panel. If an ActionScript Class Warning panel appears, simply press its OK button to dismiss it. The warning panel is simply informing us that the Flash IDE cannot find a class named Bubble and that it will automatically create one for us. This is fine and is exactly what we want.
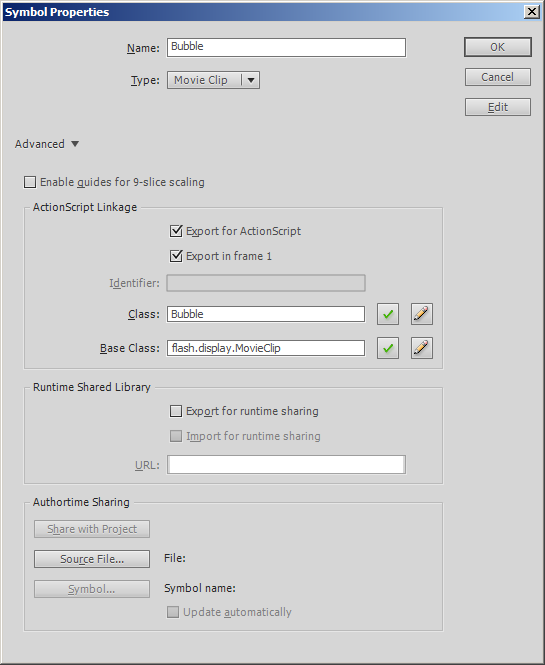
Figure 3. Adding a class linkage to the Bubbles symbol.
It’s worth bearing in mind that while we associated an ActionScript linkage class to our bubble, when exporting our content to HTML5, this linkage class name will be available to the programmer as a JavaScript class.
With that we’re now ready to export our FLA’s contents to HTML5. First save your work.
Publishing for CreateJS
Publishing to HTML5 is actually very simple and is taken care of by the Toolkit for CreateJS panel. You can open the panel by selecting Window | Other Panels | Toolkit for CreateJS from Flash Professional CS6’s drop-down menu. For easy access, feel free to dock the panel.
The panel (Figure 4) allows you to adjust various publish settings. While we’ll stick to the defaults, some are worthy of our attention before proceeding.
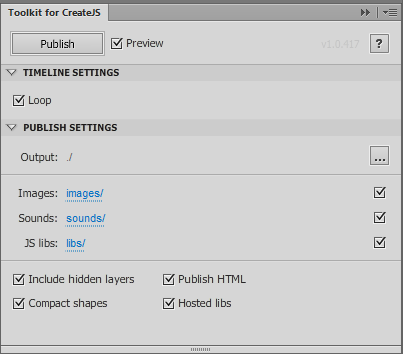
Figure 4. The Toolkit for CreateJS panel.
Near the panel’s bottom-right is the Hosted libs checkbox. After publishing to HTML5, the generated HTML file will require the use of various JavaScript libraries from the CreateJS suite. To save the developer having to download and host these libraries, the HTML file, by default, will use versions of the libraries that are hosted on a remote content delivery network.
There’s also an Include hidden layers checkbox, which is used to export HTML5 for any content sitting on guided layers. While I’d normally encourage you to uncheck this, for this tutorial there’s no need as our FLA has no hidden layers.
The panel also contains various publish paths, including where the generated output files will be written to. By default, the FLA’s root folder is used. Again, this is fine for the purpose of this tutorial.
Now go ahead and click the panel’s Publish button to export your FLA’s content as HTML5. After a brief moment, your default web browser will launch and you’ll see the contents of your FLA’s stage sitting within the browser. While you’d normally expect this content to be running within the Flash Player, this time it’s actually using HTML and JavaScript. You can confirm this by right-clicking within the browser window (Figure 5). There will be no mention of Flash Player anywhere within the context menu.
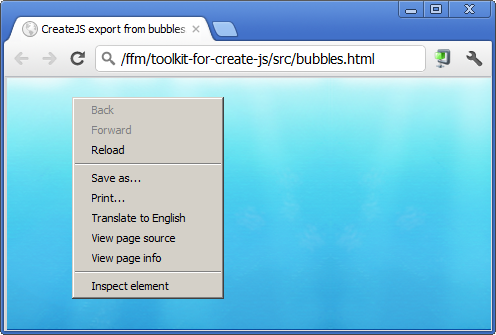
Figure 5. Look! No Adobe Flash Player.
Effectively you’re looking at an HTML5 representation of the SWF that you’d normally publish from your FLA.
The CreateJS Output Files
At the moment, our HTML doesn’t do much. It simply shows the bitmap image that was sitting on our stage. We’ll address that soon enough by writing some JavaScript to bring our underwater scene to life, but first let’s take a look at what was generated during publication (figure 6).
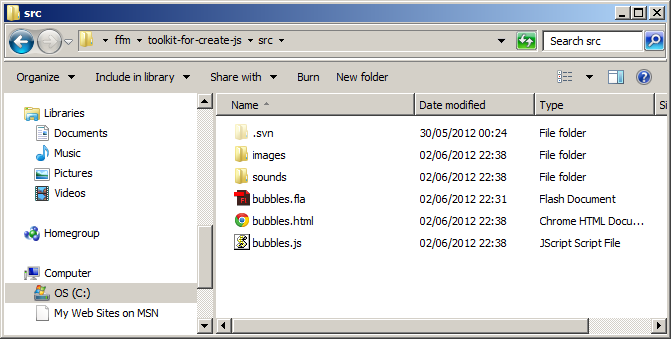
Figure 6. The files generated by the Toolkit for CreateJS panel.
You should see that the following two sub-folders and two files were created within your FLA’s root folder:
images – Any bitmap images used by your FLA are kept here.
sounds – Any sound files used by your FLA are kept here.
bubbles.html – An HTML file that is created to allow you to preview your output in the browser.
bubbles.js – This file contains the JavaScript required to represents any symbols sitting on your stage and within the library.
If you’d unchecked the Hosted libs checkbox then a third sub-folder named libs would have been created to house each of the required CreateJS libraries.
What Exactly is CreateJS?
As we’ve just seen, the contents of our FLA’s library are magically represented within a JavaScript file named bubbles.js. But how is this possible?
Well, it’s made possible by CreateJS, which provides a suite of JavaScript APIs that can be used to represent the complex artwork that is created within the Flash Professional IDE. The generated bubbles.js file simply contains calls to these APIs in order to recreate each of your library’s assets.
CreateJS consists of the following libraries:
EaselJS – Enables rich graphics and interactivity with HTML5 Canvas.
TweenJS – A tweening library that integrates with EaselJS.
SoundJS – Provides audio playback functionality.
PreloadJS – Manages and co-ordinates the loading of assets.
When you’re developing your own applications, it’s likely that you’ll make use of the CreateJS suite to further manipulate and interact with the content exported from your FLA.
This tutorial will really just scratch the surface of these powerful libraries but I encourage you to spend as much time as possible exploring the documentation on the official CreateJS website at www.createjs.com.
Understanding the Published JavaScript
Each time you publish using the Toolkit for CreateJS panel, an HTML and JavaScript file will be generated. The HTML file is the entry point and when opened within your browser, will play any content placed on your stage. The JavaScript file, as has already been explained, will contain the actual code necessary to represent that content.
Let’s take a look at that JavaScript file. Open bubbles.js within a text editor and examine the code.
You should notice that an object named lib is created, and that each property of that object is a class that represents a symbol from your FLA’s library. For example, here’s the JavaScript that defines the Bubble movie clip symbol from your library:
(lib.Bubble = function(mode,startPosition,loop) {
  this.initialize(mode,startPosition,loop,{},true);

  // Layer 1
  this.instance_2 = new lib.BubbleVector();
  this.instance_2.setTransform(0,0,0.4,0.4);

  this.timeline.addTween(
    cjs.Tween.get(this.instance_2).to({scaleY:0.4,skewX:3.3},11).to(
    {skewX:-3.1},24).to({scaleY:0.4,skewX:0},12).wait(1));

}).prototype = p = new cjs.MovieClip();
p.nominalBounds = new cjs.Rectangle(-157,-157,314.1,314.1);
The code itself is very readable. You can see an instance of BubbleVector (The BubbleVector class itself is defined earlier in the file) being added to the Bubble movie clip’s timeline:
this.instance_2 = new lib.BubbleVector();
this.instance_2.setTransform(0,0,0.4,0.4);
Followed by the definition of the tweening operations that are to be applied between the timeline’s keyframes:
this.timeline.addTween(
  cjs.Tween.get(this.instance_2).to({scaleY:0.4,skewX:3.3},11).to(
  {skewX:-3.1},24).to({scaleY:0.4,skewX:0},12).wait(1));
Quickly revisit the Bubble movie clip within your FLA’s library. Look at its timeline while reading over the code listed above and it should start to make a lot of sense.
Essentially, everything within your FLA’s library will be accessible via the lib object defined by the bubbles.js file. You can use the new keyword to create instances of these symbols then add them to the display list. Here’s an example:
var myBubble = new lib.Bubble();
stage.addChild(myBubble);
You could be forgiven for thinking that you’re looking at ActionScript, but the two lines of code above are in fact JavaScript. The CreateJS framework does a really great job of providing an API that should feel very familiar to Flash developers.
Take a final look through the code. You should see the following library symbols being declared: bubbles, Bubble, Background, background, and BubbleVector. All can be instantiated and added to your display list using JavaScript. Some are in fact instantiated within bubbles.js and used as child instances. You’ve already seen this in action, with BubbleVector being added to the display list of Bubble.
Understanding the Published HTML
Now that you’ve familiarized yourself with the bubbles.js file, let’s take a peek at the generated HTML file, bubbles.html. It’s within this file that your stage is created and updated.
At the top of the HTML file, you’ll see that the various libraries required from the CreateJS suite are loaded. Additionally, the bubbles.js file, which is the JavaScript version of your FLA’s library, is also included:
<script src="http://code.createjs.com/easeljs-0.5.0.min.js"></script>
<script src="http://code.createjs.com/tweenjs-0.3.0.min.js"></script>
<script src="http://code.createjs.com/movieclip-0.5.0.min.js"></script>
<script src="http://code.createjs.com/preloadjs-0.2.0.min.js"></script>
<script src="bubbles.js"></script>
At the bottom of the HTML file is an HTML5 canvas element, which is used to render your stage:
<body onload="init();" style="background-color:#D4D4D4">
  <canvas id="canvas" width="640" height="480"
   style="background-color:#ffffff"></canvas>
</body>
As you can see from the HTML snippet above, when the page is loaded, an init() function is called. Within this function, any image and sound resources are loaded using the PreloadJS library. If you can remember, our FLA’s stage had a movie clip that contained a bitmap image of our underwater scene. You can see the init() function below with the bitmap’s source path being listed within a manifest array, which is eventually passed to the preloader:
function init() {
  canvas = document.getElementById("canvas");
  images = images||{};

  var manifest = [
    {src:"images/background.png", id:"background"},
    {src:"images/flashlogo.png", id:"flashlogo"}
  ];

  var loader = new PreloadJS(false);
  loader.onFileLoad = handleFileLoad;
  loader.onComplete = handleComplete;
  loader.loadManifest(manifest);
}
The final chunk of work takes place within the handleComplete() function, which is called once all image and sound resources are loaded:
function handleComplete() {
  exportRoot = new lib.bubbles();

  stage = new createjs.Stage(canvas);
  stage.addChild(exportRoot);
  stage.update();

  createjs.Ticker.setFPS(30);
  createjs.Ticker.addListener(stage);
}
Three things take place here.
Firstly, a top-level container clip named lib.bubbles is instantiated and assigned to the exportRoot global variable. This container simply holds all the content that was originally sitting on your FLA’s stage.
Secondly, a JavaScript class that represents the stage is instantiated and exportRoot is added as a child. A call to the stage’s update() method forces its content to be drawn to the screen.
Finally, a static Ticker class is used to regulate the frame rate. The stage is added as a listener, which will ensure that its internal tick() method is called on every frame update, forcing a redraw.
You may also have noticed that several global variables are declared at the top of the HTML file:
var canvas, stage, exportRoot;
This permits access to these objects from anywhere within your code. The JavaScript version of your library can be accessed in a similar manner via the global lib object, which was defined within your bubbles.js file.
We’ll make good use of both the lib, canvas and stage objects throughout the remainder of this tutorial.
Getting Ready for Development
Now that you’ve familiarized yourself with the bubbles.js file, I think it’s about time we started writing some code. You could be tempted to simply start adding your JavaScript to the existing bubbles.html file, but there’s a problem with that approach. Every time you make alterations to your FLA and republish, your bubbles.html file will be overwritten.
Let’s get round this problem by creating a new HTML file to work from. Simply create a duplicate copy of the bubbles.html file and rename it BubblesDev.html. Test your BubblesDev.html file by opening it within a web browser. From now on, when developing, this is the file that you’ll use when testing your latest changes.
With that done we can finally start writing the JavaScript required to bring our underwater scene to life.
Creating a Main Loop
Every application requires a main loop. A main loop should be executed on every frame update and is an ideal location for handling an application’s high-level logic. To achieve this, we’ll create a custom tick() function for the static Ticker class to call, as opposed to it calling the stage’s internal tick() function. Think of this function as your stage’s ENTER_FRAME event handler.
Open BubblesDev.html within your text editor and add the following at the end of its script block:
function tick() {
  stage.update();
}
We’ll add more code to this function as we progress but for the time being it simply forces the stage to be redrawn.
We’ll also need to make a slight alteration within the file’s handleComplete() function. Change its final line of code from:
createjs.Ticker.addListener(stage);
to:
createjs.Ticker.addListener(window);
This will ensure that your custom tick() function is called instead of the stage’s.
Adding a Bubble
Although we now have a custom main loop, if you run BubblesApp.html within the browser, you won’t actually see anything different yet. Let’s rectify this by adding a bubble from our library onto the stage.
Add the following function at the end of your JavaScript block:
function setupBubbles() {
  var bubble1 = new lib.Bubble();
  bubble1.x = canvas.width / 2;
  bubble1.y = canvas.height / 2;

  stage.addChild(bubble1);
}
Its code should look fairly familiar and isn’t that dissimilar to the equivalent ActionScript. First off, an instance of the library’s Bubble symbol is created using the new keyword. Then the bubble1 instance is positioned in the center of the stage.
To center the bubble, we need to know the stage’s width and height. Unfortunately the global stage object does not provide width and height properties. However, we can retrieve this information from the global canvas object instead – this is the HTML5 canvas element that is used to represent our stage.
Finally, with the bubble’s position set, it is added to the stage’s display list using the stage object’s addChild() method.
Now all that’s required is to call the setupBubbles() function from a suitable location within your code. Add the call to the end of your handleComplete() function:
  createjs.Ticker.setFPS(30);
  createjs.Ticker.addListener(window);

  setupBubbles();
}
Now save your BubblesDev.html file and refresh your browser window. You should see an instance of the Bubble movie clip animating in the center of the stage (Figure 7). It really is quite impressive. You’re actually looking at a full HTML5 representation of your symbol’s vector artwork and timeline animation.
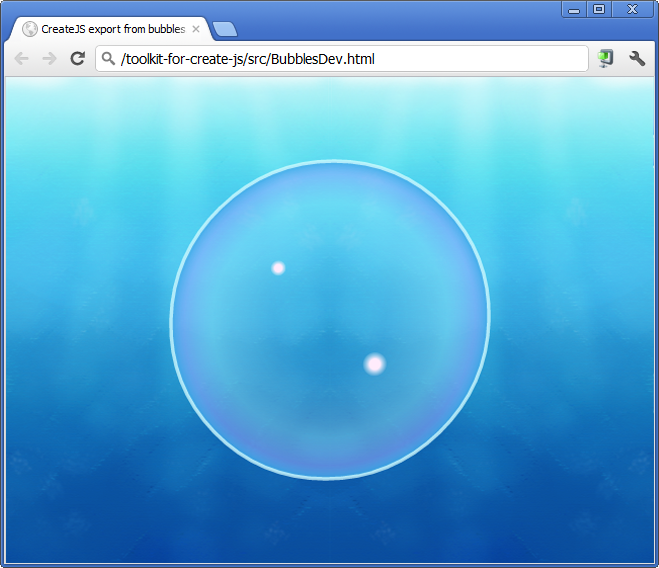
Figure 7. An HTML5 representation of your bubble movie clip.
Adding Another Bubble
Just like ActionScript, your CreateJS display objects can be scaled horizontally and vertically using the scaleX and scaleY properties. Let’s place a second bubble on the stage, and also apply a scale factor to both it and the previous bubble.
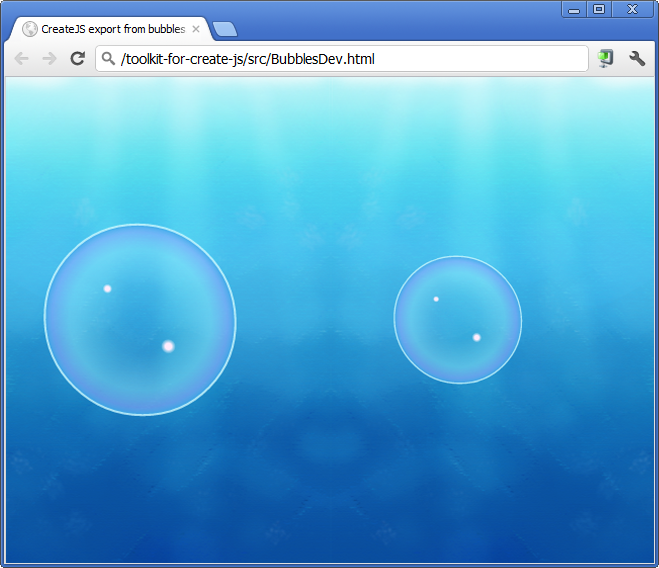
Figure 8. Positioning and scaling bubble instances.
While we’re at it, let’s also use each bubble’s width to position it away from the center of the stage. We’ll push the first bubble over to the left and the second bubble to the right (Figure 8). Make the following alterations to your setupBubbles() function:
function setupBubbles() {
  var bubble1 = new lib.Bubble();
  bubble1.scaleX = bubble1.scaleY = 0.6;
  bubble1.x = canvas.width / 2 - (bubble1.nominalBounds.width * bubble1.scaleX);
  bubble1.y = canvas.height / 2;

  var bubble2 = new lib.Bubble();
  bubble2.scaleX = bubble2.scaleY = 0.4;
  bubble2.x = canvas.width / 2 + (bubble2.nominalBounds.width * bubble2.scaleX);
  bubble2.y = canvas.height / 2;

  stage.addChild(bubble1);
  stage.addChild(bubble2);
}
The JavaScript above scales the first bubble to 60 percent of its original size. It then measures the width of the bubble, and pushes the bubble to the left of the stage’s center by that amount. Here are the two lines of code from the listing above that accomplish this:
bubble1.scaleX = bubble1.scaleY = 0.6;
bubble1.x = canvas.width / 2 - (bubble1.nominalBounds.width *
  bubble1.scaleX);
If you look closely you’ll notice that obtaining the bubble’s width isn’t as straightforward as you might expect. CreateJS’s display objects do not possess a width or height property. This is because calculating a display object’s bounds can be very expensive, especially when dealing with complex vector shapes or containers with transformations on children.
We can however, manually perform these calculations for our bubble instances thanks to the fact that our bubble’s original dimensions are available via a nominalBounds property. Here’s the code used to calculate the width of the first bubble after it has been scaled:
bubble1.nominalBounds.width * bubble1.scaleX
It’s hardly rocket science. The bubble’s original width is obtained from the nominalBounds.width property, and is then multiplied by the bubble’s current scale factor. In order for this to work, you must remember to apply the new scale factor first, before performing the calculation.
A similar procedure is performed for the second bubble, only it’s scaled by 40 percent then moved to the right of the stage’s center.
We’ll make use of the scaleX, scaleY, and nominalBounds properties again later on in this tutorial.
Creating a Custom Bubble Class
In order to create a convincing underwater scene, we’re going to need a considerable number of bubbles. Also, we’ll need to size each bubble, continually monitor and update its position to provide movement, and also apply some alpha transparency to give the illusion of distance.
To manage all this, it makes sense to encapsulate our bubble code within its own custom class, otherwise the BubblesDev.js file could become quite messy. We can do this by extending EaselJS’s Container class and placing your library’s bubble within it.
Create a new file and name it Bubble.js. Add the JavaScript shown below to your file and save it.
function Bubble(scale, speed, alpha) {
  this.initialize();

  this.bubble = new lib.Bubble();
  this.addChild(this.bubble);
}
Bubble.prototype = p = new createjs.Container();
We’ll add some more functionality to this class in a moment but first let’s explore what’s currently there.
The class’ constructor is defined by the Bubble() function and accepts three parameters. The first is a scale factor used to size the bubble; the second will be used to assign a vertical speed to the bubble; and the third represents the amount of alpha transparency to be applied. Essentially all three are used to customize each of the scene’s bubbles, ensuring that there is plenty of variety. Your class currently doesn’t make use of any of these parameters yet, but we’ll get onto that in a moment.
Inside the constructor, we perform two important tasks. The first is to call the initialize() method, which is inherited from EaselJS’s Container class. The second is to create an instance of the library’s Bubble symbol and add it to the container’s display list.
For the time being, our custom Bubble class doesn’t really give us any advantage over lib.Bubble. Let’s address that by adding some additional functionality to it. We’ll start by fleshing out the constructor function.
Add the following code at the end of the constructor function:
// Set the scale, speed and alpha.
this.scaleX = this.scaleY = scale;
this.speed = speed;
this.alpha = alpha;
The code snippet above takes each of the three parameters and sets various properties of the class. The first sizes the custom bubble by setting its scaleX and scaleY properties. The second declares and sets a member variable named speed, which will be used to move the bubble upwards on each frame update. The third sets the bubble’s alpha property.
Let’s now create a custom width and height property for the bubble using the nominalBounds property we covered earlier. Add the following two lines of JavaScript to your constructor.
// Store the bubble's dimensions.
this.width = this.bubble.nominalBounds.width * scale;
this.height = this.bubble.nominalBounds.height * scale;
Finally, we need to place the bubble on the stage. We’d like a random position for each bubble, so let’s add a few more lines of code at the end of the constructor to do that:
// Setup the bubble's initial position.
this.x = -(this.width / 2) + ((canvas.width + this.width) * Math.random());
this.y = -(canvas.height / 2) + ((canvas.height * 2) * Math.random());
The bubble will now be placed randomly on the stage, and can even appear above and below the stage area. This will be ideal for creating a realistic spread of bubbles in our underwater scene.
The final piece of functionality we’d like to add is the ability to move the bubble vertically upwards. We can achieve this by writing a method that updates the bubble’s position each time it is called. Add the following update() method at the end of your Bubble.js file:
Bubble.prototype.update = function() {
  this.y -= this.speed;
  if(this.y < -(this.height / 2))
  {
    this.x = -(this.width / 2) + ((canvas.width + this.width) *
      Math.random());
    this.y = canvas.height + (this.height / 2) + (this.height *
      Math.random());
  }
}
As you can see, it uses your class' speed member variable to change the bubble's y-position. The remainder of the code checks to see if the bubble has moved off screen. If it has then it's randomly positioned below the stage, ready to float back in. This update mechanic helps to ensure that there's a continuous flow of bubbles by re-using a bubble once it has drifted above the stage's visible area. Also, notice that we use the width and height properties that were created in the constructor throughout our update() method.
Testing your Custom Bubble Class
Before moving on, save your Bubble.js file and move back to BubblesDev.html. Let's update its setupBubbles() function to use your custom Bubble class rather than creating a bubble instance directly from the global lib object.
First, include your Bubble.js file by adding the following highlighted line within the BubblesDev.html file:
<script src="http://code.createjs.com/easeljs-0.5.0.min.js"></script>
<script src="http://code.createjs.com/tweenjs-0.3.0.min.js"></script>
<script src="http://code.createjs.com/movieclip-0.5.0.min.js"></script>
<script src="http://code.createjs.com/preloadjs-0.2.0.min.js"></script>
<script src="bubbles.js"></script>
<script src="Bubble.js"></script>
We'll also need to declare a global variable to hold a reference to our custom bubble instance. Add the following highlighted line of code directly underneath the other global variable declarations:
<script>
var canvas, stage, exportRoot;
var bubble;
Now within setupBubbles(), remove the previous code you'd written and replace it with the following:
function setupBubbles() {
  bubble = new Bubble(0.5, 4, 0.75);
  stage.addChild(bubble);
}
The code above will create a bubble instance that is scaled by 50 percent, has a vertical speed of 4 pixels per second, and has its alpha value set to 75 percent opacity.
To actually move the bubble instance we'll need to call its update() method from within our application's main loop. Add a line of code within the tick() function to do this:
function tick() {
  stage.update();
  bubble.update();
}
Save your file and then refresh your browser window. You should see an instance of your custom bubble drifting up the screen. Once it has moved off the top of the screen, it will re-appear at the bottom.
By creating a custom Bubble class, we have kept its internal workings hidden from our BubblesDev.html file. Scan back through the HTML file and look at how little code is required to get a single bubble instance up and running.
Now we need to get this working for multiple Bubble instances.
Adding Multiple Bubbles
Let's put the finishing touches to our code by instantiating multiple bubbles to give a greater sense of realism and depth to our underwater scene. We'll do this by creating four layers of bubbles stacked on top of one another. The farthest back layer's bubbles will be the smallest, with the top most layer's bubbles being the largest.
To achieve this we'll use an array to hold all the bubbles. Within your BubblesDev.html file, declare the following highlighted global variable:
var canvas, stage, exportRoot;
var bubble;
var bubbles;
While you're at it, remove the bubble global variable that's highlighted below as we will no longer have a need for it:
var canvas, stage, exportRoot;
var bubble;
var bubbles;
Now write a function that creates the first layer of bubbles. These bubbles will be the smallest and will have relatively low speeds to give the impression that they are far off in the distance. The speed, size, and opacity of each bubble will also be random to add a little more variety and realism. Here's the code:
function setupSmallBubbles() {
  var BUBBLES = 25;
  var SCALE = 0.2;
  var SCALE_VARIANCE = 0.1;
  var SPEED = 1.3;
  var SPEED_VARIANCE = 1.0;
  var ALPHA = 0.2;
  var ALPHA_VARIANCE = 0.2;

  var bubble;
  for(var i = 0; i < BUBBLES; i++)
  {
    bubble = new Bubble(
      SCALE + (Math.random() * SCALE_VARIANCE),
      SPEED + (Math.random() * SPEED_VARIANCE),
      ALPHA + (Math.random() * ALPHA_VARIANCE)
    );
    bubbles.push(bubble);
    stage.addChild(bubble);
  }
}
As you can see, each bubble is instantiated then added to the bubbles array and to the stage's display list.
Now move back to the setupBubbles() function and replace its existing code with the following:
function setupBubbles() {
  bubbles = [];
  setupSmallBubbles();
}
Now all that's left to do is to update each bubble's position within your update loop. Make the following changes to the tick() function allowing it to walk through your array of bubbles and call each one's update() method:
function tick() {
  stage.update();
  for(var i = 0; i < bubbles.length; i++)
  {
    bubbles[i].update();
  }
}
Save your latest changes and test your code by refreshing your browser. You should see 25 randomly sized bubbles drifting up the screen.
Adding the remaining three layers is easy. We'll need to write a setupMediumBubbles(), setupLargeBubbles() and setupSmallBubbles() function. Each will create slightly larger and faster moving bubbles than the previous. Here's the code for each function:
function setupMediumBubbles() {
  var BUBBLES = 12;
  var SCALE = 0.3;
  var SCALE_VARIANCE = 0.1;
  var SPEED = 1.9;
  var SPEED_VARIANCE = 1.1;
  var ALPHA = 0.4;
  var ALPHA_VARIANCE = 0.3;

  var bubble;
  for(var i = 0; i < BUBBLES; i++)
  {
    bubble = new Bubble(
      SCALE + (Math.random() * SCALE_VARIANCE),
      SPEED + (Math.random() * SPEED_VARIANCE),
      ALPHA + (Math.random() * ALPHA_VARIANCE)
    );
    bubbles.push(bubble);
    stage.addChild(bubble);
  }
}

function setupLargeBubbles() {
  var BUBBLES = 6;
  var SCALE = 0.5;
  var SCALE_VARIANCE = 0.2;
  var SPEED = 3.1;
  var SPEED_VARIANCE = 1.5;
  var ALPHA = 0.7;
  var ALPHA_VARIANCE = 0.3;

  var bubble;
  for(var i = 0; i < BUBBLES; i++)
  {
    bubble = new Bubble(
      SCALE + (Math.random() * SCALE_VARIANCE),
      SPEED + (Math.random() * SPEED_VARIANCE),
      ALPHA + (Math.random() * ALPHA_VARIANCE)
    );
    bubbles.push(bubble);
    stage.addChild(bubble);
  }
}

function setupHugeBubbles() {
  var BUBBLES = 1;
  var SCALE = 1.0;
  var SCALE_VARIANCE = 0.2;
  var SPEED = 6;
  var SPEED_VARIANCE = 6;

  var bubble;
  for(var i = 0; i < BUBBLES; i++)
  {
    bubble = new Bubble(
      SCALE + (Math.random() * SCALE_VARIANCE),
      SPEED + (Math.random() * SPEED_VARIANCE)
    );
    bubbles.push(bubble);
    stage.addChild(bubble);
  }
}
Once written, all three functions should be called from within your setupBubbles() function. Here's how the final version of the function should look:
function setupBubbles() {
  bubbles = [];
  setupSmallBubbles();
  setupMediumBubbles();
  setupLargeBubbles();
  setupHugeBubbles();
}
Once again, save your changes and refresh the browser. You'll now see all four layers of bubbles smoothly moving up the screen.
Adding Interaction
As a final exercise, let's add some interactivity, allowing the user to pop a bubble by clicking on it. We'll add this functionality directly to your custom Bubble class. Open Bubble.js into your text editor and place the following lines of code at the end of its constructor function:
// Setup an onPress event handler.
this.bubble.onPress = this.bubbleClicked;
The onPress event is triggered when the user presses their mouse over the bubble. In response to the onPress event, a method named bubbleClicked() will be called to handle it.
Add the bubbleClicked() method to the end of your Bubble.js file:
Bubble.prototype.bubbleClicked = function(e) {
  e.target.visible = false;
}
When the onPress event is triggered it passes an event object to its designated event handler. In our case, the event object will be passed to our bubbleClicked() method. From this event object we can obtain a reference to the target instance that the event was fired from. In other words, we can obtain a reference that points back to the bubble instance that was clicked. This is ideal as it allows us to hide the bubble from view, giving the illusion that it has burst.
As a final step, we'd like the bubble to eventually become visible again. Add the following highlighted line of code to the Bubble class' update() method to do this:
Bubble.prototype.update = function() {
  this.y -= this.speed;
  if(this.y < -(this.height / 2))
  {
    this.x = -(this.width / 2) + ((canvas.width + this.width) * Math.random());
    this.y = canvas.height + (this.height / 2) + (this.height * Math.random());
    this.visible = true;
  }
}
The bubble will now become visible again when it has wrapped back round to the bottom of the screen. This ensures that we continue to have a stream of visible bubbles over time.
Now save your changes and view the final version of your underwater scene within your browser. Click on the bubbles to pop them. Take a look at the code in Listing 1 to see the final version of the BubbleDev.html file. You can also see the final version of the Bubble.js class in Listing 2.
Final Statement
Hopefully this introduction to CreateJS and JavaScript, will give you the confidence to create and deliver high-quality HTML5 content, while taking advantage of Flash Professional as a design tool. JavaScript may not possess many of the language features of ActionScript 3, but with the right libraries at hand you can write extremely sophisticated web-based content that will run across a wide range of desktop and mobile browsers. And to be honest, writing rich, interactive games and applications is always a lot of fun no matter what technology you opt to use.
<!DOCTYPE html>
<html>
<head>
<meta charset="UTF-8">
<title>CreateJS export from bubbles</title>

<script src="http://code.createjs.com/easeljs-0.5.0.min.js"></script>
<script src="http://code.createjs.com/tweenjs-0.3.0.min.js"></script>
<script src="http://code.createjs.com/movieclip-0.5.0.min.js"></script>
<script src="http://code.createjs.com/preloadjs-0.2.0.min.js"></script>
<script src="bubbles.js"></script>
<script src="Bubble.js"></script>

<script>
var canvas, stage, exportRoot;
var bubbles;

function init() {
  canvas = document.getElementById("canvas");
  images = images||{};

  var manifest = [
    {src:"images/background.png", id:"background"},
    {src:"images/flashlogo.png", id:"flashlogo"}
  ];

  var loader = new createjs.PreloadJS(false);
  loader.onFileLoad = handleFileLoad;
  loader.onComplete = handleComplete;
  loader.loadManifest(manifest);
}

function handleFileLoad(o) {
  if (o.type == "image") { images[o.id] = o.result; }
}

function handleComplete() {
  exportRoot = new lib.bubbles();

  stage = new createjs.Stage(canvas);
  stage.addChild(exportRoot);
  stage.update();

  createjs.Ticker.setFPS(30);
  createjs.Ticker.addListener(window);

  setupBubbles();
}

function tick() {
  stage.update();
  for(var i = 0; i < bubbles.length; i++)
  {
    bubbles[i].update();
  }
}

function setupBubbles() {
  bubbles = [];
  setupSmallBubbles();
  setupMediumBubbles();
  setupLargeBubbles();
  setupHugeBubbles();
}

function setupSmallBubbles() {
  var BUBBLES = 25;
  var SCALE = 0.2;
  var SCALE_VARIANCE = 0.1;
  var SPEED = 1.3;
  var SPEED_VARIANCE = 1.0;
  var ALPHA = 0.2;
  var ALPHA_VARIANCE = 0.2;

  var bubble;
  for(var i = 0; i < BUBBLES; i++)
  {
    bubble = new Bubble(
      SCALE + (Math.random() * SCALE_VARIANCE),
      SPEED + (Math.random() * SPEED_VARIANCE),
      ALPHA + (Math.random() * ALPHA_VARIANCE)
    );
    bubbles.push(bubble);
    stage.addChild(bubble);
  }
}

function setupMediumBubbles() {
  var BUBBLES = 12;
  var SCALE = 0.3;
  var SCALE_VARIANCE = 0.1;
  var SPEED = 1.9;
  var SPEED_VARIANCE = 1.1;
  var ALPHA = 0.4;
  var ALPHA_VARIANCE = 0.3;

  var bubble;
  for(var i = 0; i < BUBBLES; i++)
  {
    bubble = new Bubble(
      SCALE + (Math.random() * SCALE_VARIANCE),
      SPEED + (Math.random() * SPEED_VARIANCE),
      ALPHA + (Math.random() * ALPHA_VARIANCE)
    );
    bubbles.push(bubble);
    stage.addChild(bubble);
  }
}

function setupLargeBubbles() {
  var BUBBLES = 6;
  var SCALE = 0.5;
  var SCALE_VARIANCE = 0.2;
  var SPEED = 3.1;
  var SPEED_VARIANCE = 1.5;
  var ALPHA = 0.7;
  var ALPHA_VARIANCE = 0.3;

  var bubble;
  for(var i = 0; i < BUBBLES; i++)
  {
    bubble = new Bubble(
      SCALE + (Math.random() * SCALE_VARIANCE),
      SPEED + (Math.random() * SPEED_VARIANCE),
      ALPHA + (Math.random() * ALPHA_VARIANCE)
    );
    bubbles.push(bubble);
    stage.addChild(bubble);
  }
}

function setupHugeBubbles() {
  var BUBBLES = 1;
  var SCALE = 1.0;
  var SCALE_VARIANCE = 0.2;
  var SPEED = 6;
  var SPEED_VARIANCE = 6;

  var bubble;
  for(var i = 0; i < BUBBLES; i++)
  {
    bubble = new Bubble(
      SCALE + (Math.random() * SCALE_VARIANCE),
      SPEED + (Math.random() * SPEED_VARIANCE)
    );
    bubbles.push(bubble);
    stage.addChild(bubble);
  }
}
</script>
</head>

<body onload="init();" style="background-color:#D4D4D4">
  <canvas id="canvas" width="640" height="480" style="background-color:#ffffff">
  </canvas>
</body>
</html>
Code Listing 1. Final version of the BubblesDev.html file.
function Bubble(scale, speed, alpha) {
  this.initialize();

  this.bubble = new lib.Bubble();
  this.addChild(this.bubble);

  // Set the scale, speed and alpha.
  this.scaleX = this.scaleY = scale;
  this.speed = speed;
  this.alpha = alpha;

  // Store the bubble's dimensions.
  this.width = this.bubble.nominalBounds.width * scale;
  this.height = this.bubble.nominalBounds.height * scale;

  // Setup the bubble's initial position.
  this.x = -(this.width / 2) + ((canvas.width + this.width) * Math.random());
  this.y = -(canvas.height / 2) + ((canvas.height * 2) * Math.random());

  // Setup an onPress event handler.
  this.bubble.onPress = this.bubbleClicked;
}
Bubble.prototype = p = new createjs.Container();

Bubble.prototype.update = function() {
  this.y -= this.speed;
  if(this.y < -(this.height / 2))
  {
    this.x = -(this.width / 2) + ((canvas.width + this.width) * Math.random());
    this.y = canvas.height + (this.height / 2) + (this.height * Math.random());
    this.visible = true;
  }
}

Bubble.prototype.bubbleClicked = function(e) {
  e.target.visible = false;
}
Code Listing 2. Final version of the Bubble.js class.
 This tutorial is a previously unreleased recipe from