Welcome to the third part of this HTML5 Flappy Bird tutorial series. Over the course of the first two parts we created the artwork required for our game. Today we’ll actually start writing the code using the JavaScript programming language.
What you will learn…
- How to write JavaScript directly within Adobe Animate CC
- How to write code that utilises content on the stage
- Some of the fundamentals of the CreateJS suite of JavaScript libraries
- How to implement endless scrolling within your game world
What you will need…
- A basic understanding of at least one programming language, such as JavaScript or ActionScript
During the remainder of the series, we’ll write a collection of JavaScript classes that represent our Flappy Bird clone. Each will be responsible for specific tasks within the game. In today’s tutorial we’ll focus on two classes: one which represents the main entry point into the game, and another which deals specifically with the scrolling of the game’s ground layer.
If you need a reminder as to how the scrolling behaves in Flappy Bird then take a look at the final version of our clone. It can be found here: www.yeahbutisitflash.com/projects/flappy-animatecc/flappy.html.
Getting Started
You’ll need Adobe Animate CC. A trial version can be downloaded from www.adobe.com/products/animate.html.
We’ll use the flappy.fla file that you worked on in part two. If you haven’t attempted the first two parts of the tutorial and would rather skip the design stage and jump straight into development, then simply head over to GitHub and get the latest version of the FLA from: github.com/ccaleb/flappy-bird-animate-cc-tutorial/blob/master/start/flappy-artwork.fla.
Okay, let’s get started!
Going Responsive from the Publish Settings
In part two we previewed our finished artwork in the browser using Animate CC’s default publish settings. For many situations these settings will be fine but for this tutorial we’d like our Flappy Bird clone to scale-up to fit the browser window and also resize in response to changes in the window’s width and height. All of this can be done from the Publish Settings panel.
Open the Publish Settings panel by selecting File | Publish Settings from Animate CC’s dropdown menu. From the panel, ensure that the JavaScript/HTML checkbox is checked and that the Basic tab is selected.
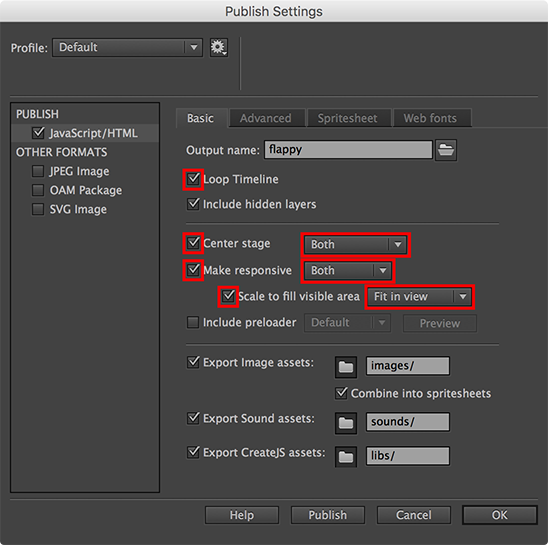
Figure 1. Responsive Publish Settings.
Firstly, we’d like our game to vertically and horizontally centre align with the browser window, so check the Centre Stage checkbox and also select Both from the dropdown box next to it.
Next, click the Make responsive checkbox. Since we want our game to resize whenever the browser’s width or height is changed, select Both from the dropdown box associated with the checkbox.
Also check the Scale to fill visible area checkbox. Now we need to decide how scaling of our viewport will be handled within the browser. We have two options. We can ensure that our game’s entire viewport is always visible, which may result in visible border spaces surrounding it. Or we can scale the viewport to cover the entire screen but at the risk of some of the viewport being cropped. For our game it’s best if the entire viewport is always visible so select Fit in view from the dropdown box to the right of the Scale to fill visible area checkbox.
Use Figure 1 above to verify that you have the correct settings then click OK to close the Publish Settings panel.
Now let’s test our changes in the browser to see exactly what our publish settings are doing for us. Remember, at the end of part two we had to temporarily guide out the Screen Flash layer before testing. Do the same again here then select Control | Test Movie | In Browser (Cmd-Enter | Ctrl-Enter) from Adobe Animate CC’s dropdown menu.
You’ll see that your game’s viewport now consumes all of the browser’s vertical screen space. Adjust the width and height of the browser window. The game’s viewport will adjust to fit the new window size and also maintain its aspect ratio. Congratulations! Your content is now fully responsive.
Move back to Animate CC and un-guide your Screen Flash layer again, then save your FLA.
Writing JavaScript within Adobe Animate CC
While it’s perfectly possible to write code externally using an editor of your choosing, we’ll write all our code within Animate CC. We’ll do this by adding scripts to our FLA’s timeline.
Begin by creating a layer folder on your root timeline named JavaScript. Add a layer within your folder and name it Main class.
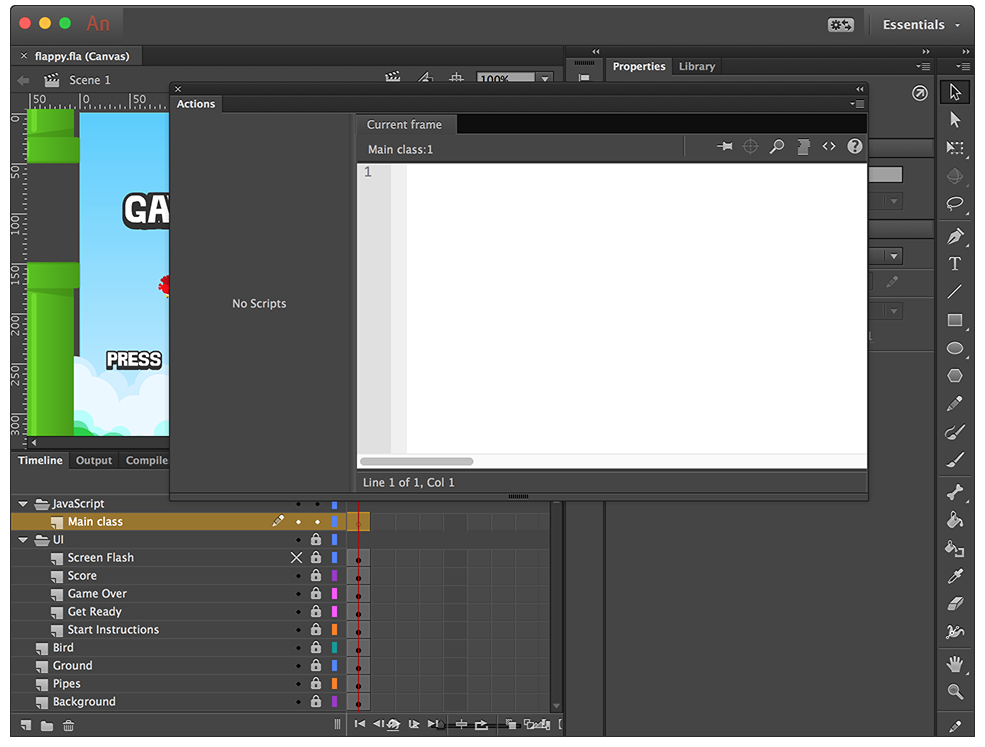
Figure 2. The timeline, stage and Actions panel.
We’ll add some JavaScript to this layer, which will be the main entry point for our game. This is done by clicking on the layer’s frame and selecting Window | Actions (F9) from Animate CC’s dropdown menu. Doing so will open the Actions panel where we’ll place our code (Figure 2).
Creating the Main Entry Point and Update Loop
We’ll write a class named Main. Within its constructor we’ll listen for a special tick event that gets dispatched every time the stage is redrawn. To do this, add the following code to the Actions panel:
function Main()
{
  createjs.Ticker.addEventListener("tick", this.update.bind(this));
}
Now add an update() method to the class that handles the event:
function Main()
{
  createjs.Ticker.addEventListener("tick", this.update.bind(this));
}

Main.prototype.update = function(evt)
{
  console.log("Main::update()");
}
The method doesn’t do much at the moment. It simply writes some text to the browser’s console. If you remember from the first part of this tutorial, we set our document’s frame rate to 60 fps. Therefore our update() method will get called, and will write text to the console, 60 times per second.
As you can see, we’re adopting an object-oriented approach for the development of our Flappy Bird clone. JavaScript 5th edition doesn’t provide the syntactic sugar found in other languages but its prototype mechanism can be used to simulate many class-based features.
We’ll aim for a very lightweight object-oriented approach in this tutorial series. We’ll use JavaScript functions to simulate class constructors and declare properties within those functions that act as member variables. Class methods will be applied via a constructor’s prototype property. All methods and member variables within our class’ will be publicly accessible.
If you aren’t familiar with Object-Oriented programming techniques then don’t worry. We’ll keep things straightforward enough that you’ll still be able to follow along.
Think of our update() method as the game’s heartbeat. All the game’s logic will eventually be run from here and will be continuously executed during the game’s lifetime within the browser.
Finally, we’ll instantiate the Main class to ensure its constructor runs. Add the following line:
function Main()
{
  createjs.Ticker.addEventListener("tick", this.update.bind(this));
}

Main.prototype.update = function(evt)
{
  console.log("Main::update()");
}

var main = new Main();
Save your FLA file.
Testing your Code
Let’s go ahead and test the code we have so far. Republish your FLA by selecting File | Publish (Alt + Shift + F12 | Ctrl + Shift + F12) from Animate CC’s dropdown menu. Now refresh your browser to load and run the latest version of your game.
Since we un-guided the Screen Flash layer a few moments ago, you’ll be greeted by a white screen. However, your Main class’ update() method will now be getting called on each frame update. You can verify this by checking your browser’s console. To do this from Chrome, select Tools | Developer Tools (Cmd + Option + i | F12) to open the Developer Tools window. Then click the Console tab to open the JavaScript console window. Here you should see the text from your update() method being traced out (Figure 3).
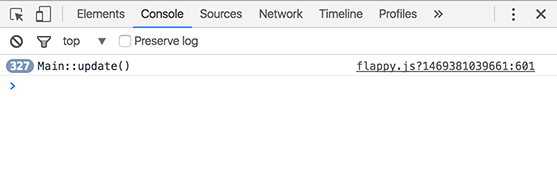
Figure 3. The console window.
The console is also a great way to interactively call code or view any errors in your JavaScript. If any errors are being reported then correct your code, republish, and test.
Accessing Display Objects
Okay, let’s do something about the white screen flash movie-clip that is covering the stage. Of course, we can simply guide it out from the timeline but let’s actually write some JavaScript to deal with it.
Move back to Adobe Animate CC and add the following line of code within your constructor:
function Main()
{
  exportRoot.screenFlash.visible = false;

  createjs.Ticker.addEventListener("tick", this.update.bind(this));
}
The above line, simply gets a reference to our screen flash movie-clip and hides it from view.
exportRoot is a special global variable that is made available to you. It represents your stage and all the content within it. If you think back to part two, you should remember that we assigned an instance name of screenFlash to the movie-clip that represents the screen flash. We can access that movie-clip via the exportRoot object. In fact, we can do this for any display object within the stage that has an instance name assigned to it.
Once we have referenced the screen flash, we can then work with the various properties and methods associated with it. In this case, we want to set its visible property to false in order to hide it.
Adobe Animate CC is integrated with CreateJS, which is a suite of JavaScript libraries that enables rich interactive content via HTML5. Many of CreateJS’s APIs are loosely modelled on Adobe’s own ActionScript 3 API and will therefore feel familiar to anyone who has created Flash content using ActionScript.
For example, the EaselJS library – which is a part of the CreateJS suite – provides a MovieClip class. We’re just after using the MovieClip class to set the visibility of our Screen Flash movie-clip. It provides many properties and methods that are similar to the ActionScript 3 equivalent. You can find the CreateJS API reference for MovieClip along with other classes which we’ll use throughout this tutorial here: www.createjs.com/docs/easeljs/modules/EaselJS.html.
You can also find code examples and reference material for the entire CreateJS suite on the site’s official homepage: www.createjs.com.
While we’re at it, let’s go ahead and temporarily hide most of the other UI elements – we’ll make them visible again at a later date but right now they’re simply acting as a distraction. Add the following lines, which directly access the gameOverPrompt, getReadyPrompt, and startInstructions movie-clip instances that are sitting on the stage:
function Main()
{
  exportRoot.screenFlash.visible = false;
  exportRoot.gameOverPrompt.visible = false;
  exportRoot.getReadyPrompt.visible = false;
  exportRoot.startInstructions.visible = false;

  createjs.Ticker.addEventListener("tick", this.update.bind(this));
}
Save your changes and republish. Refresh the browser and you should now see the contents of your stage. The screen flash should be hidden along with various other UI elements.
Detecting Mouse and Keyboard Presses
In order to make our game’s little hero flap his wings, the user will need to either click on the screen or press any key on their keyboard. Let’s go ahead and write some JavaScript to check for user interaction.
Within the constructor, add a few lines of code that will call a userPressed() method in response to the user clicking on the canvas or pressing a key:
function Main()
{
  exportRoot.screenFlash.visible = false;
  exportRoot.gameOverPrompt.visible = false;
  exportRoot.getReadyPrompt.visible = false;
  exportRoot.startInstructions.visible = false;

  canvas.onmousedown = this.userPressed.bind(this);
  window.onkeydown = this.userPressed.bind(this);

  createjs.Ticker.addEventListener("tick", this.update.bind(this));
}
Also, write the actual userPressed() method. Place it directly below the update() method:
Main.prototype.update = function(evt)
{
  console.log("Main::update()");
}

Main.prototype.userPressed = function(evt)
{
  console.log("Main::userPressed()");
}
For the time being it’s a stub method that simply traces some text to the JavaScript console.
Save and republish your FLA. Refresh your browser and test the latest changes by clicking on the game’s viewport or by pressing some keys on your keyboard. Each of your interactions should result in the following text being sent to the JavaScript console window:
> Main::userPressed()
As well as making the bird flap its wings, the userPressed() method will be responsible for starting a new game. When a game begins, the ground layer and pipes will start scrolling. When the game is over, the ground and pipes will stop scrolling.
Pinning Scripts
We’ll concentrate on the ground layer for the remainder of this tutorial. We’ll create a class named Ground to handle the logic for it. Just like our Main class, this class will have a constructor used to initialise it and an update() method that acts as its heartbeat.
Before we begin, let’s pin our Main class to the Actions panel. Pinning allows us to quickly move between each of our classes within the Actions panel as we work.
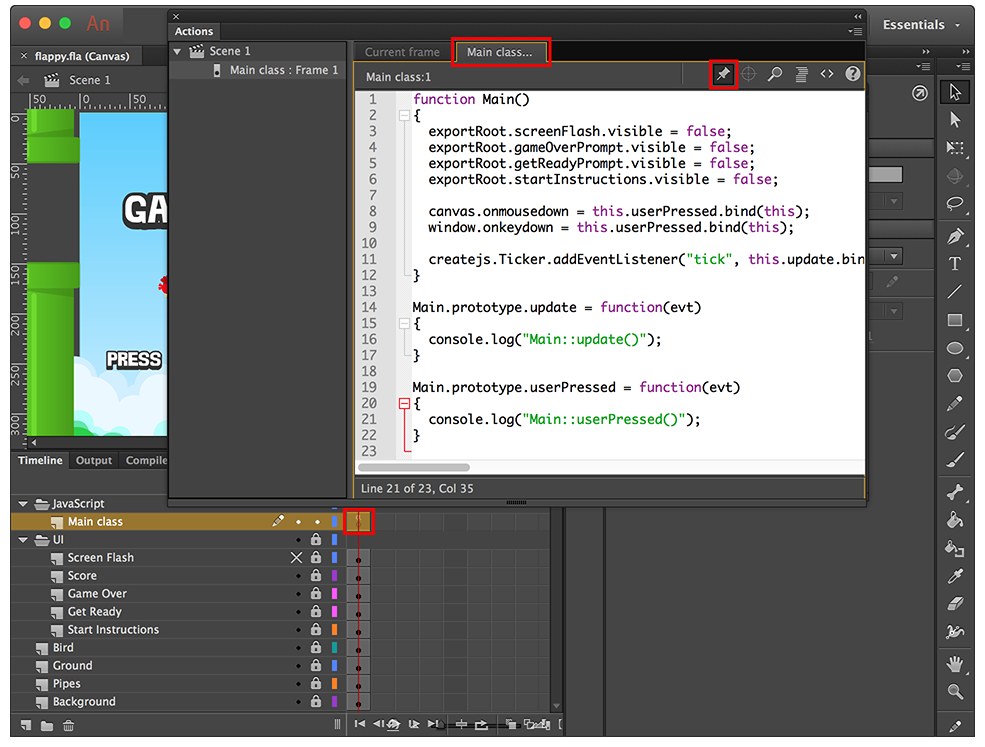
Figure 4. Pinning your script to the Actions panel.
Ensure the Actions panel is visible. If it’s not then find the Main class layer on the timeline. If you look at the first frame you’ll see that it has an icon indicating that your code is attached to it (Figure 4). Click on the frame then open the Actions panel by selecting Windows | Actions (F9) from Animate CC’s dropdown menu.
Within the Actions panel you’ll see the JavaScript for your class and above your code you’ll see the Pin Script button (Figure 4). Click the button and a new tab will be created (Figure 4) containing your Main class’ code. This tab will remain within the Actions panel even after you close the panel.
We’ll do the same for our Ground class when we start writing it.
The Ground Class
Within Animate CC, create a new layer directly above the Main class layer. Name the layer Ground class and click on its first timeline frame which is where we’ll add the code. If the Actions panel isn’t visible then select Window | Actions (F9) from the dropdown menu.
Within the Actions panel, click on the Current frame tab, which is the tab to the left of your Main class tab. You’ll be presented with an empty script window. Pin this window by clicking the Pin Script button. A new tab will be created named Ground class, which is where we’ll write our code.
Begin by writing the class’ constructor. Declare a member variable within the constructor that will be used to track whether the ground is scrolling:
function Ground()
{
  this.scrolling = false;
}
Add a simple update() method that, for the time being, traces some text to the console when scrolling is taking place:
function Ground()
{
  this.scrolling = false;
}

Ground.prototype.update = function()
{
  if (this.scrolling == true)
  {
    console.log("Ground::update() scrolling");
  }
}
Adding Start and Stop Methods
We’ll also need methods to initiate scrolling of the ground layer and to stop it. Add a startScrolling() and a stopScrolling() method to your class:
Ground.prototype.update = function()
{
  if (this.scrolling == true)
  {
    console.log("Ground::update() scrolling");
  }
}

Ground.prototype.startScrolling = function()
{
  this.scrolling = true;
}

Ground.prototype.stopScrolling = function()
{
  this.scrolling = false;
}
At the moment our Ground class won’t do much other than write some text to the console whenever scrolling is taking place. Shortly we’ll start adding code to actually deal with the movie-clips within our stage that represent the ground layer. But first let’s wire-up the Ground class to our Main class.
Adding the Ground Class to the Update Loop
Our Ground class’ update() method currently isn’t being called anywhere. We’ll fix that by calling it from within the Main class’ own update() method.
Within the Actions panel, click on the Main class tab to view its code.
Instantiate the Ground class and store it within a member variable:
function Main()
{
  this.ground = new Ground();

  exportRoot.screenFlash.visible = false;
  exportRoot.gameOverPrompt.visible = false;
  exportRoot.getReadyPrompt.visible = false;
  exportRoot.startInstructions.visible = false;

  canvas.onmousedown = this.userPressed.bind(this);
  window.onkeydown = this.userPressed.bind(this);

  createjs.Ticker.addEventListener("tick", this.update.bind(this));
}
Within the update() method, call the Ground instance’s own update() method. While you’re at it, remove the previous log() statement:
Main.prototype.update = function(evt)
{
  console.log("Main::update()");
  this.ground.update();
}
Now all that’s left to do is to trigger the scrolling of the ground when the user interacts with the game. Add a new method named startGame() and call it from your userPressed() method. Also remove the log() statement that’s within your userPressed() method.
Main.prototype.userPressed = function(evt)
{
  console.log("Main::userPressed()");
  this.startGame();
}

Main.prototype.startGame = function()
{
  this.ground.startScrolling();
}
Save your FLA.
Now republish and test your changes within the browser.
The Ground class’ update() method is now being called on every frame update along with the Main class’ update() method. However you won’t see anything being traced to the JavaScript console because the ground’s update() method only writes to the console when scrolling has been initiated.
Go ahead and click anywhere on the screen to initiate scrolling. The ground’s startScrolling() method will get called, which will result in the following text being repeatedly output to the console:
> Ground::update() scrolling
If you can see this then your code is working as expected.
Working with the Ground Slice Movie-Clips
Okay, now that we have the Ground class wired up to our Main class, we can go ahead and start working with the actual movie-clip instances that represent the ground.
If you unlock the timeline’s Ground layer and take a look at the stage, you’ll see that we have three movie-clips named ground0, ground1, and ground2. Each of these clips represent a vertical ground slice and are sitting adjacent to one another to create the ground layer.
Remember, we can take advantage of the global exportRoot variable to access any display objects on our stage. Let’s write some code within our Ground class’ constructor to store all three ground slices within an array.
Within the Actions panel, move back to the Ground class tab and add the following line to the class’ constructor:
function Ground()
{
  this.scrolling = false;
  this.slices = [exportRoot.ground0, exportRoot.ground1, exportRoot.ground2];
}
We’ve stored each of our ground slices within an array named slices. We have declared this array as a member variable, which allows us to easily access the ground slices within any method in our class. The order of the array’s elements is important. Each slice is stored in the array based on its position relative to the screen’s left-hand side. The slice at the front of the array is the closest to the screen’s left while the slice at the end of the array is the farthest away. This ordering will come into play soon.
We want to move each of our ground slices every time the Ground class’ update() method is called. We’ll write a method named updateSlicePositions() to do that, but first add a line of code to actually call the method:
Ground.prototype.update = function()
{
  if (this.scrolling == true)
  {
    console.log("Ground::update() scrolling");
    this.updateSlicePositions();
  }
}
Now add the method itself:
Ground.prototype.stopScrolling = function()
{
  this.scrolling = false;
}

Ground.prototype.updateSlicePositions = function()
{
  for (var i = 0; i < this.slices.length; i++)
  {
    var slice = this.slices[i];
    slice.x -= Main.SCROLL_SPEED;
  }
}
The updateSlicePositions() method is fairly straightforward. A for-loop is used to walk through our slices array and pick out each of the ground slice movie-clips. The x-position of each movie-clip is then moved to the left slightly. A constant named SCROLL_SPEED is used to specify the number of pixels to move each of the slices by. That constant belongs to the Main class and will also be used to move the game’s pipes when we eventually get onto them. It hasn’t yet been added so let’s do that now.
Within the Actions panel, move to the Main class and add the following line directly below the class’ constructor:
function Main()
{
  this.ground = new Ground();

  exportRoot.screenFlash.visible = false;
  exportRoot.gameOverPrompt.visible = false;
  exportRoot.getReadyPrompt.visible = false;
  exportRoot.startInstructions.visible = false;

  canvas.onmousedown = this.userPressed.bind(this);
  window.onkeydown = this.userPressed.bind(this);

  createjs.Ticker.addEventListener("tick", this.update.bind(this));
}

Main.SCROLL_SPEED = 3.0;
We’ve assigned a value of 3.0 to the SCROLL_SPEED constant meaning that each of the ground slices will be moved to the left by 3 pixels every time the stage is redrawn.
Let’s test what we have so far. Save your changes and republish. Now refresh your browser and click anywhere on the screen. The ground layer will start scrolling and eventually disappear out of the left-hand side of the screen.
This is a definite step in the right direction but to create endless scrolling we need our ground slices to wrap back around and re-appear from the screen’s right-hand side. Let’s go ahead and write some code to do that.
Repositioning the Ground Slices
Move back to Animate CC.
We’ll need to know when a ground slice has fully left the screen. We can determine this by checking to see if a slice has moved beyond a certain x-position. To work out what that x-position is we’ll first need to discover the width of our ground slices. We can determine the width by simply measuring the distance between the position of the first and second ground slice.
Move back to the Ground class and add the following line to the Ground class’ constructor:
function Ground()
{
  this.scrolling = false;
  this.slices = [exportRoot.ground0, exportRoot.ground1, exportRoot.ground2];
  this.sliceWidth = exportRoot.ground1.x - exportRoot.ground0.x;
}
As you can see, we’ve stored the width in a member variable named sliceWidth. This will allow us to easily access the width throughout the class.
Now that we know the width we can easily work out the x-position each slice needs to reach before it is off-screen. We know from looking at our stage that when the game begins the first ground slice sits perfectly against the left-hand side of the screen. So calculating the off-screen x-position is simply a matter of subtracting the ground slice width from the first slice’s x-position:
function Ground()
{
  this.scrolling = false;
  this.slices = [exportRoot.ground0, exportRoot.ground1, exportRoot.ground2];
  this.sliceWidth = exportRoot.ground1.x - exportRoot.ground0.x;
  this.leftBound = exportRoot.ground0.x - this.sliceWidth;
}
As you can see from the above code, we’ve stored that value within a member variable named leftBound so that we can easily access it elsewhere within the class.
We’re about to write a method named checkLeftSliceIsOutsideScreen() that will check to see if the left-most ground slice has moved outside the screen. If it has then this method will take that slice and position it directly after the right-most ground slice, which will result in it being just outside the screen’s right-hand side. First though, let’s add a line to our update() method to call the checkLeftSliceIsOutsideScreen() method:
Ground.prototype.update = function()
{
  if (this.scrolling == true)
  {
    this.updateSlicePositions();
    this.checkLeftSliceIsOutsideScreen();
  }
}
Okay, now let’s write the checkLeftSliceIsOutsideScreen() method. Add the following at the end of your class:
Ground.prototype.checkLeftSliceIsOutsideScreen = function()
{
  var firstSlice = this.slices[0];
  var lastSlice = this.slices[2];
  if (firstSlice.x < this.leftBound)
  {
    firstSlice.x = lastSlice.x + this.sliceWidth;
    this.slices.shift();
    this.slices.push(firstSlice);
  }
}
Let’s examine our method in a bit more detail to better understand how it works.
The first two lines simply get references to the left-most and right-most ground slices and store them within local variables. Remember, the items within the slices array are ordered so we know that the left-most ground slice is always at the front of the array while the right-most ground slice is always at the end of the array:
var firstSlice = this.slices[0];
var lastSlice = this.slices[2];
We then check to see if the left-most slice has moved outside the left-hand side of the screen:
if (firstSlice.x < this.leftBound)
If it has, we position the ground slice directly after the right-most slice:
firstSlice.x = lastSlice.x + this.sliceWidth;
Now that the slice is on the far right of the screen, we need to remove it from the front of the slices array and place it at the end:
this.slices.shift();
this.slices.push(firstSlice);
Let’s try out our latest changes. Save your FLA then re-publish. Refresh your browser and click anywhere on the game’s viewport. You’ll see the ground layer scrolling indefinitely. Each slice will re-appear from the right-hand side of the screen after it has scrolled out of the left.
Congratulations! We have an endless scrolling ground layer.
Summary
We’ve covered significant ground in part three. Not only can Adobe Animate CC be used as a design tool, it can just as easily be used to write the JavaScript for your HTML5 projects.
We’ve walked through the steps to write a main application class for our game and a class to scroll the game's ground layer. Along the way we’ve seen how to write code that works directly with the contents of our stage, hooking into some of the visual elements created in parts one & two. Additionally we’ve written JavaScript that responds to the user’s mouse and keyboard interactions.
Now that scrolling for the ground layer is up and running it won't be that difficult to get the game's pipes scrolling too. However, I'll let you digest what's been covered today and we'll tackle the pipes in part four. See you then.
Christopher Caleb

Christopher Caleb is a freelance developer and published author. His body of work spans a wide range of projects that encompass casual games, interactive kiosks, social networks, and mobile applications. Christopher's expertise covers both native and cross-platform technologies, with a focus on optimisation within hardware constraints. He specialises in delivering highly engaging experiences with usability being a primary concern.
He blogs at www.yeahbutisitflash.com and tweets as @chriscaleb.