Flash @ Adobe MAX

Looks like Flash Professional will be getting some attention at this year’s Adobe MAX. Focus seems to be on the latest drawing and animation improvements, and also Flash’s HTML5 and WebGL publish targets.

Here’s a list of the sessions and labs that’ll be on offer:

Part 6: Building an HTML5 Flappy Bird Clone with Adobe Animate CC

Welcome to the final part of this HTML5 Flappy Bird tutorial series. We’ll work on the game’s user interface and finish up by adding some sound effects.

What you will learn…

  • How to programmatically update text fields
  • How to apply a tween to a movie-clip using JavaScript
  • How to preload and playback sound within your projects

What you will need…

  • A basic understanding of at least one programming language, such as JavaScript or ActionScript

Before you continue, spend a few moments looking at the final version of the game here: www.yeahbutisitflash.com/projects/flappy-animatecc/flappy.html.

Take a look at the user interface elements and listen out for the sound effects that are triggered as the game plays. We’ll be adding these bells and whistles onto your project today.

Getting Started

You’ll need Adobe Animate CC. A trial version can be downloaded from www.adobe.com/products/animate.html. You’ll also need the FLA file you were working with in part five.

Okay let’s get coding.

Tracking the Score

Last time we got as far as detecting when the bird had successfully passed through the pipes. However we hadn’t gone as far as actually awarding a point to the player. Let’s go ahead and do that.

We’ll begin by adding a member variable to our Main class that will track the player’s current score. Add the following line:

function Main()
{
  this.ground = new Ground();
  this.pipes = new Pipes();
  this.bird = new Bird();
	
  this.score = 0;
  
  exportRoot.screenFlash.visible = false;
  exportRoot.gameOverPrompt.visible = false;
  exportRoot.getReadyPrompt.visible = false;
  exportRoot.startInstructions.visible = false;
  
  createjs.Ticker.addEventListener("tick", this.update.bind(this));
  
  canvas.onmousedown = this.userPressed.bind(this);
  window.onkeydown = this.userPressed.bind(this);
}

Each time the player begins a game we’ll need to reset the score. Add the following line to the startGame() method to do that:

Main.prototype.startGame = function()
{
  this.score = 0;
  this.ground.startScrolling();
  this.pipes.startScrolling();
  this.bird.startFlying();
}

Now let’s write a method within our Main class that will increment the score and display it on the screen:

Main.prototype.scoredPoint = function()
{
  this.score++;
  exportRoot.score.text = this.score;
}

In the method above, we target the stage’s score text field and update it by setting its text property to the value stored within our score member variable.

To date we’ve made use of the MovieClip class provided by CreateJS to update our game’s display objects. However, text fields are instances of CreateJS’ Text class. The Text class provides an API for handling text, including the text property for obtaining and changing the text field’s value. You can find our more about the Text class on the official CreateJS site: createjs.com/docs/easeljs/classes/Text.html.

Finally, call this method from the class’ checkForBirdPassingPipe() method. We’ll also remove the code we wrote previously that sent some text to the browser’s JavaScript console:

Main.prototype.checkForBirdPassingPipe = function()
{
  if (this.bird.isAlive())
  {
    if (this.pipes.hasBirdPassedApproachingPipe(this.bird))
    {
      this.pipes.setNextApproachingPipe();
      console.log("Main::checkForBirdPassingPipe() - Score a point!");
      this.scoredPoint();
    }
  }
}

Save your changes then publish your document to the browser.

Now each time you successfully fly between a pair of pipes you should see your score update on the screen. You will probably notice that the score doesn’t yet reset each time you start a new game. Don’t worry though, we’ll get onto that in just a moment. But first let’s do some refactoring.

Creating the UI Class

At the moment our UI code is being handled within the Main class. Let’s move that code into its own class. This will give us a good place to add code that handles the rest of the game’s user interface elements.

Create a new timeline layer directly above the Main class layer. Name the layer UI class and click on the first frame of its timeline. Open the Actions panel by selecting Window | Actions (F9) from the dropdown menu.

We’ll begin by adding a constructor to the class that will store a reference to each of our game’s user interface elements:

function UI()
{
  this.scoreLabel = exportRoot.score;
  this.gameOverPrompt = exportRoot.gameOverPrompt;
  this.getReadyPrompt = exportRoot.getReadyPrompt;
  this.anyKeyPrompt = exportRoot.anyKeyPrompt;
  this.screenFlash = exportRoot.screenFlash;
}

Now let’s write a method within our class that is responsible for display the player’s current score. Add the following to your class:

UI.prototype.updateScore = function(score)
{
  this.scoreLabel.text = score;
}

This method takes the current score as a parameter and updates the text field to reflect that score.

Now move back to your Main class and we’ll go ahead and wire-up the UI class to it.

Within the Main class’ constructor, instantiate the UI class and store it within a member variable:

function Main()
{
  this.ground = new Ground();
  this.pipes = new Pipes();
  this.bird = new Bird();
  this.ui = new UI();
	
  this.score = 0;
	
  exportRoot.screenFlash.visible = false;
  exportRoot.gameOverPrompt.visible = false;
  exportRoot.getReadyPrompt.visible = false;
  exportRoot.startInstructions.visible = false;
	
  createjs.Ticker.addEventListener("tick", this.update.bind(this));
	
  canvas.onmousedown = this.userPressed.bind(this);
  window.onkeydown = this.userPressed.bind(this);
}

Next, alter the scoredPoint() method to call the UI class’ updateScore() method:

Main.prototype.scoredPoint = function()
{
  this.score++;
  exportRoot.score.text = this.score;
  this.ui.updateScore(this.score);
}

Save your changes then publish and test within the browser.

If everything has gone according to plan then the score should still update each time you fly between the pipes. We haven’t added any more functionality. All our changes are under the hood. The code that handles the updating of the score now sitting within our new UI class.

Now we are in a position to reset the score when each game begins.

Clearing the Score on Each New Game

We’ll write a new method within the UI class that gets called each time the player begins a game. It’s within this method that we’ll reset the on-screen score. Add the following method named gameStart():

UI.prototype.gameStart = function()
{
  this.updateScore(0);
}

We’ll add more to this method shortly.

Now let’s add some code to our Main class to ensure that gameStart() gets called when the player starts a game. Add the following line to the Main class:

Main.prototype.startGame = function()
{
  this.score = 0;
  this.ground.startScrolling();
  this.pipes.startScrolling();
  this.bird.startFlying();
  this.ui.gameStart();
}

Save your changes and republish. Now the score will reset each time you start a new game.

Let’s go ahead and start lacing in the other user interface elements. We’ll begin by showing the Get Ready prompt and start instructions.

Showing the Start Instructions

Do this by adding the following method to the UI class:

UI.prototype.updateScore = function(score)
{
  this.scoreLabel.text = score;
}

UI.prototype.getReady = function()
{
  this.gameOverPrompt.visible = false;
  this.getReadyPrompt.visible = true;
  this.startInstructions.visible = true;
  this.screenFlash.visible = false;
}

The getReady() method above takes the various member variables that represent each of the UI elements and sets their visibility. We make the Get Ready prompt and the start instructions visible and hide the others.

Also, make a call to getReady() from within the class’ constructor. This will ensure that the user interface gets properly setup when the game is first loaded:

function UI()
{
  this.scoreLabel = exportRoot.score;
  this.gameOverPrompt = exportRoot.gameOverPrompt;
  this.getReadyPrompt = exportRoot.getReadyPrompt;
  this.startInstructions = exportRoot.startInstructions;
  this.screenFlash = exportRoot.screenFlash;
  this.getReady();
}

You may remember that in part three we added some code to the Main class to temporarily hide the game’s user interface elements. With the UI class’ getReady() method in place, we no longer need this code. Move to the Main class and remove the following lines:

function Main()
{
  this.ground = new Ground();
  this.pipes = new Pipes();
  this.bird = new Bird();
  this.ui = new UI();
	
  this.score = 0;
	
  exportRoot.screenFlash.visible = false;
  exportRoot.gameOverPrompt.visible = false;
  exportRoot.getReadyPrompt.visible = false;
  exportRoot.startInstructions.visible = false;
	
  createjs.Ticker.addEventListener("tick", this.update.bind(this));
	
  canvas.onmousedown = this.userPressed.bind(this);
  window.onkeydown = this.userPressed.bind(this);
}

Save your changes and re-publish.

Now when you load the game you’ll see a Get Ready prompt and text informing the user how to start the game. If you try playing the game you’ll notice that these UI elements don’t disappear. Let’s go ahead and address that.

Removing the Start Instructions

Remember that the UI class’ gameStart() method gets called every time the player starts a new game. This is the ideal place to hide the game’s start instructions. Add the following lines of code:

UI.prototype.gameStart = function()
{
  this.gameOverPrompt.visible = false;
  this.getReadyPrompt.visible = false;
  this.startInstructions.visible = false;
  this.screenFlash.visible = false;
  this.updateScore(0);
}

Save your changes and re-publish. This time the user interface elements will be hidden when a new game is started.

Game Over Prompt

We’re making real progress. You’ll notice that there’s nothing to inform the player that their game is over. Let’s rectify that by displaying the Game Over message when our little flappy bird is killed.

Let’s add a new method to our UI class named gameOver():

UI.prototype.gameOver = function()
{
  this.gameOverPrompt.visible = true;
  this.getReadyPrompt.visible = false;
  this.startInstructions.visible = true;
}

We’ll call this method from the Main class’ birdHitGround() method:

Main.prototype.birdHitGround = function()
{
  this.bird.hitGround();
  this.ground.stopScrolling();
  this.pipes.stopScrolling();
  this.ui.gameOver();
}

Test your latest changes in the browser. You’ll now be greeted with a Game Over message at the end of each game, which will then get hidden from view when you start another.

The Screen Flash

We’re almost done with the user interface work. All that’s left to do is add a screen flash effect when the bird collides with a pipe.

If you think back to part one you’ll remember that we created a white rectangular movie-clip that covered the screen. In part two we added that movie-clip to the stage and gave it an instance name of screenFlash. At the moment that clip remains hidden from view during play. What we want to do is make it visible when the player collides with a pipe then apply a tween to it to simulate a quick screen flash effect. We’ll write a new method to take care of this.

Within the UI class, add the following method:

UI.prototype.triggerScreenFlash = function()
{
  this.screenFlash.visible = true;
  this.screenFlash.alpha = 1;
  createjs.Tween.get(this.screenFlash).to({alpha:0}, 100);
}

Our method above performs the tween using code. CreateJS provides a Tween class that is used to change the value of properties over a period of time. In our method, we use it to change the alpha transparency of our screenFlash member variable from 1 to 0 over the course of 100 milliseconds. This will give us a quick and snappy screen flash effect.

You can find out more about CreateJS’ Tween class from the official docs: createjs.com/docs/tweenjs/classes/Tween.html.

Now all we need to do is move to our Main class and call our triggerScreenFlash() method. We’ll make the call from within the birdHitPipe() method:

Main.prototype.birdHitPipe = function()
{
  this.bird.fallFromSky();
  this.ground.stopScrolling();
  this.pipes.stopScrolling();
  this.ui.triggerScreenFlash();
}

Save your changes and test everything within the browser.

Now when you collide with a pipe the screen will flash. This does an effective job of further communicating to the player that a collision has taken place.

It’s looking good! That’s us finished with the user interface but there’s still one thing missing. That’s right, sound.

Adding Sound

To finish things off we’ll add three sound effects to our game. Specifically we’ll need sounds for:

  1. When a point is scored by successfully flying between a pair of pipes.
  2. When the player flaps the bird’s wings.
  3. When the bird hits a pipe or strikes the ground.

Three sound files encoded in the popular WAV format have been made available for you to use in your project. They have been packaged within a ZIP file and can be found here: www.yeahbutisitflash.com/projects/flappy-animatecc/sound.zip.

Once downloaded, uncompress the ZIP file. You’ll find the files within a folder named sound. Copy this folder to the same location as your project’s flappy.fla file. We’ll write JavaScript to load and use these sounds.

The CreateJS suite provides a library named SoundJS, which makes it easy to handle audio. We’ll take advantage of it to preload and playback our game’s sound effects.

You can find out more about the SoundJS library from the official docs: createjs.com/soundjs.

Preloading the Sound

The first thing that’s needing done is to preload our three audio files into memory. We’ll add a method to our Main class to take care of that. Add the following:

Main.prototype.registerSound = function()
{
  createjs.Sound.registerSound("sound/point.wav", "point");
  createjs.Sound.registerSound("sound/flap.wav", "flap");
  createjs.Sound.registerSound("sound/hit.wav", "hit");
}

We make use of SoundJS’ registerSound() method. It takes two arguments. The first is the relative file path to a sound file to be loaded. The second is an author specified ID that is used to actually play the sound later. We’ve assigned the IDs of point, flap, and hit to each of our sounds respectively.

Call our registerSound() method from the Main class’ constructor. Add the following line:

function Main()
{
  this.ground = new Ground();
  this.pipes = new Pipes();
  this.bird = new Bird();
  this.ui = new UI();

  this.score = 0;
	
  this.registerSound();
	
  createjs.Ticker.addEventListener("tick", this.update.bind(this));
	
  canvas.onmousedown = this.userPressed.bind(this);
  window.onkeydown = this.userPressed.bind(this);
}

Save your changes. Okay, let’s hook-up the playback of one of the sounds.

Playing Sound When a Point is Scored

We’ll playback our point sound every time the player scores a point. This can quite easily be done with a single line of JavaScript. Add the following to our Main class’ scoredPoint() method:

Main.prototype.scoredPoint = function()
{
  this.score++;
  this.ui.updateScore(this.score);
  createjs.Sound.play("point");
}

The SoundJS library provides a play() method that will playback the sound that was preloaded and registered using the specified ID. In our case, we request that the sound with the ID of point be played back.

Save your changes and re-publish your FLA. Try the game in your browser and you should now hear a sound effect being played every time your successfully fly between a pair of pipes.

Playing the Flap Sound

We’ll trigger the remaining two sounds from within the Bird class. Open it within the Actions panel and find the flap() method. As you can probably guess, this is a good place to actually trigger a flapping sound. Add the following line:

Bird.prototype.flap = function()
{
  if (this.state == Bird.ALIVE && this.mc.y > 0)
  {
    this.velocity = Main.FLAP_IMPULSE;
    createjs.Sound.play("flap");
  }
}

Save and test your latest changes. Every time you click the screen or press a key you’ll hear a flapping sound to accompany your action.

Playing the Collision Sound

The last thing we need to implement is the playback of a sound when the bird either collides with a pipe or hits the ground.

One thing that’s important when working with audio is that you don’t bombard the player with too many sounds as it can quickly annoy. This is very true of our hit sound. To avoid irritating the user, we’ll only play the sound when the bird hits a pipe or collides with the ground, but not both.

If the player nosedives the bird into the ground then we’ll trigger the hit sound. If, on the other hand, the bird collides with a pipe first before falling to the ground, we’ll make sure the hit sound is only triggered in response to striking the pipe but not when the bird finally hits the ground.

Start by triggering the hit sound from within the Bird class’ fallFromSky() method. After all, this gets called when the bird has just collided with a pipe. Add the following line:

Bird.prototype.fallFromSky = function()
{
  if (this.state == Bird.ALIVE)
  {
    this.state = Bird.DYING;
    this.velocity = 0;
    createjs.Sound.play("hit");
  }
}

We’ll also need to trigger the same sound from within the hitGround() method. However, we’ll need to ensure that the sound is played only if the bird has struck the ground without first hitting a pipe. This can be done quite easily by checking the bird’s state:

Bird.prototype.hitGround = function()
{
  if (this.state == Bird.ALIVE)
  {
    createjs.Sound.play("hit");
  }
  this.state = Bird.DEAD;
  this.mc.stop();
}

Save your changes, re-publish, and test everything within the browser.

Congratulations! You now have a fully working Flappy Bird clone complete with audio.

Summary

Thanks for sticking with me across all six parts! I hope you’ve learned how easy it is to leverage Adobe Animate CC to create exciting responsive HTML5 content that will work across all modern browsers. As well as working with the design and animation tools within Animate CC, we’ve also spent considerable time working with JavaScript and seeing how the CreateJS suite integrates with Animate CC’s HTML5 Canvas document. And hopefully you’ve also picked up a few games programming tips along the way!

You can find the final version of the project on GitHub at: github.com/ccaleb/flappy-bird-animate-cc-tutorial. As an added bonus I’ve separated the JavaScript code into external files that are loaded at runtime using the PreloadJS library, which is part of the CreateJS suite.

We’ve only scratched the surface of the excellent CreateJS suite. I highly encourage you to spend as much time as possible with the official CreateJS documentation as you work on your own HTML5 Canvas projects. It can be found on the official site here: createjs.com.

Thanks again and good luck with any future projects and experiments!

Christopher Caleb

ccaleb

Christopher Caleb is a freelance developer and published author. His body of work spans a wide range of projects that encompass casual games, interactive kiosks, social networks, and mobile applications. Christopher’s expertise covers both native and cross-platform technologies, with a focus on optimisation within hardware constraints. He specialises in delivering highly engaging experiences with usability being a primary concern.

He blogs at www.yeahbutisitflash.com and tweets as @chriscaleb.

WebGL in Flash Online Video Course

As you can probably guess from my most recent posts, I’m pretty excited by Flash Professional’s HTML5/WebGL support. It opens a huge number of possibilities for those wishing to target mobile browsers and, in many ways, makes your Flash content a first-class citizen within a web page.

One thing that’s lacking at the moment however, is a decent number of tutorials and other resources. Thankfully Lynda.com has just released a video course, HTML5 Canvas and WebGL in Flash Professional CC. It takes you through the steps required to make several types of content including vector-based animation, interactive banner ads, and simple HTML5 games.

It’s still very early days for the technology, but being able to build Flash content that runs outside of the Flash plugin is an exciting prospect.

Part 5: Building a HTML5 Flappy Bird Game Clone with Adobe Animate CC

Welcome to part five of this HTML5 Flappy Bird tutorial series. Parts three and four had us implement endless scrolling. Today we’re going to get our little hero up and flapping. Along the way we’ll implement some basic physics in order to perfectly capture that familiar Flappy Bird feeling. We’ll also spend some time adding collision detection.

What you will learn…

  • We’ll continue to explore some of the fundamentals of CreateJS
  • You’ll see how easy it is to simulate very simple game world physics
  • How to handle collision detection within your game

What you will need…

  • A basic understanding of at least one programming language, such as JavaScript or ActionScript

Before we begin, spend a few minutes looking over your existing code from the previous two parts. Familiarise yourself with the Main class, which acts as the game’s main entry point and handles much of the high-level game logic. We’ll be adding more code to it throughout today’s tutorial. We’ll also be making some changes to our Ground and Pipes class. So spend a few moments reminding yourself how those work too.

Finally, it doesn’t hurt to remind yourself what we’re aiming towards. You can find the final version of the Flappy Bird clone here: www.yeahbutisitflash.com/projects/flappy-animatecc/flappy.html.

Getting Started

You’ll need Adobe Animate CC. A trial version can be downloaded from www.adobe.com/products/animate.html. You’ll also need the FLA file you were working with in part four.

Now let’s start writing the code to bring our little flappy hero to life!

Looping the Flapping Animation

Before we start writing our Bird class, let’s revisit the actual Bird movie-clip and add a timeline script to ensure its flapping animation loops. At present the animation runs once then stops, but we really want it to run indefinitely.

Within the Library panel, find and double-click on the Bird movie-clip.

You should now see the timeline for the Bird movie-clip, complete with all of its layers. Add a new layer above all the others and name it Script. Click on frame 15 at the end of the layer’s timeline and create a keyframe by selecting Insert | Timeline | Keyframe (F6) from the dropdown menu.
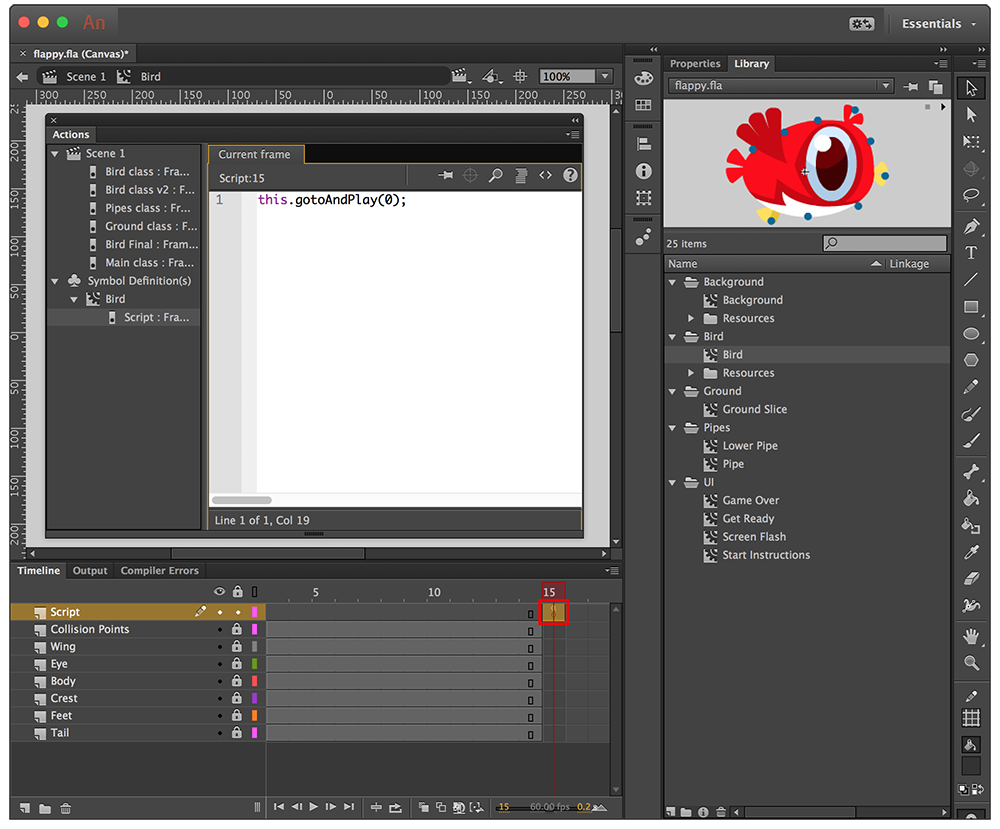
figure-1

Figure 1. Adding JavaScript to the timeline.

Now open the Actions panel by selecting Window | Actions (F9) and write the following line of JavaScript:

this.gotoAndPlay(0);

This will ensure that when the playhead reaches the end of the timeline, it will be sent back to the first frame of the timeline and continue to play. Effectively it creates an endless flapping animation.

Figure 1 above illustrates the steps we’ve just followed.

There are two things to note here. Firstly, you may be tempted to place your script on frame 14 rather than 15. However, this will result in the playhead being immediately moved to the first frame before the final frame of the flapping animation actually gets rendered to the screen.

Secondly, you may be wondering why we passed a value of 0 to the gotoAndPlay() call rather than using a value of 1. For HTML5 projects, Animate CC uses zero-based indexing when referring to frame numbers. This means that the first frame is actually referred to as frame 0, the second frame is frame 1, and so on.

Save your changes and move back to the main stage. Now we’re in a position to start writing our Bird class.

The Bird Class

Create a new timeline layer directly above the Pipes class layer. Name the layer Bird class and click on the first frame of its timeline. Open the Actions panel by selecting Window | Actions (F9) from the dropdown menu.

We’ll start by adding a constructor to the class. Initially it won’t do much other than store a reference to the bird movie-clip instance that sits on the timeline, and also store the bird’s initial y-position:

function Bird()
{
  this.mc = exportRoot.bird;
  this.initY = this.mc.y;
}

We’ll also need two public methods: one that initiates the bird when a new game begins and one that acts as the bird’s update loop. We won’t worry about the exact implementation details for either of these methods just yet. Instead we’ll simply have each write some text to the web browser’s JavaScript console.

Add the following below your constructor:

Bird.prototype.startFlying = function()
{
  console.log("Bird::startFlying()");
}

Bird.prototype.update = function()
{
  console.log("Bird::update()");
}

Now let’s go ahead and hook up our Bird class to the Main class.

Find the Main class within the Action panel’s Script Navigator and select it.

Within its constructor, declare a member variable that holds an instance of your Bird class:

function Main()
{
  this.ground = new Ground();
  this.pipes = new Pipes();
  this.bird = new Bird();
	
  exportRoot.screenFlash.visible = false;
  exportRoot.gameOverPrompt.visible = false;
  exportRoot.getReadyPrompt.visible = false;
  exportRoot.startInstructions.visible = false;
	
  createjs.Ticker.addEventListener("tick", this.update.bind(this));
	
  canvas.onmousedown = this.userPressed.bind(this);
  window.onkeydown = this.userPressed.bind(this);
}

Also ensure that the bird instance gets updated within the Main class’ update() method. Add the following line:

Main.prototype.update = function(evt)
{
  this.bird.update();
  this.ground.update();
  this.pipes.update();
}

Finally, start the bird flying by adding the following line within the startGame() method:

Main.prototype.startGame = function()
{
  this.ground.startScrolling();
  this.pipes.startScrolling();
  this.bird.startFlying();
}

Let’s test that everything is hooked up correctly. Save your changes then publish to the browser by selecting Control | Test Movie | In Browser (Cmd-Enter | Ctrl-Enter) from Animate CC’s dropdown menu. Firstly, you should notice that the bird’s wing flapping animation loops as expected. Secondly, you should see the following being repeatedly written to the browser’s JavaScript console, which verifies that our bird’s update() method is successfully being called:

> Bird::update()

Finally, the bird’s startFlying() method should get called every time the user clicks the screen (or presses a key) to start a new game. To verify this, click on the game’s viewport and check that the following gets written to the JavaScript console:

> Bird::startFlying()

If everything is working as expected we can start to add some implementation detail to our Bird class.

Adding State

Our flappy bird can be in one of three states during the lifetime of the game: alive, dying, and dead.

The bird is ‘alive’ when the player has control of it and is attempting to fly through each of the pipes. When the bird has collided with a pipe and is falling to the ground then it will be in its ‘dying’ state. And finally, when the bird has collided with the ground or the player hasn’t started their very first game, then the bird will be in its ‘dead’ state.

We need to model and track these three states within our Bird class. Begin by adding the following three constants directly below the class’ constructor:

function Bird()
{
  this.mc = exportRoot.bird;
  this.initY = this.mc.y;
}

Bird.ALIVE = 0;
Bird.DYING = 1;
Bird.DEAD  = 2;

Also, add a member variable named state and initially set it to the Bird.DEAD state:

function Bird()
{
  this.mc = exportRoot.bird;
  this.initY = this.mc.y;
  this.state = Bird.DEAD;
}

Bird.ALIVE = 0;
Bird.DYING = 1;
Bird.DEAD  = 2;

We’ll also need a few public methods that will allow other classes to determine whether the bird is alive or dead. Add them directly above the class’ startFlying() method:

Bird.ALIVE = 0;
Bird.DYING = 1;
Bird.DEAD  = 2;

Bird.prototype.isAlive = function()
{
  return (this.state == Bird.ALIVE);
}

Bird.prototype.isDead = function()
{
  return (this.state == Bird.DEAD);
}

Bird.prototype.startFlying = function()
{
  console.log("Bird::startFlying()");
}

Finally, we’ll change the bird’s state to ‘alive’ whenever its startFlying() method gets called. Make the following changes:

Bird.prototype.startFlying = function()
{
  console.log("Bird::startFlying()");
  this.state = Bird.ALIVE;
}

Save your work.

We’re now in a position to actually start added some physics to our game world. This will force our little flappy friend to fall to earth due to gravity and also allow the bird to overcome that gravity by applying a vertical impulse to it every time the player makes the bird flap its wings.

Configuring the Physics

We’ll need to define some constants that will be used to define our physics world. Move to the Main class and add the following three constants:

Main.SCROLL_SPEED = 3.0;
Main.GRAVITY = 0.55;
Main.FLAP_IMPULSE = -8.15;
Main.MAX_VELOCITY = 15;

The first of our constants – GRAVITY – simply holds a decimal value that simulates the force of gravity on our flappy bird. This gravitational force will be applied downwards onto our bird, forcing him to accelerate towards the ground unless an upward force is applied that negates the game world’s gravity.

It’s worth noting that we aren’t aiming for complete realism here. We’re making a simple fun game after all! Therefore, the value of 0.55 that I’ve used is fairly arbitrary and one that I’ve arrived at through trial and error. Once you have things up and running, feel free to tinker with these values.

The second constant that we’ve defined is FLAP_IMPULSE and is used to apply an upward force on our bird whenever the player attempts to flap the bird’s wings. Our game’s gravitational force will be applied on every frame update, whereas the flap impulse is applied on a single frame to provide a massive upwards thrust against gravity. As with the value assigned to the GRAVITY constant, the value I’ve used for FLAP_IMPULSE has been derived through trial and error. A negative value is used for this constant because it will be applied in the opposite direction (upwards) to the game engine’s gravity.

The final constant is simply used to ensure that the bird’s vertical speed when falling never exceeds a certain value. This is required to ensure an element of balance to the gameplay and makes things a little easier for the player.

Save your changes.

Implementing the Physics

Let’s go ahead and implement the game’s physics. Only the bird itself is affected by the game’s physics, so we’ll add the implementation within the Bird class.

Begin by declaring a velocity member variable within the constructor:

function Bird()
{
  this.mc = exportRoot.bird;
  this.initY = this.mc.y;
  this.state = Bird.DEAD;
  this.velocity = 0;
}

Velocity typically describes the speed of something in a given direction. For 2D games this typically results in an object’s horizontal speed and direction being modelled as well as its vertical speed and direction. However, we’re only concerned with the bird’s vertical velocity in our game – its horizontal movement is actually faked by moving each of the game’s pipes towards it. Therefore our velocity member variable is only used to represent the bird’s vertical speed and direction.

As you can see. The bird is given an initial velocity of 0 meaning that it is neither moving upwards or downwards.

We’ll also need to ensure that the bird’s velocity gets reset every time a new game is started. This can be done within the Bird class’ startFlying() method. While we’re at it, we’ll also ensure that the bird gets placed at its initial y-position every time this method gets called. Add the following lines:

Bird.prototype.startFlying = function()
{
  this.state = Bird.ALIVE;
  this.mc.y = this.initY;
  this.velocity = 0;
}

We now need to ensure that the game’s gravitational force is applied to the bird on each frame update. We’ll write an updateVelocity() method to do that. Add the following at the end of your Bird class:

Bird.prototype.updateVelocity = function()
{
  this.velocity += Main.GRAVITY;

  if (this.velocity > Main.MAX_VELOCITY)
  {
    this.velocity = Main.MAX_VELOCITY;
  }

  this.mc.y += this.velocity;
}

There are a few things going on in this method. Firstly, we add the gravitation force to our bird’s vertical velocity. This constant force on each frame update will effectively force the bird towards the ground, simulating the effects of gravity.

Next, we check to see if the bird’s velocity has exceeded our stipulated MAX_VELOCITY. If it has then we simply limit the bird’s velocity, which will prevent it from picking up any more vertical speed.

Finally, we actually update the y-position of our bird on the screen. This is done by adding the bird’s current vertical velocity to its movie-clip’s y-position.

Believe it or not, but that’s all that’s required to simulate physics within our game! Now all we need to do is call our updateVelocity() method from the class’ update() method. Make the following changes:

Bird.prototype.update = function()
{
  console.log("Bird::update()");
  if (this.state == Bird.ALIVE || this.state == Bird.DYING)
  {
    this.updateVelocity();
  }
}

As you can see from the code above, we only want to apply gravity to our bird when it’s alive or dying. In other words, we don’t want to apply any gravity to it when it’s already lying dead on the ground.

Save your changes then publish and test your latest code within the browser. Verify things are working as expected by clicking anywhere on the game’s viewport. You should see our little flappy bird drop like a stone straight out of the bottom of the screen. Every time you click, he’ll be placed back at his original start position before falling out of the screen again.

Congratulations you have successfully simulated gravity within your game! But what about the bird itself? He can’t fly yet. We’ll let’s go ahead and fix that.

Adding Flapping

Every time the player makes our little hero flap his wings we need to apply an upward force that will push him vertically upwards, defeating the effect of gravity.

We’ll simply set the bird’s velocity to the value set within our Main.FLAP_IMPULSE constant. This will give us the behaviour we’re looking for in our game.

Within the Bird class, add a new method named flap():

Bird.prototype.startFlying = function()
{
  this.state = Bird.ALIVE;
  this.mc.y = this.initY;
  this.velocity = 0;
  this.flap();
}

Bird.prototype.flap = function()
{
  if (this.state == Bird.ALIVE && this.mc.y > 0)
  {
    this.velocity = Main.FLAP_IMPULSE;
  }
}

As you can see from the code above, we only want to apply the flap impulse if the following two conditions are met:

  • The bird is currently alive
  • The bird has not left the top of the screen

The second of the two conditions here is important because it prevents the player from simply flying out of the screen and over the top of each of the pipes.

Also, look closely at the startFlying() method above. We make a call to flap() from here to ensure the bird immediately flaps when each new game is started.

Once a new game has begun, we need to make sure that each successive mouse click (or key press) results in the bird flapping upwards again. Make the following changes to the Main class’ userPressed() method to achieve this:

Main.prototype.userPressed = function(evt)
{
  if (this.bird.isDead())
  {
    this.startGame();
  }
  else
  {
    this.bird.flap();
  }
}

The logic here is straightforward. If the bird is dead then a user press will start a new game. If the bird isn’t dead then each user press will force the bird to flap upwards.

Save your changes and republish. Now when you run the game within the browser you’ll be able to click the mouse (or press any key) to make the bird flap upwards. Give it a try.

There currently isn’t any collision detection. The bird won’t die if it touches any of the pipes, and it simply falls off the bottom of the screen rather than slamming into the ground. Let’s go ahead and address these things.

Detecting Ground Collision

Let’s start by checking to see if the bird has collided with the ground.

If you remember back to the previous parts in the series, we added a number of blue dots around our bird. These dots act as collision points and are used to check if the bird has collided with the ground or any of the pipes. This is done by examining the on-screen position of each dot and checking to see if it’s within the bounding area of each pipe or the ground strips.

Before we can work with these collision points we’ll need to obtain and store references to them. Do that by adding the following method to your Bird class:

Bird.prototype.setupCollisionPoints = function()
{
  this.collisionPoints = [this.mc.hit0, this.mc.hit1, this.mc.hit2,
                          this.mc.hit3, this.mc.hit4, this.mc.hit5,
                          this.mc.hit6, this.mc.hit7, this.mc.hit8];

  for (var i = 0; i < this.collisionPoints.length; i++)
  {
    this.collisionPoints[i].visible = false;
  }
}

Our method stores the nine collision points within a member variable named collisionPoints. Our member variable is an array and our code also loops through that array and hides each of the hit points from view. This is done by setting each collision point movie-clip’s visible property to false. The player will no longer see the collision points surrounding the bird during play.

Although the blue dots are now hidden during game play, we can still reference them and use their on-screen position to perform collision detection. They may now be invisible but they do still surround the bird during play.

Now, call setupCollisionPoints() within the Bird class’ constructor to ensure the method gets run:

function Bird()
{
  this.mc = exportRoot.bird;
  this.initY = this.mc.y;
  this.state = Bird.DEAD;
  this.velocity = 0;
  this.setupCollisionPoints();
}

Now that we have a reference to each of our collision points, we can write a new method that checks to see if any of the points are within a target movie-clip’s bounding region. That target movie-clip could be, for example, a pipe or a ground slice.

Add the following code:

Bird.prototype.hitTest = function(target)
{
  for (var i = 0; i < this.collisionPoints.length; i++)
  {
    var pt = this.collisionPoints[i].localToLocal(0, 0, target);
    var collision = target.hitTest(pt.x, pt.y);
    if (collision == true)
    {
      return true;
    }
  }

  return false;
}

Our method takes a single movie-clip instance as a parameter named target. It then loops through each of our collision points and checks to see if the position of each is within the bounding region of the target movie-clip. If it is, the method returns true to indicate that a collision has been detected. Otherwise false is returned.

To do this we take advantage of the hitTest() method provided by CreateJS’s MovieClip class. It takes two parameters: the x and y positions to check within the target movie-clip’s local coordinate space. Since we need to work within our target movie-clip’s co-ordinate space, we need to convert the position of each of our collision points to the same co-ordinate space before calling hitTest(). We use another CreateJS method named localToLocal() to do this. It takes a movie-clip’s (in this case a collision point) position and converts it to the same co-ordinate space as our target movie-clip.

For the time being, let’s add one more method to our Bird class. This method will get called whenever the bird hits the ground:

Bird.prototype.hitGround = function()
{
  this.state = Bird.DEAD;
  this.mc.stop();
}

This method simply changes the bird’s state to ‘dead’ and also stops its wing flapping animation.

Since we’ve stopped the wings from flapping when the bird hits the ground we’ll need to remember to start them again when a new game starts. Make a small alteration to your startFlying() method to achieve this:

Bird.prototype.startFlying = function()
{
  this.state = Bird.ALIVE;
  this.mc.y = this.initY;
  this.mc.play();
  this.velocity = 0;
  this.flap();
}

Save your changes. Let’s now move onto our Ground class where we’ll write a public method that is used to check if the bird has collided with the ground.

Add the following method at the end of your Ground class:

Ground.prototype.isBirdTouchingGround = function(bird)
{
  for (var i = 0; i < this.slices.length; i++)
  {
    if (bird.hitTest(this.slices[i]))
    {
      return true;
    }
  }

  return false;
}

This method takes an instance of our bird movie-clip as a parameter and returns true if the bird is touching the ground, and false otherwise. It checks by looping through the vertical slices that the ground is made up from and seeing if the bird is touching any of them. To detect for collision, we simply call the hitTest() method that we added to the Bird class.

Now that both our Bird and Ground classes facilitate collision detection, we can write some logic within our Main class to tie everything together and check to see if the bird has collided with the ground.

Move to the Main class. We’ll write a method that gets called on every frame update to actively check if the bird is touching the ground. Add the following:

Main.prototype.checkForBirdCollidingWithGround = function()
{
  if (this.bird.isDead() == false)
  {
    if (this.ground.isBirdTouchingGround(this.bird))
    {
      this.birdHitGround();
    }
  }
}

var main = new Main();

Our checkForBirdCollidingWithGround() method is easy to read. If the bird isn’t dead, then it calls the ground instance’s isBirdTouchingGround() method to see if the bird is touching the ground. If it is touching then another method named birdHitGround() is called. We’ve still to add this method so lets go ahead and do that:

Main.prototype.startGame = function()
{
  this.ground.startScrolling();
  this.pipes.startScrolling();
  this.bird.startFlying();
}

Main.prototype.birdHitGround = function()
{
  this.bird.hitGround();
  this.ground.stopScrolling();
  this.pipes.stopScrolling();
}

Essentially the birdHitGround() method brings the game to a halt. It simply calls the bird’s hitGround() method and also stops the ground and pipes from scrolling. The hitGround() method remember, changes the bird’s state to ‘dead’.

Now all that’s left to do is actually call our checkForBirdCollidingWithGround() method from within the game’s main loop. Add the following line of code:

Main.prototype.update = function(evt)
{
  this.bird.update();
  this.ground.update();
  this.pipes.update();
	
  this.checkForBirdCollidingWithGround();
}

Save your changes. Now republish and test the latest version of the game within the browser.

Now when the bird collides with the ground, the game stops and can be restarted again by clicking anywhere within the viewport or by pressing any key.

As you can no doubt tell, we’ve yet to implement collision detection for the pipes. Let’s move onto that now.

Colliding With Pipes

We’ll begin by adding a new method to the bird that will make it fall from the sky. This method will eventually get called when the bird collides with a pipe. Add the following to the Bird class:

Bird.prototype.fallFromSky = function()
{
  if (this.state == Bird.ALIVE)
  {
    this.state = Bird.DYING;
    this.velocity = 0;
  }
}

Our new method simply sets the bird to its ‘dying’ state and sets its vertical velocity to 0, which will result in it immediately falling towards the ground.

We’ll also need to add a method to the Pipes class that will check to see if the bird has collided with any of the pipes. Add the following:

Pipes.prototype.isBirdTouchingAPipe = function(bird)
{
  for (var i = 0; i < this.pipes.length; i++)
  {
    if (bird.hitTest(this.pipes[i]))
    {
      return true;
    }
  }
	
  return false;
}

Our isBirdTouchingAPipe() method returns true if the bird collides with any of the pipes and false if no collisions are detected. It simply loops through our array of pipes and passes each to the bird’s hitTest() method.

Now we can move to the main application class and hook up the logic to check for collision with the pipes and react to it.

Move to the Main class and add the following method to it:

Main.prototype.checkForBirdCollidingWithGround = function()
{
  if (this.bird.isDead() == false)
  {
    if (this.ground.isBirdTouchingGround(this.bird))
    {
      this.birdHitGround();
    }
  }
}

Main.prototype.checkForBirdCollidingWithPipes = function()
{
  if (this.bird.isAlive())
  {
    if (this.pipes.isBirdTouchingAPipe(this.bird))
    {
      this.birdHitPipe();
    }
  }
}

It’s not that different from our checkForBirdCollidingWithGround() method. If the bird is currently alive then we check to see if it has just collided with a pipe. If a collision is detected then a method named birdHitPipe() gets called. We’ve yet to write this method but first add the following line to the update() method to ensure that checkForBirdCollidingWithPipes() gets called on each frame update:

Main.prototype.update = function(evt)
{
  this.bird.update();
  this.ground.update();
  this.pipes.update();
	
  this.checkForBirdCollidingWithGround();
  this.checkForBirdCollidingWithPipes();
}

Now let’s add the birdHitPipe() method:

Main.prototype.birdHitGround = function()
{
  this.bird.hitGround();
  this.ground.stopScrolling();
  this.pipes.stopScrolling();
}

Main.prototype.birdHitPipe = function()
{
  this.bird.fallFromSky();
  this.ground.stopScrolling();
  this.pipes.stopScrolling();
}

Save your work, republish, and test your latest changes in the browser.

Start flapping and you should now notice that your little hero can now slam straight into a pipe before plummeting to his death. Once he hits the ground you can restart the game by clicking the mourse or pressing any key. However you may notice that the game currently doesn’t reset properly. Each of the pipes should start outside the screen on each retry. At the moment they don’t, which can result in the bird appearing directly over the pipe that just killed him, which in turn will result in the bird immediately dying again.

This can easily be rectified. Move to the Pipes class and add the following line of code:

Pipes.prototype.startScrolling = function()
{
  this.scrolling = true;
  this.setupStartPosition();
}

Now save and republish. The pipes should properly reset after you start a new game.

Improving Flapping and Falling

Things are looking good but our flappy bird looks a little unnatural when in flight. We can make the bird’s motion look more realistic by rotating his body based on his vertical velocity. This will result in the bird pointing skywards when the player initiates a flap, and rotating towards a downwards position the faster he drops towards the ground.

To do this we need to decide how far skywards the bird can tilt and also how far forward the bird needs to tilt when nosediving towards the ground. At the moment our bird’s movie-clip is orientated to an angle of 0 degrees. To tilt upwards we can simply set a negative angle. Let’s try setting the bird’s rotation property to a value of -22 just to see how that looks. Add the following temporary line into the Bird class’ constructor:

function Bird()
{
  this.mc = exportRoot.bird;
  this.initY = this.mc.y;
  this.state = Bird.DEAD;
  this.velocity = 0;
  this.setupCollisionPoints();
  this.mc.rotation = -22;
}

Save your change, re-publish, and refresh the browser. You should now see the bird pointing skywards.

This looks good. We’ll make sure the bird doesn’t rotate beyond this point when flapping upwards. Now let’s decide upon a maximum rotation value for when the bird is falling towards the ground. Remove your previous test line and let’s try a rotation of 90:

function Bird()
{
  this.mc = exportRoot.bird;
  this.initY = this.mc.y;
  this.state = Bird.DEAD;
  this.velocity = 0;
  this.setupCollisionPoints();
  this.mc.rotation = -22;
  this.mc.rotation = 90;
}

Save, re-publish, and test. You should now see the bird pointing straight down as if performing an impressive nosedive. We’ll make sure the bird does not rotate beyond this angle when heading towards the ground.

Now let’s add two new constants to the Bird class that store both angles. Also, remove your previous line of code as it’s no longer required:

function Bird()
{
  this.mc = exportRoot.bird;
  this.initY = this.mc.y;
  this.state = Bird.DEAD;
  this.velocity = 0;
  this.setupCollisionPoints();
  this.mc.rotation = 90;
}

Bird.ALIVE = 0;
Bird.DYING = 1;
Bird.DEAD  = 2;

Bird.MAX_UP_ANGLE   = -22.5;
Bird.MAX_DOWN_ANGLE =  90;

The first constant holds the maximum angle we’ll rotate to when the bird is flying skywards, and the second constant holds the maximum angle the bird will rotate towards when falling downwards.

Now let’s go ahead and write a method that actually calculates the current angle of rotation based on the bird’s velocity. We’ll call this method on every frame update to ensure the orientation of the bird’s body always reflects the bird’s current vertical velocity. Add the following method:

Bird.prototype.updateRotation = function()
{
  if (this.velocity > 0)
  {
    var diff = Bird.MAX_DOWN_ANGLE - Bird.MAX_UP_ANGLE;
    var norm = this.velocity / Main.MAX_VELOCITY;
    this.mc.rotation = Bird.MAX_UP_ANGLE + (diff * norm);
  }
  else
  {
    this.mc.rotation = Bird.MAX_UP_ANGLE;
  }
}

Let’s review the code we’ve just written. If the bird’s vertical velocity is greater than 0 then we know that the bird is falling towards the ground. If this is the case then we use the following three lines of code to calculate the angle of rotation and apply it to the bird’s movie-clip:

var diff = Bird.MAX_DOWN_ANGLE - Bird.MAX_UP_ANGLE;
var norm = this.velocity / Main.MAX_VELOCITY;
this.mc.rotation = Bird.MAX_UP_ANGLE + (diff * norm);

If the bird’s vertical velocity is 0 or less then we know that it is moving upwards. If that is the case then we simply snap the bird’s orientation skywards. The following line takes care of that by simply setting the bird’s rotation property to the value of the Bird.MAX_UP_ANGLE constant:

this.mc.rotation = Bird.MAX_UP_ANGLE;

Now all that’s left to do is call our updateRotation() method on every frame update. Add the following line:

Bird.prototype.update = function()
{
  if (this.state == Bird.ALIVE || this.state == Bird.DYING)
  {
    this.updateVelocity();
    this.updateRotation();
  }
}

Save your changes, re-publish, and test everything within the browser. Hopefully you’re happy with the tilting of the bird each time he flaps upwards and then falls towards the ground. It’s a nice effect and you can also easily tweak the settings by adjusting the Bird.MAX_UP_ANGLE and Bird.MAX_DOWN_ANGLE constants.

Detecting When The Bird Passes Through A Pipe

In Flappy Bird, the player is awarded a point each time the bird passes through a pair of pipes. We’ll wrap today’s tutorial up by writing some code to actually detect when the bird has successfully flown between a pair of pipes.

The first thing we’ll need to do is add a new method to the Bird class that will return the bird’s position. Add the following:

Bird.prototype.getPosition = function()
{
  return {x: this.mc.x, y: this.mc.y};
}

The above method simply returns an Object with two properties: x and y, which represent the stage position of the bird’s movie-clip.

Now we need to move to the Pipes class and add some code that will help determine if the bird has flown through a pair of pipes. We’re particularly interested in the pipe that the bird is currently approaching. Let’s create a member variable that will hold a reference to the pair of pipes that the bird is currently approaching. Add the following:

Pipes.prototype.startScrolling = function()
{
  this.scrolling = true;
  this.setupStartPosition();
  this.approachingPipe = this.pipes[0];
}

When the game starts, the first pipe stored in the pipes member variable will be the pipe that the bird is currently approaching. We therefore set that first pipe to our approachingPipe member variable.

Each time the bird passes through a pair of pipes, we’ll need to set the approachingPipe member variable to point to the next upcoming pipe pair. Add the following method to do this:

Pipes.prototype.setNextApproachingPipe = function()
{
  for (var i = 0; i < this.pipes.length; i++)
  {
    if (this.pipes[i] == this.approachingPipe)
    {
      this.approachingPipe = this.pipes[i + 1];
      return;
    }
  }
}

This method will get called every time the bird passes through the current approaching pipe. It simply loops through our array of pipe movie-clip references until it finds the current approaching pipe. Once found, the method simply sets the approachingPipe member variable to point to the very next pipe stored in the array.

We also need to add a method to the Pipes class that is used to determine if our flappy hero has actually passed through the approaching pipes pair. Add the following method:

Pipes.prototype.hasBirdPassedApproachingPipe = function(bird)
{
  var birdXPosition = bird.getPosition().x;
  if (birdXPosition > this.approachingPipe.x)
  {
    return true;
  }

  return false;
}

There’s not much to this method. It takes a reference to our Bird instance as a parameter. It then gets the bird’s x-position using its getPosition() method and compares that value against the x-position of the approaching pipe. If the bird’s x-position is greater than the pipe’s then we know that the bird has passed through the pipe.

Now all we need to do is add some code to the Main class to hook everything together. Move to the Main class and add the following method to it:

Main.prototype.checkForBirdPassingPipe = function()
{
  if (this.bird.isAlive())
  {
    if (this.pipes.hasBirdPassedApproachingPipe(this.bird))
    {
      this.pipes.setNextApproachingPipe();
      console.log("Main::checkForBirdPassingPipe() - Scored a point!");
    }
  }
}

The above method will get called on every frame update. If the bird is alive then is simply calls the Pipes instance’s hasBirdPassedApproachingPipe() method to see if the bird has successfully flown through a pipe. If it has then we make another call to the Pipes instance to set the next approaching pipe. Finally we write some text to the JavaScript console informing us that the player has scored a point.

At the moment we don’t have anything in place to actually track, increment, or display the player’s updated score, but we’ll address that in the next tutorial. For the time being, writing text to the console will do.

Finally, make a call to our checkForBirdPassingPipe() method so that it does indeed get called on every frame update:

Main.prototype.update = function(evt)
{
  this.bird.update();
  this.ground.update();
  this.pipes.update();
	
  this.checkForBirdCollidingWithGround();
  this.checkForBirdCollidingWithPipes();
  this.checkForBirdPassingPipe();
}

Save your FLA and test the your latest changes in the browser.

Now when your fly through a pair of pipes, the following text will be written to the console:

Main::checkForBirdPassingPipe() - Scored a point!

This validates that our code is now successfully tracking the bird as it flies through each of the game’s pipes.

Summary

We’re so close to finishing our game now. The scrolling of the ground and pipes is in place and the player can now control and navigate the bird through each of the game’s pipes. We have basic but effective game physics and working collision detection too!

In the final tutorial in the series we’ll tidy up a few loose ends. We’ll get the score counter working, add some missing user interface elements, and drop in a few sound effects. See you soon.

Christopher Caleb

ccaleb

Christopher Caleb is a freelance developer and published author. His body of work spans a wide range of projects that encompass casual games, interactive kiosks, social networks, and mobile applications. Christopher’s expertise covers both native and cross-platform technologies, with a focus on optimisation within hardware constraints. He specialises in delivering highly engaging experiences with usability being a primary concern.

He blogs at www.yeahbutisitflash.com and tweets as @chriscaleb.
Array and Vector API Improvements

It’s not often you see updates to the ActionScript 3 class APIs these days, so I was pleasantly surprised to see that the AIR 19 beta introduces two new methods to the Vector and Array class:

  • insertAt()
  • removeAt()

They are intended as a replacement for the splice() method when you only want to add or remove a single element. So why use them over the splice() method? Well both methods make a change directly to the array or vector rather than creating and returning an altered version. They’ve been implemented with performance in mind and will perform better than the existing splice() methods.

To show the new APIs in action, here are two quick examples.

In the first example I add a score of 800 to the 2nd element of a vector of high scores:

var topScores :Vector.<int> = new <int>[1000, 500, 250, 100, 50];
topScores.insertAt(1, 800);
trace(topScores); // [1000, 800, 500, 250, 100, 50]

And in the second example I remove the lowest score from the array and trace it:

var topScores :Vector.<int> = new <int>[1000, 500, 250, 100, 50];
var lowest :int = topScores.removeAt(topScores.length - 1);
trace("The lowest score of " + lowest + " was removed.");

You can download the AIR 19 beta from Adobe Labs.

Building an HTML5 Flappy Bird clone with Adobe Animate CC: Part 4

Welcome to the fourth part of this HTML5 Flappy Bird tutorial series. In the previous post we implemented endless scrolling of our game’s ground layer. Today we’ll do the same for the pipes that our little hero must fly between.

What you will learn…

  • We’ll continue writing JavaScript directly within Adobe Animate CC
  • Some of the fundamentals of the CreateJS suite of JavaScript libraries
  • How to implement endless scrolling within your game world

What you will need…

  • A basic understanding of at least one programming language, such as JavaScript or ActionScript

In part three we wrote a Ground class that handles the scrolling of the game’s ground layer, and a Main class that acts as the game’s top-level entry point. Today we’ll take what we learned from scrolling the ground layer and write a new class that scrolls the game’s pipes. We’ll also hook our new class up to Main.

Before we start coding, it may be useful to remind yourself how the pipes look and behave within the final version of the Flappy Bird clone. Before proceeding, spend a few moments with the game: www.yeahbutisitflash.com/projects/flappy-animatecc/flappy.html.

Getting Started

You’ll need Adobe Animate CC. A trial version can be downloaded from www.adobe.com/products/animate.html. You’ll also need the FLA file you were working with in part three.

Now let’s get to work!

The Pipes Class

Launch Adobe Animate CC and open your FLA file.

Create a new timeline layer directly above the Ground class layer. Name the layer Pipes class and click on the first frame on its timeline. Open the Actions panel by selecting Window | Actions (F9) from the dropdown menu. Within the Actions panel, click on the Current frame tab and then click the Pin Script button to create a Pipes class tab. Okay, let’s write some JavaScript.

Our Pipes class will have a similar structure to the Ground class. It will have a constructor, two methods to start and stop scrolling, and an update method.

Add the following JavaScript to the Actions panel:

function Pipes()
{
  this.scrolling = false;
}

Pipes.prototype.startScrolling = function()
{
  this.scrolling = true;
}

Pipes.prototype.stopScrolling = function()
{
  this.scrolling = false;
}

Pipes.prototype.update = function()
{
  if (this.scrolling == true)
  {
    console.log("Pipes::update() scrolling");
  }
}

Our class won’t do much at the moment – it’ll simply write some text to the console when scrolling is taking place – but we’ll work on that soon enough. First let’s go ahead and wire it up to the Main class.

figure-1b

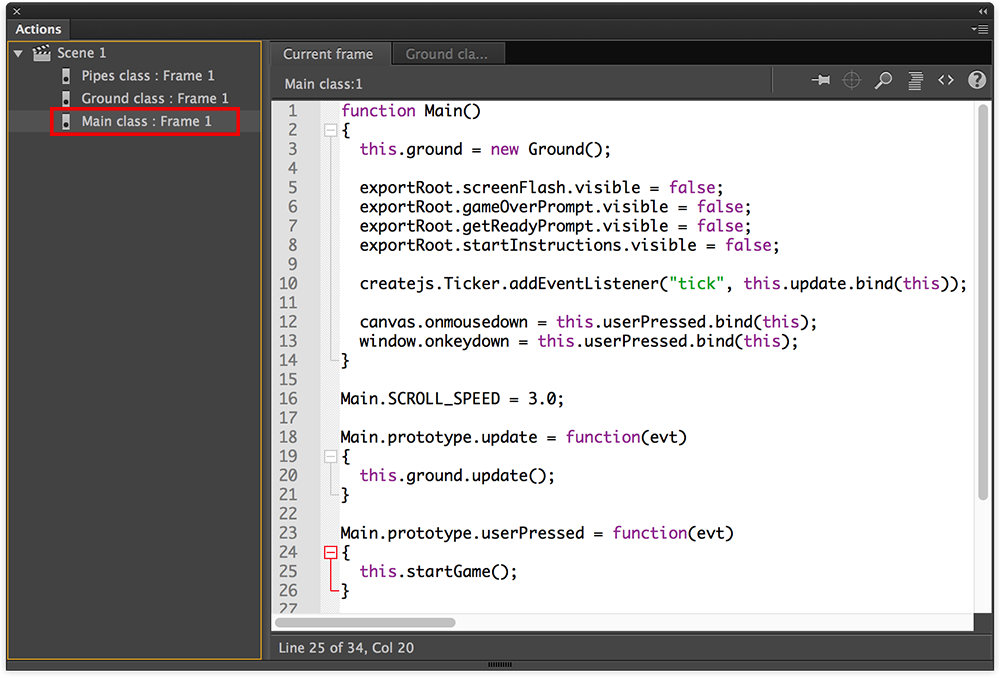
Figure 1. Selecting the Main class from the Script navigator.

As usual, we’ll open the Main class within the Actions panel. You can move to the Main class by selecting it from the Script Navigator, which is on the Action panel’s left-hand side. Within the navigator list you will see your Pipes, Ground, and Main classes. Click on the Main class and it will appear within the Script pane (Figure 1). Also, feel free to pin the class to the Actions panel.

Within your Main class, declare a member variable that holds an instance of our Pipes class:

function Main()
{
  this.ground = new Ground();
  this.pipes = new Pipes();
	
  exportRoot.screenFlash.visible = false;
  exportRoot.gameOverPrompt.visible = false;
  exportRoot.getReadyPrompt.visible = false;
  exportRoot.startInstructions.visible = false;
	
  canvas.onmousedown = this.userPressed.bind(this);
  window.onkeydown = this.userPressed.bind(this);
	
  createjs.Ticker.addEventListener("tick", this.update.bind(this));
}

Now ensure the pipes instance gets updated within the Main class’ update() method. Add the following line:

Main.prototype.update = function(evt)
{
  this.ground.update();
  this.pipes.update();
}

Finally, initiate scrolling of the pipes within the startGame() method:

Main.prototype.startGame = function()
{
  this.ground.startScrolling();
  this.pipes.startScrolling();
}

Let’s check that everything is working. Save your changes then test within the browser by selecting Control | Test Movie | In Browser (Cmd-Enter | Ctrl-Enter) from Animate CC’s dropdown menu. Click on the game’s viewport to initiate scrolling. Not only will the ground layer scroll across the screen but you should also see the following text being output to the JavaScript console:

> Pipes::update() scrolling

If you can see this then the Pipes class is working as expected and we can start fleshing it out.

Working with the Pipe Movie-Clips

Okay, now we can start thinking about using the actual pipe movie-clips sitting on the stage. As a quick reminder, take a look at the stage. If you unlock the Pipes layer on the timeline, you’ll find three pipes named pipe0, pipe1, and pipe2 respectively. The placement of these pipes on the stage is actually quite important.

The first pipe sits just outside the left of the stage, the second is positioned directly in the centre of the stage, and the third is just outside the stage’s right-hand side. The horizontal distance between the pipes is intentional: it’s the exact distance we want between every pipe that our little flappy bird will fly through.

Also, notice that each of the pipes has a different y-position. Again there’s a reason for this. Remember, as the user plays the game, each new pipe that appears will have a random y-position. However we do need to apply some constraints to these y-positions during play otherwise we run the risk of having gaps in some pipes that are impossible to reach. The pipe on the far-left has been used to indicate the highest vertical position that any of the pipes can be placed at during play. The pipe on the far-right has been used to indicate the lowest vertical position that any pipe can be placed at during play.

This means that if we wish to increase the distance between the pipes or the variation in y-positioning of each pipe then it’s simply a matter of changing things visually within the stage rather than having to find and alter any code.

Obtaining the Distance Between Pipes

Of course, our Pipes class needs to be able to determine these values by interrogating the stage when it’s first instantiated. Let’s add some code to do that. We’ll start by obtaining the distance between the pipes – we’ll deal with the vertical positioning in a moment. Add the following line to your class’ constructor:

function Pipes()
{
  this.scrolling = false;
	
  this.distanceBetweenPipes = exportRoot.pipe1.x - exportRoot.pipe0.x;
}

Calculating the distance is a simple case of subtracting the first pipe’s x-position from the second’s. We’ve stored that value within a member variable named distanceBetweenPipes allowing us to access it throughout the class.

Obtaining the Left Bounds

In order to manage the scrolling of the pipes we’ll need to know when a pipe has scrolled off the screen. We can use the pipe’s width to calculate the x-position it will be at once it has fully scrolled off the screen:

function Pipes()
{
  this.scrolling = false;
	
  this.distanceBetweenPipes = exportRoot.pipe1.x - exportRoot.pipe0.x;
  this.leftBound = -exportRoot.pipe0.nominalBounds.width;
}
The nominalBounds property returns the bounding rectangle for a movie-clip’s first frame. From that we retrieved the width of our pipe. The bounding rectangle that is returned represents the author-time dimensions and therefore does not reflect any changes made to the movie-clip at runtime. Since we don’t apply any changes in scale to our pipes at runtime, this is fine, and we can safely obtain the width knowing that it will be correct.

Obtaining the Minimum and Maximum Vertical Positions

Now let’s store the minimum and maximum vertical positions that our pipes can be at. Declare the following two member variables:

function Pipes()
{
  this.scrolling = false;
	
  this.distanceBetweenPipes = exportRoot.pipe1.x - exportRoot.pipe0.x;
  this.leftBound = -exportRoot.pipe0.nominalBounds.width;
	
  this.maxPipeY = exportRoot.pipe0.y;
  this.minPipeY = exportRoot.pipe2.y;
}

Referencing All Three Pipes

And since we’ll be scrolling all three pipes across the screen, we’ll store each within an array that we can easily access:

function Pipes()
{
  this.scrolling = false;
	
  this.distanceBetweenPipes = exportRoot.pipe1.x - exportRoot.pipe0.x;
  this.leftBound = -exportRoot.pipe0.nominalBounds.width;

  this.maxPipeY = exportRoot.pipe0.y;
  this.minPipeY = exportRoot.pipe2.y;

  this.pipes = [exportRoot.pipe0, exportRoot.pipe1, exportRoot.pipe2];
}

As with the ground slices, the order the pipes are stored within the array is important. The left-most pipe should be at the front of the array, while the right-most pipe should be at the back.

Scrolling the Pipes

We’re now in a position to write the code to actually scroll the pipes, which is almost identical to the code we wrote for the ground slices.

Within our update() method we’ll call two methods: updatePipePositions() and checkLeftPipeIsOutsideScreen(). Add the following two lines and also remove the log() statement that’s there:

Pipes.prototype.update = function()
{
  if (this.scrolling == true)
  {
    console.log("Pipes::update() scrolling");
    this.updatePipePositions();
    this.checkLeftPipeIsOutsideScreen();
  }
}

Now add the following two methods to the class:

Pipes.prototype.updatePipePositions = function()
{
  for (var i = 0; i < this.pipes.length; i++)
  {
    var pipe = this.pipes[i];
    pipe.x -= Main.SCROLL_SPEED;
  }
}

Pipes.prototype.checkLeftPipeIsOutsideScreen = function()
{
  var leftMostPipe = this.pipes[0];
  var rightMostPipe = this.pipes[2];
  if (leftMostPipe.x < this.leftBound)
  {
    leftMostPipe.x = rightMostPipe.x + this.distanceBetweenPipes;
    this.pipes.shift();
    this.pipes.push(leftMostPipe);
  }
}

Save your changes and republish the project. Test everything in a browser. You should now see the pipes scrolling along with the ground. When each pipe moves outside the left-hand side of the screen, a new one will appear from the right. This is the exact same behaviour as the slices that make up our ground layer.

Random Vertical Positions

At the moment the vertical position of each pipe doesn’t change. However, when each new pipe appears from the right we want to set a random y-position for it to make the game more challenging. Let’s go ahead and write some code to randomly set the y-position of each new pipe.

Add the following method at the end of your class:

Pipes.prototype.setRandomYPosition = function(pipe)
{
  var delta = this.minPipeY - this.maxPipeY;
  pipe.y = this.maxPipeY + Math.round(Math.random() * delta);
}

The method above takes a pipe as a parameter and randomly sets its y-position somewhere between the minimum and maximum vertical positions that were set within the constructor.

Now that we’ve defined this method let’s actually use it. Make a call to setRandomYPosition() from within your checkLeftPipeIsOutsideScreen() method and pass the pipe that has just moved off the screen to it:

Pipes.prototype.checkLeftPipeIsOutsideScreen = function()
{
  var leftMostPipe = this.pipes[0];
  var rightMostPipe = this.pipes[2];
  if (leftMostPipe.x < this.leftBound)
  {
    leftMostPipe.x = rightMostPipe.x + this.distanceBetweenPipes;
    this.setRandomYPosition(leftMostPipe);
    this.pipes.shift();
    this.pipes.push(leftMostPipe);
  }
}

The above change sets a random y-position to the pipe immediately after it’s re-positioned outside the screen’s right-hand side.

Let’s try our latest changes in the browser. Save everything and republish. After clicking the screen you should see that each new pipe that enters the screen now has a random y-position.

The Pipes Starting Position

We’re almost done with the Pipes class for the time being. However you may have noticed that our game currently begins with a pipe already on the screen. This is going to make things quite tricky for the player so let’s write some code to reposition all three pipes outside the right-hand side of the screen to begin with. We’ll also set an initial random y-position for each of the three pipes. And since we’ll need to reset the position of the pipes each time a new game is started, let’s also declare our array of pipe references within our new method too rather than doing it only once within the constructor.

Add the following method at the end of your class:

Pipes.prototype.setupStartPosition = function()
{
  this.pipes = [exportRoot.pipe0, exportRoot.pipe1, exportRoot.pipe2];

  for (var i = 0; i < this.pipes.length; i++)
  {
    var pipe = this.pipes[i];
    pipe.x = (lib.properties.width * 1.5) + (i * this.distanceBetweenPipes);
    this.setRandomYPosition(pipe);
  }
}

It’s fairly straightforward. We use a for-loop to walk through our array of pipes. Within that loop we set the x-position and apply a random y-position to each pipe. Both the stage width and the distance between pipes is used when calculating each pipe’s initial x-position. This will ensure that each pipe sits outside the screen’s right-hand side when the game begins, and also ensure they have the correct gap between them. We actually use one and a half times the stage width to make an even larger gap between the bird and the first pipes. This will give the player just a little more breathing space when they start each new game.

The stage width itself is determine by querying the global lib variable, which contains an object named properties. This object contains a number of properties used to describe your stage including width, height, fps, and color.

With the setupStartPosition() in place, call it from your constructor and also remove the declaration for the pipes member variable since it’s now handled within setupStartPosition():

function Pipes()
{
  this.scrolling = false;
	
  this.distanceBetweenPipes = exportRoot.pipe1.x - exportRoot.pipe0.x;
  this.leftBound = -exportRoot.pipe0.nominalBounds.width;
	
  this.maxPipeY = exportRoot.pipe0.y;
  this.minPipeY = exportRoot.pipe2.y;
	
  this.pipes = [exportRoot.pipe0, exportRoot.pipe1, exportRoot.pipe2];
  this.setupStartPosition();
}

Save and republish. Now when you run the game from the browser you’ll notice that there is no longer a pipe sitting on the stage. When you click, the first pipe will now scroll in from outside the screen and also have a random y-position. This is exactly what we want!

Summary

That’s us finished with the scrolling of the ground layer and the pipes. We’ve seen how easy it is to write JavaScript that interacts with the stage’s contents to create an endless scrolling effect.

Next time we’ll simulate physics within our game world and get our little hero flapping. See you then.

Christopher Caleb

ccaleb
Christopher Caleb is a freelance developer and published author. His body of work spans a wide range of projects that encompass casual games, interactive kiosks, social networks, and mobile applications. Christopher’s expertise covers both native and cross-platform technologies, with a focus on optimisation within hardware constraints. He specialises in delivering highly engaging experiences with usability being a primary concern.

He blogs at www.yeahbutisitflash.com and tweets as @chriscaleb.

iOS Concurrency

The beta release of Adobe AIR 19 has landed and the big news is that we finally have the AS3 Workers API for iOS.

So what are Workers? Well put simply, Workers lets us create multi-threaded AIR and Flash Player applications. This is significant because you can finally relegate CPU intensive tasks to a background worker thread while your main application thread continues to do its own thing. So for example, you could write code to perform some heavy image processing in the background without your app’s UI being blocked. In fact, this is one of the primary reasons for using workers: to ensure your app’s user interface and animation stay as smooth as possible even when there’s a lot of processor intensive code being run.

You can find the API documentation for the Worker class on Adobe’s official AS3 Language Reference site. There’s also the Introducing Concurrency on iOS article on the Adobe Developer Connection website, which will help you get started.

And if you want a more detailed introduction to workers then take a look at Shawn Blais’s excellent tutorial on the subject. Part three is particularly interesting as Shawn shows the Nape physics engine running in a separate thread to guarantee a silky smooth 60 frames-per-second simulation.

You can download the AIR 19 beta from Adobe Labs.

Video: Intro to Flash Pro’s WebGL Runtime API

The video from my Introduction to Flash Professional’s WebGL Runtime API webinar is now available.

The encoding for the video unfortunately looks a bit wonky in places but I’ve provided the slides from the presentation below so you should be able to follow along with the audio.

In addition, the FLA and source code from the presentation is available on GitHub. You’ll find the original JavaScript version of the code that I ran through during the webinar and there’s also a bonus TypeScript implementation in there too. Oh and a big thanks to Robert Penner for the improvements to my TypeScript code.

Finally, here’s a link to the running version of the actual WebGL content that I produced during the webinar.

Thanks once again to everyone who attended!

Code: Intro to Flash’s WebGL Runtime API

I’ve placed the example source code from yesterday’s webinar on GitHub. You’ll find the original FLA file complete with the JavaScript source code (it’s inside bunny.html). As an added bonus I’ve also included a TypeScript version of the example.

You can find the repository here: https://github.com/ccaleb/flash-webgl-intro

And here’s a link to a running version of the code.

Slides: Intro to Flash’s WebGL Runtime API

Thanks to everyone who attended today’s webinar about Flash Professional’s WebGL Runtime API. Here are the slides from today.

Unfortunately I ran out of time and had to quickly skip over most of my content on ECMAScript 6 and TypeScript. If you’d like to know more though then please visit the links listed at the end of the presentation.